TUTORIAL THURSDAY: Dandelion Wishes Stamp Set
Happy Thursday! On Thursdays, I’m starting to share a tutorial featuring 1 stamp set with 2-3 different samples! You can choose to see them on this post and/or print out the tutorials to keep for reference! 🙂
Hope you enjoy it! Idea #1

Measurements:
- Whisper White Thick Card Base: 4-1/4”x 5-1/2”
- Gorgeous Grape: 4” x 5-1/4”
- Daffodil Delight Brights Designer Series Paper: 3 ¾” x 5”
- Rainbow Glimmer Paper: ½” x 5 ½”
Supplies: (SHOP THESE PRODUCTS ONLINE)
- Stamp Sets: Dandelion Wishes (151345)
- Cardstock: Thick Whisper White (140272), Gorgeous Grape (146987), Daffodil Delight- Brights 6” x 6” Designer Series Paper (152487), Rainbow Glimmer Paper (153056)
- Ink: Gorgeous Grape (147099)
- Tools & Accessories: Champagne Rhinestone Jewels (151193), Paper Trimmer (152392), Wink of Stella (141897), Stampin’ Seal Adhesive (152813)
Instructions:
- Stamp the Dandelions and greeting on the Daffodil Delight Brights paper in Gorgeous Grape ink.
- Accent the centers of the Daffodils with the Champagne Rhinestones.
- Add shimmer with Wink to Stella to the stamped Dandelions.
- Adhere the papers to the card front with Stampin’ Seal adhesive.
- Adhere the Rainbow Glimmer over the full card front.
Idea #2

Measurements:
- Card Base: 5-1/2” x 8-1/2” scored at 4-1/4”
- Whisper White mat: 4” x 5 ¼”
- Gorgeous Grape mat: 4 5/8” x 3 ½”
- Watercolor Paper: 4 ½ ” x 3 3/8”
Supplies: (SHOP THESE PRODUCTS ONLINE)
- Stamp Sets: Dandelion Wishes (146747)
- Cardstock: Pacific Point, Gorgeous Grape, Whisper White, Fluid 100 Watercolor Paper (149612)
- Ink: Pacific Point (147098), Gorgeous Grape (147099)
- Tools & Accessories: Stamparatus (146276), Paper Trimmer (152392), Water Painters (151290), Old World Paper 3D Embossing Folder (153200), Sponge Brayers (141714), Bone Folder (102300), Stampin’ Dimensionals (104430), Frosted and Clear Epoxy Droplets (147801)
Instructions:
- Fold card base on the score line and burnish crease using the bone folder.
- Using Pacific Point and Gorgeous Grape ink pads, press top and bottom lids together to create a pool of colour inside the top lid of each pad.
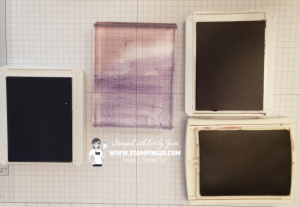
- Fill water painter with water and brush clear water across the watercolour paper before adding any colour.
- Using the Water Painter, pick up some of the Pacific Point ink from the inside of the lid to create a pool of colour. Add this first colour to one area of your watercolour paper.
- Add Gorgeous Grape using the same process.
- Allow to air dry thoroughly before stamping the image.
- Using sponge brayer, add ink to the inside of the Old World Paper 3D Embossing Folder, place Whisper White mat inside and run it through your embossing machine.
- Adhere this dry embossed cardstock mat to the front of the card base using a strong adhesive and set aside.
- Set up the Dandelion stamp on the Stamparatus for correct placement on the dry watercolour paper.
- When the watercolour wash is fully dry, ink up the Dandelion stamp with Pacific Point and stamp image on watercolour paper using Stamparatus.
- Use the same process with the Stamparatus for the sentiment.
- Adhere completed watercolour image to the Gorgeous Grape mat using a strong adhesive.
- Place Stampin’ Dimensionals on the back of the Pacific Point mat and adhere to dry embossed Whisper White mat.
- Add Frosted Epoxy Droplets to the stamped image.
Idea #3
Measurements:
- Thick Whisper White Card Base: 8 ½” x 5 ½”
- Balmy Blue: 5 ¼” x 4”
- Highland Heather: 5 ¼” x 2”
- Designer Paper: 2 ¾” x 4 ½”
Supplies: (SHOP THESE PRODUCTS ONLINE)
- Stamp Sets: Dandelion Wishes (146747)
- Cardstock: Thick Whisper White (140272), Balmy Blue (146982), Highland Heather (146986), Snowflake Splendor Designer Series Paper (153512)
- Ink: Highland Heather (147103), Versamark (102283)
- Tools & Accessories: Heat Tool (129053), White Stampin’ Emboss Powder (149511), Dimensionals, Subtle 3D Embossing Folder (151775)
Instructions:
- Emboss the Balmy Blue cardstock using the Subtle 3D Embossing Folder then adhere it to the Whisper White card base.
- Adhere the Highland Heather cardstock on to the card.
- Stamp the dandelion image on to the Designer Paper using Versamark and heat emboss with White Embossing Powder. Adhere the designer paper to the Whisper White mat then to the card.
- Stamp sentiment using Highland Heather ink on to the Whisper White layer.
- Add it to the card using Stampin’ Dimensionals.

QUICK LINKS & PROMOS:
-
-
-
-
-
- NEW: August-December 2020 Mini Catalogue – View PDF here See products online
- Bonus Day Coupons- If you spent $60 or more in July- you can redeem your coupons August 4-31! Go to store
- Jo-Jo’s Stamping Essentials– click here
- Clearance Rack – click here
- WEEKLY NEWSLETTER & TUTORIALS: Sign up for my newsletter to get updates, specials & card ideas!
- JO JO POINTS: Earn free stamps with my VIP reward program!
- New to Stampin’ Up? Check out my STAMPING 101 TIPS
-
-
-
-