Skip to content
Hand Stamped Cards with Josee Smuck-Stampin' Up! Canada Demonstrator
Menu
  • Home
  • JO JO POINTS
  • **Join**
  • Monthly Craft Kit
  • Weekly News
  • Shop Now
  • Contact Me
Menu

Category: Tutorials

Crazy About You!

Posted on May 7, 2015May 7, 2015 by Josee

Good Morning!

I hope you are getting some wonderful weather where you are! It's finally warm here and I'm loving it. Not even going to complain that it's been 'too' hot πŸ™‚ 

I've got a few NEW Catalogue Sneak Peeks for you…make sure you check out my Facebook page for those πŸ™‚

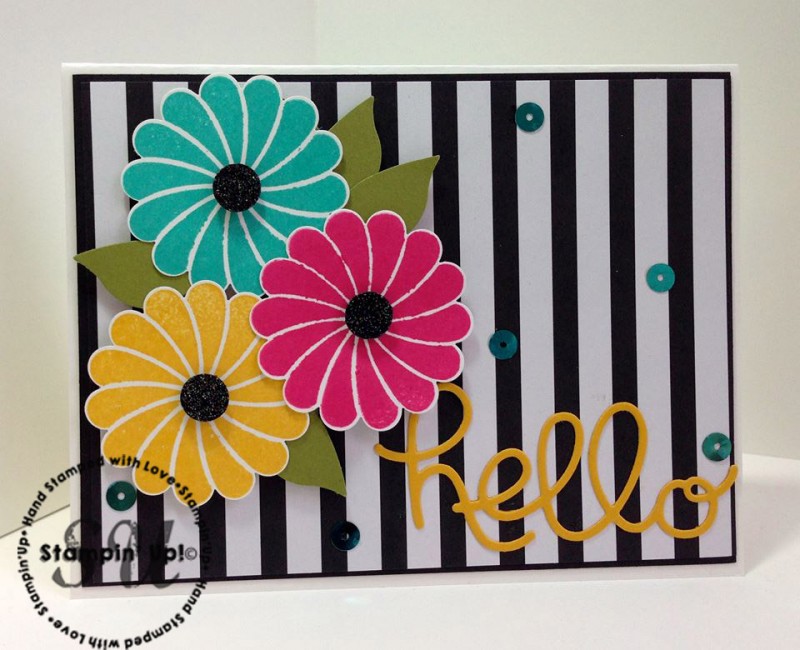
I've got a fun card to share today! I love the colour combination- this card just makes me thing of the hot tropics, somewhere near the beach! One can dream right? 

crazy about you

You can download the project sheet for this card here: Crazy About You card

Here are the supplies used on this card:


Measurement:

Whisper White 5-1/2” x 8-1/2” and 2-1/4” x 6-3/4” (flowers)

Basic Black 5-1/4” x 4” and scrap piece for centers of the flower

Striped DSP 5-1/8” x 3-7/8

Crushed Curry 2” x 3-12”,  scrap pieces of Old Olive

Instructions:

  1. Stamp the flower image in Melon Mambo, Crushed Curry and Bermuda Bay ink.  Punch out the flower using the 1-3/4” Scalloped Circle punch.  Punch out black centers and attach to the center of the flowers using Dimensionals.
  2. Layer the striped DSP to the Basic Black card stock and then on to the card base. 
  3. Punch out the bird wings and use as leaves.  Arrange flowers and leaves and attach to the card using Dimensionals. 
  4. Cut out the “hello” in Crushed Curry and attach it to the card.
  5. Attach Bermuda Bay sequins to the front of the card.

Thanks for stopping by today! 

retiring

Don't forget to check out the Retiring Items before they are gone for good!


signature


stampingjojojopoints

May Hostess Code to use: PP2Z9ZRJ

Earn FREE stamps! Use this monthly Hostess Code to earn JO JO POINTS for every $40 you spend (before taxes & shipping)!

Click here to learn more about this updated Loyalty Program!
hostessrewards

>>How to use the hostess code:

a. Enter your items into cart
b. At Check out- Look under the "Special Offers" box (bottom left)
c. Enter HOSTESS CODE in box and hit apply, then complete your order

d. After you receive your order confirmation, keep track of your JO JO POINTS earned on your JO JO POINTS Tracking Sheet! Earn 1 JO JO POINT for every $40 you spend before taxes and shipping!

e. Once you have 10 JO JO POINTS, email me your Tracking Sheet and choice of photopolymer or clear-mount stamp set FREE!!

NOTE: If your order is over $200, do not use the Hostess Code so that you to claim the Stampin' Rewards (more FREE items!) on your order! You will still earn JO JO POINTS on that order!… READ MORE “Crazy About You!”

Read more

Shabby Butterfly Basics

Posted on May 1, 2015May 1, 2015 by Josee

Hello! Happy Friday!

Today I wanted to show you a bit of shabby chic look using the Butterfly Basics stamp set. 

Fern card

I just love the texture on this card! You can download the intructions for this card here: Fern Card

Here are the supplies used on this card:

Measurements:  

  • Crumb Cake base 8 ½” x 5 ½”
  • Whisper white  2 ½” x 4”    

Instructions:

  1. Sponge card base with Early Espresso ink.
  2. Stamp card base with Honeycomb image using Crumb Cake ink and Splatter image from Gorgeous Grunge using Early Espresso ink.
  3. Stamp fern onto Whisper White layer using Always Artichoke ink. 
  4. Stamp post mark with Crumb Cake and Gorgeous Grunge with Early Espresso.
  5. Sponge edge of stamped piece with Early Espresso
  6. Use distressing tool to rough up the edges of stamped piece. (This distressing tool is on the retired list!)
  7. Wrap linen thread around stamped piece several times and tie in knot. Adhere to card base using Stampin’ Dimensionals.
  8. Stamp Happy Birthday with Early Espresso ink.

Thanks for stopping by! Have a great weekend!!

signature


stampingjojojopoints

May Hostess Code to use: PP2Z9ZRJ

Earn FREE stamps! Use this monthly Hostess Code to earn JO JO POINTS for every $40 you spend (before taxes & shipping)!

Click here to learn more about this updated Loyalty Program!
hostessrewards

>>How to use the hostess code:

a. Enter your items into cart
b. At Check out- Look under the "Special Offers" box (bottom left)
c. Enter HOSTESS CODE in box and hit apply, then complete your order

d. After you receive your order confirmation, keep track of your JO JO POINTS earned on your JO JO POINTS Tracking Sheet! Earn 1 JO JO POINT for every $40 you spend before taxes and shipping!

e. Once you have 10 JO JO POINTS, email me your Tracking Sheet and choice of photopolymer or clear-mount stamp set FREE!!

NOTE: If your order is over $200, do not use the Hostess Code so that you to claim the Stampin' Rewards (more FREE items!) on your order! You will still earn JO JO POINTS on that order!

… READ MORE “Shabby Butterfly Basics”
Read more

Creativ Festival

Posted on April 24, 2015April 23, 2015 by Josee

Good Morning!

Today I've got a cute project to show you. I think this is a great Father's Day project, but….I also think with some creative changes to the stamps and colours used this could be modified to make a great Mother's Day gift on a bottle of wine too πŸ™‚

guy greeting bottle bib

You can download the project sheet here: Guy Greeting Bottle Bib

Here are the supplies needed for this project: 


Measurements:            

  • Card Stock: Basic Gray—2.5” x 6.75” scored at 2” from top , Naturals White— 4.25” x 1.5” and scrap for banner
  • DSP: 1 piece of your favorite Adventure Bound DSP — 1” x 4.25” and co-ordinating 1/2” x 4.25” . Optional: Cut a piece of the DSP to cover the front of the bottle (hint: you may end up with a scrap for the thinner strip needed on bib)
  • Chevron Ribbon: One 6” length and one 1.5” for bowtie

Instructions:

  1. Punch 1-3/8” circle on the 2” end of the Basic Gray card stock to fit over neck of bottle
  2. Stamp “Father” in Island Indigo on the bottom of the Naturals White and “World’s Greatest” on the scrap, then trim banner. Stamp strong man in Basic Gray above “Father”.
  3. Adhere stamped piece and DSP to front of bottle bib. Attach banner with dimensional
  4. Atttach 6” length of ribbon in a loop using sticky strip on one end. Wrap 1-1/2” ribbon around middle to form a bowtie and adhere with sticky strip.
  5. Optional: Cover front of bottle with DSP to match bib.
  6. Fold bib on score line and put on neck of bottle BEFORE attaching bowtie with dimensional πŸ™‚


Thanks for stopping by today! Don't forget to get you name in for the Freebie Friday draw!!

signature


stampingjojojopoints

April Hostess Code to use: WEG2FME7

Earn FREE stamps! Use this monthly Hostess Code to earn JO JO POINTS for every $40 you spend (before taxes & shipping)!

Click here to learn more about this updated Loyalty Program!
hostessrewards

>>How to use the hostess code:

a. Enter your items into cart
b. At Check out- Look under the "Special Offers" box (bottom left)
c. Enter HOSTESS CODE in box and hit apply, then complete your order

d. After you receive your order confirmation, keep track of your JO JO POINTS earned on your JO JO POINTS Tracking Sheet! Earn 1 JO JO POINT for every $40 you spend before taxes and shipping!

e. Once you have 10 JO JO POINTS, email me your Tracking Sheet and choice of photopolymer or clear-mount stamp set FREE!!

NOTE: If your order is over $200, do not use the Hostess Code so that you to claim the Stampin' Rewards (more FREE items!) on your order! You will still earn JO JO POINTS on that order!

Read more

Cheerful Critters

Posted on February 20, 2015February 20, 2015 by Josee

Good Morning! Happy Friday!

I've got a cute card to share with you today! 

StampingJo, Cheerful Critters, Happy Heart Textured Impressions Embossing Folder, Best Day Ever Stamp Set, Oval Collection Framelits Dies, Blendabilities, Sequin Trim

It's a simple, but simply cute card! The little heart stamp from Best Day Ever fits perfectly in the Happy Heart Textured Impressions Embossing Folder and I couldn't help adding a little belt to the bunny's oufit with the Bermuda Bay Sequin Trim. smiley

Here are the supplies I used on this card:


Measurements: 

  • Melon Mambo: 5.5”x8.5”
  • Whisper White: 5”x3.75”, plus some for die cutting

Instructions:

  1. Cut card base from Melon Mambo, cut base layer from Whisper White
  2. Emboss Whisper White with Happy Heart embossing folder, then stamp ‘heart’ stamp from Best Day ever inside random embossed hearts; adhere to card base
  3. Stamp bunny from Cheerful Critters and sentiment on Whisper White; use Oval Framelit to die cut
  4. Die cut Bermuda Bay washi sheet with the next size oval to mat the stamped Whisper White oval
  5. Color the bunny stamped image using Blendabilities
  6. Trim the bottom of both ovals where the stamped image ends
  7. Adhere the washi oval and stamped oval on to the embossed base layer
  8. Cut a small section of Bermuda Bay Sequin Trim to create a little belt for the bunny’s outfit 

I found another great way to use the Bermuda Bay Sequin Trim and I can't wait to show you that card next week! 

Thanks for stopping by! Have a great weekend!!

signature


stampingjojojopoints

February Hostess Code to use: QFACZA4Y

NEW! A NEW way to earn FREE stamps! Use this monthly Hostess Code to earn JO JO POINTS for every $40 you spend (before taxes & shipping)!

Click here to learn more about this updated Loyalty Program!
hostessrewards

>>How to use the hostess code:

a. Enter your items into cart
b. At Check out- Look under the "Special Offers" box (bottom left)
c. Enter HOSTESS CODE in box and hit apply, then complete your order

d. After you receive your order confirmation, keep track of your JO JO POINTS earned on your JO JO POINTS Tracking Sheet! Earn 1 JO JO POINT for every $40 you spend before taxes and shipping!

e. Once you have 10 JO JO POINTS, email me your Tracking Sheet and choice of photopolymer or clear-mount stamp set FREE!!

NOTE: If your order is over $200, do not use the Hostess Code so that you to claim the Stampin' Rewards (more FREE items!) on your order! You will still earn JO JO POINTS on that order!

… READ MORE “Cheerful Critters”
Read more

Stampin’ Gals Gone Wild – The Ultimate Paper Cutting Guide

Posted on April 11, 2014July 7, 2016 by Josee

SGGW Wed FreebieHey everyone!  I am so excited to share with you a project that is unlike anything you’ve seen before.  It’s not a craft project but a template that is going to save you time and money.

connie1

Intrigued?  Well, rather than explain it, let’s get going with this quick video and it will explain it all!

If you are unable to view the video, CLICK HERE to view it online.

Here is the template!  Just download it and print off a few copies!

Click here>>> Download the Stampin' Gals Gone Wild
ULTIMATE PAPER CUTTING GUIDE HERE

Other Versions:
1)
Cardstock Cutting Guide for 12×12

2) Cardstock Cutting Guide- AUS

3) Cardstock Cutting Guide- UK

Thanks so much for checking out today’s Stampin’ Gals Gone Wild Wednesday Freebie!!!

signature


Read more

Posts pagination

  • Previous
  • 1
  • 2
  • 3
  • 4
  • 5
  • 6
  • Next

go to store