
This is going to be a long post!!! lol
I’ve been having a ton of fun creating watercoloured backgrounds using ink colours, water and a stamping block. For these cards I used Block E, but of course you can recreate the technique with any size block to make different styled cards.
The fun part of this technique is that your background will turn out slightly different each time depending on how much ink you place on your block and how much water you spray.
CARD #1

Measurements
- Rich Razzleberry: 5 1/2″ x 8 1/2″, scored at 4 1/4″
- Shimmery White: 3 3/4″ x 5″
- Whisper White: 3/4″ x 1 5/8″
Products
- Stamp Set: Beautiful Moments (151677)
- Cardstock: Rich Razzleberry (115316), Shimmery White (101910), Whisper White (100730)
- Ink: Rich Razzleberry (147091), Gorgeous Grape (147099), Highland Heather (147103), Memento Black (132708)
- Accessories: Block E (118484), Stampin’ Spritzer (126185); Stampin’ Dimensionals (104430); Tear & Tape Adhesive (138995)
CARD #2

Measurements
- Basic Black: 4″ x 5 1/4″
- Shimmery White: 3 3/4″ x 5″
Products
- Stamp Set: Ornate Style (152572) Peaceful Moments (151677)
- Cardstock: Basic Black (121045); Shimmery White (101910), Whisper White (100730)
- Ink: Rich Razzleberry (147091), Gorgeous Grape (147099), Highland Heather (147103), Memento Black (132708)
- Accessories: Block E (118484), Stampin’ Spritzer (126185); Stampin’ Dimensionals (104430); Tear & Tape Adhesive (138995); White Stampin’ Chalk Marker (132133); Clear Wink of Stella Glitter Brush (141897)
Tip:
- I added highlighting to the flowers with the Chalk Marker, then used Wink of Stella to add some shimmer
CARD #3

Measurements
- Highland Heather: 5 1/2″ x 8 1/2″, scored at 4 1/4″
- Gorgeous Grape: 4″ x 5 1/4″
- Basic Black: 3″ x 4 1/4″ (Stitched Rectangle Die)
- Shimmery White: 2 5/8″ x 4″ (Stitched Rectangle Die)
Products
- Stamp Set: Silhouette Scenes (149223)
- Cardstock: Gorgeous Grape (146987); Highland Heather (146986); Basic Black (121045); Shimmery White (101910), Whisper White (100730)
- Ink: Rich Razzleberry (147091), Gorgeous Grape (147099), Highland Heather (147103), Memento Black (132708); Uninked Stampin’ Craft Pad & Whisper White Refill (147277)
- Accessories: Block E (118484), Stampin’ Spritzer (126185); Stampin’ Dimensionals (104430); Tear & Tape Adhesive (138995); White Stampin’ Chalk Marker (132133); Clear Wink of Stella Glitter Brush (141897); Playful Pets Trim Combo Pack (152466); Frosted & Clear Epoxy Droplets (147801); Stitched Rectangles Dies (151820); Classic Label Punch (141491); Stitched Rectangles Dies (151820); Wrapped In Texture Embossing Folders (153574)
Tips:
- The great part about the new Wrapped in Texture Folders is that it gives you more options. You get 2 different patterns and each folder is 3-3/8″ x 6-1/4″ so you can choose to only emboss part of the card (left side, right side, top, bottom or middle) of your cardstock. To do the entire cardstock, I just match it up the best I can the second time I run it through my die-cut machine twice.
- For the ribbon, I tied 3 together on the left hand side and then adhered the ends to the back of the cardstock.
Photo Tutorial
1. To create the background, I used 3 different purples (Highland Heather, Gorgeous Grape and Rich Razzleberry). |
2. I started with the lightest colour at the top and pressed each colour into the block a few times to make the colours a bit darker.
|
|
3. You don’t have to cover the entire block, some white space actually looks good.
|
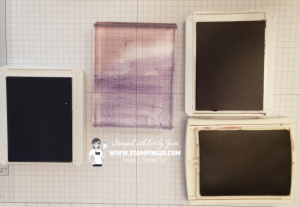
4. Use the Stampin’ Spritzer to spray the block. I sprayed it about 4-5 times. Tip: If you put too much water on it, your colours will overblend and it won’t stay a rectangle as much. If you don’t put enough water on it, you’ll have spots that are not blended at all.  |
5. Here is what my block looked like before I placed it on my cardstock.  |
6. When you place it on the cardstock, your colours will start to blend. (I found this one a little dry at the top, but, it worked out nicely anyhow)  |
|
7. Your paper will be warped initially, you can let it air dry or use a heat tool to dry it quickly.
|
8. If you have a spot with too much water, you can gently remove a bit at a time with a tissue or paper towel.
|
|
9. If you want to add a bit more to your background, you can use the remaining colour from your block with a scrunched up piece of plastic wrap.
|
10. Gently tap on to your wet cardstock or dry cardstock. (If it’s still wet, you will find that it will blend a bit.)  |
|
11. You will get a different look each time!
|
12. Now it’s time to pick out your stamps and make a card. (For the background that was a bit dry at the top, I used one of my stitched rectangular dies to cut it a bit before using.)  |


QUICK LINKS & PROMOS:
-
-
-
-
-
- NEW: August-December 2020 Mini Catalogue – View PDF here See products online
- Bonus Day Coupons- If you spent $60 or more in July- you can redeem your coupons August 4-31! Go to store
- Jo-Jo’s Stamping Essentials– click here
- Clearance Rack – click here
- WEEKLY NEWSLETTER & TUTORIALS: Sign up for my newsletter to get updates, specials & card ideas!
- JO JO POINTS: Earn free stamps with my VIP reward program!
- New to Stampin’ Up? Check out my STAMPING 101 TIPS
-
-
-
-