Hi Stamping Friends!
I thought I’d put together a list of the essential products that I use all the time and that are important to making great cards or paper-crafting projects!
Stamping Essentials


(updated May 2024)


Hi Stamping Friends!
I thought I’d put together a list of the essential products that I use all the time and that are important to making great cards or paper-crafting projects!
Stamping Essentials
(updated May 2024)

 Have you tried to Heat Emboss on your cards? If you haven't, maybe you feel a little intimidated by the process or just don't know where to start? Or don't know the difference between heat embossing and dry embossing (ie: using the Big Shot and Embossing Folders)? Check out this video from Stampin' Up that shows you how to heat emboss with Stampin' Up Embossing Powders and Heat Tool. I think you will fall in love with this technique!
→To create the splotches, you'll take an Aqua Painter filled with water, and just drop a few dribbles of water on there. Then you'll take your Clear Embossing Powder and pour it over the water.
→You'll want to hold the Heat Tool up high enough that you don't scorch your paper and you'll want to move the Heat Tool back and forth to keep the heat moving.
→You can get any color of embossing powder by using our ink pads and clear powder. So you'll want to make sure that the ink pad you're working with is nice and juicy.
→You can heat emboss on vellum.
→The Stampin' Up Heat Tool comes with two settings. And it has a low setting, so that you can emboss on delicate papers like vellum and keeps small die cuts from blowing away.
→VersaMark is great for heat embossing because it stays tacky for longer, so you have plenty of time to pour your powder on.
→The circle used to make the orange from the Orange Blossom stamp set can be stamped on the background to make the little polka dots.
→Use Gold or Silver Embossing Powder to create a faux metal.
→Die cut the Lovely Words Thinlits and use Paper Snips to cut out and use just the die cut word.
→Use two pieces of scrap paper: One is for inking up your image and the other is for pouring on your powder.
→Use a pair of household tweezers to help lift your die cuts out of the powder.
Orange Blossom stamp set, Aqua Painter, Clear Embossing Powder, Heat Tool, Vellum Cardstock, Versamark Ink, Lovely Words Thinlits, Big Shot, Paper Snips, Gold Embossing Powder


QUICK LINKS:
FREE GIFT Essentials Pack– When You Join My Team in July!
NEW! 2017-2018 ANNUAL CATALOGUE– Download the PDF version or check out the new products in store
NEW! MEMORIES AND MORE and PLANNER KIT product line- check them out here!
CLEARANCE RACK– Save up to 60% —NEW products added!!
JO JO POINTS– Earn free stamps with my Jo Jo Points Program
NEW to STAMPIN' UP? Check out my tips here.

>>>>Updated with new 2017-2018 Catalogue Info<<<<
Are you new to stamping or just new to Stampin Up? Then I have some stamping tips for you to get started with Stampin Up! If you have been a Stampin Up fan for some time, keeping reading as you just may learn something new!
If you have browsed the Stampin Up catalogues or my online store you may have noticed there are hundreds of products to choose from! That may make it more difficult for a newbie to figure out where to start! But, it’s all good, I promise!

First, if you are not sure where to start with stamping, start by deciding what kind of cards you want to make. Do you want to make birthday cards? Christmas cards? Thank you cards? Sympathy cards? Baby Shower invites and favors? Kids cards and party invitations? Wedding invitations? Pretty feminine cards? Or masculine cards? You get the idea. Start with an occasion or season in mind. You may notice that the Stampin Up Annual Catalogue is divided into sections based on some of these card occasions to make it easier to find what you are looking for.
Then, your next step is to decide whether or not you want to be able to color in your stamps. This is important to know because Stampin Up offers bold, solid stamps that are meant to be stamped with various ink colors.

If you prefer this look, you will want to choose a few different colors of ink pads to start with.
If you love the look of watercolored stamped images, Stampin Up also offers outline stamps that are meant to be stamped with (usually) a Basic Black ink and then colored in. Options include using our new Watercolor Pencils, Stampin Write Markers or our ink pads and Aqua Painters to watercolor. If you prefer this look, start with the Archival Basic Black ink pad and the coloring option of your choice. 
Another option is the greeting or sentiment stamp sets that offer various wording options for your cards. These are great for the Stampin Up stamp sets that have only images (and no sentiments) or for someone who loves to create cards with their own drawings or materials (such as Designer Series Paper) but prefers to add a stamped sentiment.

Deciding on your preference will help you narrow down your decision on which stamps to start with. You can then build your stamp collection from there 😉
Of course, you may still find yourself not sure of where to start or just can’t decide where to start. My suggestion is to choose one of the many product suites to start with. For example, in the 2017 Occasions Catalogue on page 8 and 9 you will see the Cupcakes & Carousels Suite- if you love the look of this suite, you can start with that stamp set, the Designer Series Paper and cardstock and ink that match. The work of deciding on colors has already been done for you!
One thing to note as well is that Stampin Up stamps come in two styles of material for the stamps themselves. Classic Rubber and Photopolymer. When you are deciding on stamps, you will often see the reference to wood or clear mount.

When you see ‘wood’ that means the stamps are the Classic Rubber, ready to be mounted on the wood blocks provided with the stamp set. Wood mount stamps cost more because they come with their own wood blocks. You will need to peel the backing off the rubber stamps and mount them onto the wood blocks yourself, but you will only do this once. Many find this advantageous because the stamps can be trimmed further if desired in order to keep any stray rubber from leaving ink where it shouldn’t when stamping.
A tip: punch out all the rubber stamps and before peeling off the sticky backing, place them on each wood block to make sure they are a good fit before sticking them on because once they are on they are staying! That stuff is super sticky!!
When you see the reference to Clear Mount- that means they are the Classic Rubber stamps with a non-adhesive backing on them to be used on clear acrylic blocks that you buy separately. Each time you stamp you will ‘mount’ these stamps on the proper sized block and remove them after cleaning your stamps.

Then there are the Photopolymer stamps- these also need the clear acrylic blocks to mount on before stamping. The best part of photopolymer stamps is that you can see exactly where you are stamping!
I made this video some time ago, but I think it’s still helpful today.
Of course you need something to stamp on! You will want to have a look at the cardstock and envelopes.


Stampin Up cardstock and inks are color coordinated. In fact, most of the Stampin Up products are color coordinated which makes stamping so much easier when you don’t have to worry about colors matching. Trust me on this one. I had one customer who started stamping with me many years ago who loved the stamps, but rarely bought the cardstock or ink, only stamps for the most part. After a year or so of this she told me she had wasted so much time and money on trying to buy cheaper inks, paper and ribbon at the local craft store only to sit frustrated every time she stamped because NOTHING matched! She would buy a pink ink, pink cardstock and pink ribbon only to realize they were never the same pinks! Needless to say she became my biggest advocate for buying the coordinated Stampin Up products!
On top of having some good cardstock and ink, you will want an effective method to cut and score your cardstock. The Stampin Trimmer is my go to tool as it allows me to measure the cardstock and cut! With the use of a Bone Folder, you can also use your Stampin Trimmer for scoring your cardstock, but I prefer to use my Simply Scored Scoring Board– love this tool as it makes lining up the cardstock so easy and you can mark your most used measurements (like 4.25″ and 5.5″ for your standard card centers). Check out the Ultimate Cutting Guide here.
?Stampin Up offers ink refills. You don’t have to worry about ink pads or Stampin’ Write markers drying up. One Stampin’ Up refill bottle with last you quite a long time and you can reink anytime you need to. Plus, the reinkers can be used for dyeing products with the Stampin’ Spritzers or dip dyeing.
?All of Stampin’ Up’s Designer Series Papers (aka Patterned Papers) are also color coordinated! If you are not sure what colors to start with, try choosing a set of Designer Series Papers that catch your eye and then choose the colors from that set of papers.
?Ribbon, buttons, washi tape and other accessories are all made to coordinate with the Stampin Up colors! This makes it so easy to find the perfect embellishment for your cards!
? Stampin’ Up now offers Embossing Paste to add dimension to your cards! Learn more about it here.


?You can find all the adhesives you need to get started and Stampin Up has all kinds of adhesives for differents jobs as one adhesive does not fit all!
 ?Most of the Stampin Up Framelits and Thinlits coordinate with the stamp sets. Got a Big Shot? (or other die cutting machine?) Or want one? You will love that many of the stamp sets you buy have coordinating dies to make cutting out images so easy!!
Not sure where to start? Having a set of basic shape dies like the Layered Circles or Layered Ovals Framelits are a great set to start with as they will work with most stamp sets. Get creative with your dies too- cut out shapes, use the dies to create different shapes out of the cutouts or use your imagination to use the dies in different ways!
The Big Shot can also be used to dry emboss your cardstock too for amazing texture and dimension on your cards! (See the samples below)
Not sure what the Big Shot is? Check out this how to video to get you started.


These cards were all created with the Big Shot and dies and embossing folders!
?The Stampin Up punches also coordinate with many of the stamp sets, so when checking out the catalogue, take note of the coordinating punches and dies (if any) listed with the stamp set information and check them out! 
?Broken stamp case? You can purchase replacement stamp cases on page 183 of the Annual catalogue (or find them in store here) but did you know the stamp cases can also be used for more than just stamps? You can use them to store and organize your Watercolor Pencils, Stampin Write Markers, your clear acrylic blocks, keep completed cards safe or keep your cardstock scraps organized. These stamp cases have been used for many non- stamping related uses too like keeping desk supplies organized or makeup and nail supplies together in kits.
?Love wood stamps but can never line them up properly? The Stamp-a-ma-jig was made for just that!! If you are not sure how to use it, check out this video.
?Stampin’ Up offers project kits and Paper Pumpkin kits to make crafting easy to take where ever you go!
?Stampin Up supports Ronald McDonald House Charities (RMHC) every year! Usually found at the back of the Annual Catalogue, Stampin Up chooses one stamp set to help support RMHC- the purchase of this stamp set … READ MORE “Stamping Tips for using Stampin Up stamps, cardstock, inks and accessories!”

If you are looking to make something a little different, give this fun Double Z Fold card a try. This card uses some soon to be retired products: the Fruit Stand Designer Series Paper, the Tin of Cards stamp set and the Real Red Stitched Satin Ribbon! So make sure to check them out in store before they are gone for good!

Start by stamping the LIVE LAUGH LOVE greeting from the Layering Love stamp set in Tuxedo Black ink on a scrap piece of Whisper White cardstock.
Die cut the greeting with the heart framelit from the Sweet & Sassy Framelits. Die cut the heart the next size larger from Old Olive cardstock to create a mat layer. Adhere the stamped heart to the Old Olive die cut.
Tie a bow with the Real Red 3/8” Stitched Satin Ribbon (soon to retire!) – adhere with a Mini Glue Dot.
Cut, score and fold on the score lines of the Real Red cardstock (11" x 4-1/4", scored at 2-3/4" & 5-1/2").
Adhere the 4" x 5-1/4" Whisper White cardstock to the Real Red card base.
Next, adhere the strawberry Fruit Stand Designer Series Paper 2-3/8" x 3-7/8" layer to the Old Olive 2-1/2" x 4" layer and then to card front.
Adhere the striped Fruit Stand Designer Series Paper layer to the Old Olive strip – bending on score lines (scored at 2-3/4 & 5-1/2") as you glue them together
Tip: make sure you are gluing from the left to the right as you adhere the Designer Series Paper strip or it will not fit properly due to the score line folding.
Adhere the left side to the folded back front panel and the right side (shown below with the two strawberries) to the inside layer.

Stamp 'HAPPY BIRTHDAY' from the Tin of Cards stamp set in Tuxedo Black ink on the inside Whisper White layer.
Adhere the die cut heart to front strip as shown on the card above. Then, cut out three strawberries from the Designer Series Paper and adhere along the smaller Z strip as shown.
· Real Red 11" x 4-1/4", scored at 2-3/4 & 5-1/2"
· Whisper White 4" x 5-1/4" & scrap
· Old Olive 2-1/2" x 4" & 1-1/2" x 11", scored at 2-3/4 & 5-1/2" plus scrap piece for die cutting
· Fruit Stand Designer Series Paper (strawberry pattern) 2-3/8" x 3-7/8" & (striped pattern) 1-3/8" x 10-7/8", scored at 2-3/4 & 5-1/2", plus strawberry pattern scraps for cutting strawberries out
Layering Love (141962-Wood, 141965-Clear); Tin of Cards (138946) Retiring Product
Whisper White (100730), Real Red (102482), Old Olive (100702), Fruit Stand Designer Series Paper (141660) Retiring Product
Tuxedo Black Memento (132708)
Stampin’ Trimmer (126889), Real Red 3/8” Stitched Satin Ribbon (141693) Retiring Product, Sweet & Sassy Framelits Dies (141707), Big Shot (143263), Glue Dots (103683), Liquid Multipurpose Glue (110755)
I hope you give today's Double Z Fold card a try!


QUICK LINKS:
2017 OCCASIONS CATALOGUE– Available January 4th to May 31st
RETIRING LIST– These items are only available while supplies last!
CLEARANCE RACK– Save up to 60%
JO JO POINTS– Earn free stamps with my Jo Jo Points Program
NEW to STAMPIN' UP? Check out my tips here.

Happy happy weekend!
I don't usually post on the weekend, but I thought I would share these fun and easy templates with you in case you are making cards today on World Card Making Day! I can't think of a better excuse to carve some time into the day and get stamping!
Do you remember the last time you received a card in the mail? In a sea of junk mail and bills, a card is a simple thing that really stands out to the person who receives it. Sending a card is a small gesture that shows just how much you care about that special someone in your life. With World Card Making Day today, celebrate by making and sending a handmade card to someone who could use a little recognition, love, or just a boost (which is anyone, really!).
Check out these templates designed to maximize your Designer Series Papers (that you can stock up on during the sale!)
 Use as variety of paper strips and punch the ends with the Triple Banner Punch. Stamp a greeting and add ribbon for a quick, attractive card!
 Create a ‘window’ on your Designer Series Paper using framelits or punches, then layer an image or greeting underneath. Try this template with several papers from the same collection and get a different look every time.
 Why throw away scraps when they’re this pretty? Instead, use them up on this great card design. Use designs from one paper collection, or mix and match for more possibilities.
For more card inspiration, check out my Facebook today, I will be sharing lots of card ideas to keep you stamping all day long!
In celebration of World Card Making Day, from October 1-5, you can save up to 25% on cardmaking essentials that can be used to share your love all year long!
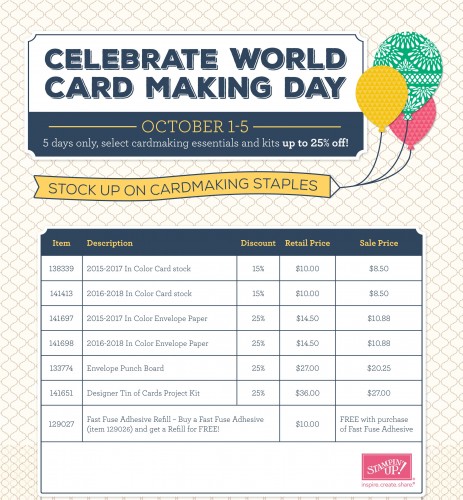
And check out the Designer Series Papers that are on sale too! Shop both sales here.

I hope you enjoyed today's templates!!
Enjoy the rest of your weekend! Happy Stamping!!!