Skip to content
Hand Stamped Cards with Josee Smuck-Stampin' Up! Canada Demonstrator
Menu
  • Home
  • JO JO POINTS
  • **Join**
  • Monthly Craft Kit
  • Weekly News
  • Shop Now
  • Contact Me
Menu

Category: Tips & Techniques

Rose Wonder Paper Pieced Birthday Card

Posted on April 21, 2016April 18, 2016 by Josee

TH_social_retired2016_demo_Apr1816_NA_4

Hello! 

Thanks for stopping by today! I think you are going to love the technique used in today's card! Using the Rose Wonder stamp set and the Rose Garden Thinlits Dies, this card comes together beautifully!
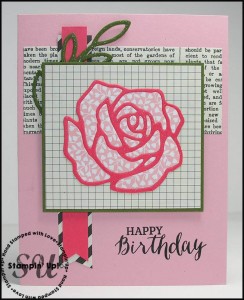
Rose Wonder, paper piecing, hand stamped Birthday card, Stamin' Up


How To Make It: 


1.    Adhere the Typeset Specialty designer paper (newsprint design) directly to the Blushing Bride cardstock base.
2.    Using the Stampin’ Paper Snips, banner cut both the Watermelon Wonder cardstock strip and the Typeset Specialty designer paper (striped design).  Layer these two strips with the Watermelon Wonder layer offsetting the top edge of the Typeset designer paper layer.  Adhere to each other, and then, to the card.
3.    Take the leaves thinlit from the Rose Garden Thinlits dies set and die cut from the Mossy Meadow cardstock piece.
4.    Adhere the Typeset Specialty designer paper (grid design) to the Mossy Meadow cardstock.
5.    Die cut the single Rose thinlit from each of the following: scrap piece of Watermelon Wonder cardstock and the Love Blossoms designer paper.  Be careful not to lose any of the little pieces from the Love Blossoms rose.
6.    Brush on some clear Wink of Stella onto the leaves and Watermelon Wonder rose die cuts.
7.    Adhere the Watermelon Wonder rose ‘frame’ die cut onto the Typeset grid layer, then, glue and paper piece the inner rose pieces from the Love Blossoms designer paper die cut.
8.    Add Stampin’ Dimensionals to the back of the Mossy Meadow panel.
9.    Position the leaves onto the banner strip, followed by the paper pieced Rose Wonder panel.
10.    Ink up the sentiment with Basic Black Archival ink and stamp in place onto the Blushing Bride cardbase.

Supplies:

Stamp Sets: Rose Wonder (140697)
Inks: Basic Black Archival (140931)
Paper: Blushing Bride cs (131198), Mossy Meadow cs (133676), Watermelon Wonder cs (138334), Typeset Specialty Designer Series Paper (133704), Love Blossoms Designer Series Paper Stack (140548)
Other:  Rose Garden Thinlits Dies (140619), Wink of Stella brush – clear (141897), Big Shot (113439), Big Shot die brush (140603), Paper Snips (103579), Multipurpose Liquid Glue (110755), Stampin’ Dimensionals (104430)

Measurements: 

Blushing Bride card stock: 5 ½” x 8 ½”, score at 4 ¼”
Mossy Meadow card stock: 3 ¼” x 3”
Watermelon Wonder card stock:  4 ¾” x ½”, Watermelon Wonder scrap piece:  2 ¾” x 2 ½”
Love Blossoms Designer paper:  2 ¾” x 2 ½”
Typeset Specialty Designer paper (newsprint design): 4” x 1 ¾” , Typeset Specialty Designer paper (grid design): 3-1/8” x 2-7/8”, Typeset Specialty Designer paper (striped design): 4 ¾” x ¾”


I hope you give this technique a try and I hope it inspires you to give it a try with some different dies! Which dies would you try this technique with?

retiring products

     signature


     April Hostess Code to use:  DBBZ2AUS

jojopoints blog post footer

Read more

Bravo: Congrats Watercolor card

Posted on April 7, 2016May 2, 2016 by Josee

Hello! 

I've got a fun and simple card to show you today! This card uses a fun 'watercolor' technique and the Bravo stamp set!

Bravo Congratulations card

How to Make It:
•    Place a drop of each reinker (a part from each other) on a plastic plate or large acrylic block (or you can even put it in the stamp pad lids)
•    Make sure water is flowing in AquaPainter, and “paint” just the water on cardstock, leaving it pretty wet (you want it to kinda puddle)
•    Then, pick up some of the Daffodil Delight reinker and “swoosh” it on the top third
•    Next, the Pumpkin Pie and continue your “swoosh,” overlapping a bit
•    And finally, finish off with the Melon Mambo—you will want to do all of this pretty rapidly and each color in just one big “swoosh”
•    LET DRY
•    Stamp words over watercolored area
•    Assemble as shown

Measurements:
•    Shimmery White Card Base:  8 ½ X 5 ½ 
•    Basic Black:  3 7/8 X 5 1/8
•    Shimmery White:  3 ¾ X 5
 

Supplies:
•    Stamp Set: Bravo (135380)
•    Inks: Basic Black (140931); Reinkers:  Daffodil Delight (119672), Pumpkin Pie (105229), Melon Mambo (115662)
•    Paper: Shimmery White (101910), Basic Black (121045)
•   Other:  AquaPainter (103954)

Thanks for reading! I hope you enjoyed this simple and fun technique today! Enjoy!
 

shop online new

     signature


     April Hostess Code to use:  DBBZ2AUS

jojopoints blog post footer

Read more

World of Dreams Sunset Card

Posted on April 1, 2016March 31, 2016 by Josee

Hello! Happy Friday!

I've got a gorgeous card to share with you today! 

World of Dreams, Sheltering Tree, sunset background, hand stamped, hand-made card

How to Make It: 
1.    Cut and score your Crumb Cake card base.
2.    Adhere Basic Black layer to card base with dimensionsals
3.    Using your circle punch – punch out a circle from your post-it note – ensure that when you punch it’s at the tacky side.
4.    Position punched out circle to the right of half way. Using your sponges and inks sponge in a circular motion around your post-it circle gradually increasing the colour. Start with Saffron, then curry, then pumpkin then Cajun.  Go back over with the lighter colours for a smooth look. 
5.    When happy remove your post it and light sponge So Saffron to soften the ‘sun’.  
6.    Stamp your silhouette stamp in Jet Black Stazon on the left hand side with it slightly overlapping the sun. Then on the right just do a couple of the branch ends – this gives you card continuation or the illusion of a treeline. Stamp sentiment of choice at the bottom in Jet Black Stazon – this  sentiment is from the Sheltering Tree Stamp Set
7.    Adhere this layer to card using Dimensionals. 

Supplies Used:
•    Stamp Sets: World of Dreams #134186 clear-mount, 134183 wood mount, Sheltering Tree #137163
•    Inks: Jet Black Stazon #101406, So Saffron #126957, Pumpkin Pie #126945, Cajun Craze #126965, Crushed Curry #131173
•    Paper: Crumb Cake #121685 , Basic Black #121688, Shimmery White #121717
•    Other: 1 ¼” Circle Punch #119861, Post It Notes, Stampin Sponges #101610, Stampin Dimensionals #104430

Measurements: 
Crumb Cake –  (4 1/8” x 8 ¼”)
Basic Black –  (3 7/8” x 3 7/8”)
Shimmery White –  (3 5/8” x 3 5/8”)

Thanks for stopping by! Have a wonderful weekend!
 

    shop online new  

     signature


     April Hostess Code to use:  DBBZ2AUS

jojopoints blog post footer

Read more

Life is a beautiful ride

Posted on March 24, 2016March 21, 2016 by Josee

Good Morning! 

I hope you are having a wonderful first week of Spring!! I love watching all our snow finally melt away! Today's card makes me thing of taking a Spring drive with the windows down and a warm breeze coming in! Ah. Can't wait! 

This card uses a Beautiful Ride from the 2016 Occasions catalogue and a fun, but perhaps messy, baby wipe technique. 

Beautiful Ride, Stampin Up, hand stamped, hand made, all occasion card,

How To Make It: 
1.    Stamp Car and Love Stamp onto Whisper White layer using Memento Tuxedo Black ink
2.    Use post it notes to mask around car 
3.    Apply one drop of each color reinker to baby wipes to create a baby wipe ink pad


4.    Dab the baby wipe "ink pad' to the car, turning the baby wipes to achieve desired coloring                                            
5.    Remove post it notes, use blender pen to pick up color from the baby wipe ink pad and color top of car, bumper, middle of tires
6.    Use a Basic Black marker to color tires
7.    Taking the strip of whisper white that measures 1 X 5 ¼ dab the baby wipe ink pad onto it
8.    Punch the colored 1 x 5 ¼  strip using the Confetti Hearts Border punch
9.    Layer the Confetti Heart strip over the 1 x 5 ¼ Tempting Turquoise strip, attach both to the Whisper White layer
10.  Stamp sentiment on whisper white scraps and create a banner using the Triple banner punch
11.  Punch the Tempting Turquoise strip also with the Triple Banner punch
12.  Layer the banners and attach using Dimensionals

If you happen to get any unwanted ink on your whisper white you can bling it up with Rhinestones!  Or you can leave the Rhinestones off.  ðŸ™‚ 

Supplies:
Stamp Sets: Beautiful Ride #140738
Inks: Real Red Refill #103287, Daffodil Delight Refill #119672, Tempting Turquoise Refill #10104, Pumpkin Pie Refill #105229, Memento Tuxedo Black ink pad #132708  
Paper: Tempting Turquoise #102067, Whisper White #100730
Other: Confetti Hearts Border #137415, Banner Triple #138292, Baby Wipes, Post it notes, Blender Pen #102845, Basic Black marker #100082, Rhinestones #119246

Measurements: 
Whisper White 5 ¼ x 4, 5 ¼ x 1, ¾ x 3 scrap for sentiment banner 
Tempting Turquoise 8 ½ X 4 ¼, 5 ¼ x 1, ¾ x 3 scrap for sentiment banner 

Thanks for stopping by today! I hope you enjoyed today's card. Have a great day! 

saleabration freebies shop online new  

     signature


     March Hostess Code to use:  7VWRHYUG

jojopoints blog post footer

Read more

In the Meadow All Occasion/Just Because card

Posted on February 24, 2016February 22, 2016 by Josee

Hello! 

Thanks for coming by the blog today! I've got a pretty card today, showcasing In the Meadow.

In the Meadow, Stampin Up, StampingJo.com; hand stamped, hand made card, watercolors, all occasion card

How to Make It:

  1. Stamp images onto Shimmery White paper using Black Archival Ink.
  2. Squeeze your ink pads to get some ink on the inside of the lids. This is where you will get your color from.  Optionally, you can add color with a reinker.
  3. Using an Aqua Painter, paint the background in Soft Sky, then the deer and tree trunks in Chocolate Chip. Paint the grass and trees in Wild Wasabi using varying amounts of ink to create depth. Paint the mountains in Smoky Slate. Add Wisteria Wonder to both the mountains and sky to give them more depth.
  4. Stamp the sentiment onto the Crumb Cake banner. Use paper snips to flag the right side and wrap linen thread around the left side securing the ends in the back with either Fast Fuse or a glue dot. Attach banner to water colored image.
  5. Attach the image to the Chocolate Chip mat using Fast Fuse
  6. Attach the Chocolate Chip mat to the Crumb Cake mat using Dimensionals.

Supplies:

  • Stamp Sets: In the Meadow (C: 140754) & Cottage Greetings (C: 139962)
  • Inks: Archival Black (140931), Chocolate Chip (126979), Wild Wasabi (126959), Soft Sky (131181), Smoky Slate (131179), Wisteria Wonder (126985)
  • Paper: Shimmery White (101910), Chocolate Chip (102128), Crumb Cake (120953)
  • Other: Aqua Painters (103954), Fast Fuse (129026), Dimensionals (104430), Linen Thread (104199)

Measurements:

  • Card Base in Crumb Cake: 5-1/2” x 8-1/2” and scored at 4-1/4”
  • Chocolate Chip Mat: 5-1/8” x 3-7/8”
  • Shimmery White Mat (with Images): 5” x 3-3/4”
  • Crumb Cake Banner: ½” x 4-1/4”

If you would like to see more cards made using this stamp set, check out this My Crafty Friends Monday post. Have a great day!

saleabration freebies shop online new


     signature


     February Hostess Code to use:  Q27EAVTX

jojopoints blog post footer

Read more

Posts pagination

  • Previous
  • 1
  • 2
  • 3
  • 4
  • 5
  • …
  • 19
  • Next

go to store