Skip to content

Hand Stamped Cards with Josee Smuck-Stampin' Up! Canada Demonstrator

Stampin' Up! Canada Demonstrator; Rubber Stamps & Supplies for Cardmaking & Scrapbooking in Stittsville, Ontario (near Ottawa)

Menu
  • Home
  • JO JO POINTS
  • **Join**
  • Monthly Craft Kit
  • Weekly News
  • Shop Now
  • Contact Me
Menu

Birthday Blooms Happy Birthday

Posted on March 22, 2016March 21, 2016 by Josee

Good morning!

We are in the last week of March, which means time is running out on Sale-A-Bration! If you have not gotten your freebies yet, don't wait too long- you have until March 31st to place your qualifying order!! Every $60 you spend before taxes and shipping earns you your choice of Sale-A-Bration freebies! You can check out the Sale-A-Bration brochures at the end of this post. 

Now, onto today's card! I've got a lovely birthday card featuring Birthday Blooms!

Birthday Blooms, Stampin Up, hand stamped, hand made, birthday card, Shine On Designer Series Paper, Gold Sequin Trim, Triple Banner Punch

How to Make It: 
1.    Score and burnish fold on base card.
2.    Adhere Shine On DSP layer to card base with dimensionsals
3.    Insert Birthday Bouquet piece into Triple Banner Punch and punch. Adhere this piece to your Shine On layer with Snail Adhesive. 
4.    Stamp Sentiment on Vellum piece in Stazon and adhere to Banner about half way down.
5.    Fold sequin trim piece in half and using a Glue Dot adhere to banner about 1/3 way down.  
6.    Stamp Flower image onto shimmery white in Jet Black Stazon. Colour your flower with Calypso Coral Ink using the Aqua Painter.  Colour leaves in Old Olive. Cut out your image and adhere to card using Dimensionals. 
7.    Apply Wink of Stella (clear) to petals and buds.

Supplies:
•    Stamp Sets: Birthday Blooms CM #140658/WM#140655
•    Inks: Jet Black Stazon #101406, Calypso Coral #126983, Old Olive #126953
•    Paper: Kraft #133674, Shine On Specialty DSP #140579, Birthday Bouquet DSP #140557, Shimmery White #121717, SAB Botanical Gardens Designer Vellum Stack #141019
•    Other: Aqua Painter #103954, Triple Banner Punch #138292, Gold Sequin Trim #132983, Wink of Stella Brush Clear #141897, Stampin Dimensionals #104430, Snail Adhesive #104332


Measurements: 

  • Kraft – 4” x 12” – score at 6”
  • Shine On SDSP – 3 7/8” x 5 7/8”
  • Birthday Bouquet DSP – 5 ½” x 2”
  • Botanicals Vellum – 3” x 2”
  • Shimmery White – 4”x 4”
  • Sequin Trim – 7”

We've got some NEW Weekly Deals today, so check them out here! 

Thanks for stopping by! Have a wonderful day! 

saleabration freebies shop online new  

     signature


     March Hostess Code to use:  7VWRHYUG

jojopoints blog post footer

Read more

My Crafty Friends Monday: Timeless Textures

Posted on March 21, 2016March 17, 2016 by Josee

Welcome to "My Crafty Friends Monday!" 

2016 Occasions Catalogue & Sale-A-Bration Edition


My Crafty Friends Monday-NEW-SMI hope you enjoyed a great weekend! Each Monday, I like to feature different projects that have inspired me and I know they'll inspire you too!
 
Each project was created by different & amazingly talented stampers- make sure you check out their blogs for more details and to check out their other amazing projects!!
(**Note…don't worry- I've contacted each of these stampers and allowed them to decline if they choose.) 
 

This week's featured stamp set is 'Timeless Textures' (140514 wood, 140517 clear-mount).


Bekka Prideaux- her blog

Timeless Textures by Bekka Prideaux

Just gorgeous! Love these colors!


Sacha Van De Kerkhof- her blog

Timeless Textures by Sacha Van De Kerkhof

So pretty! 


Cindee Wilkinson- her blog

Timeless Textures by Cindee Wilkinson

Love all the layers on this one! Beautiful!


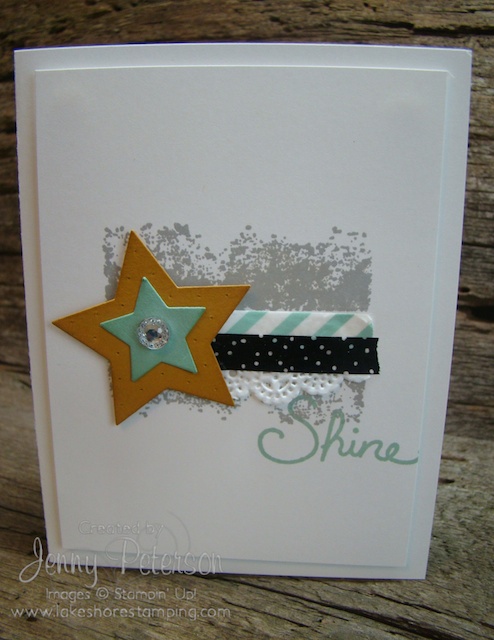
Jenny Peterson- her blog

timeless textures by jenny peterson

I love the way the Timeless Texture stamp was used to create a mat for the layering. Nice!


Julie Edwards- her blog

Timeless Textures by Julie Edwards

So pretty with a pop of color!


Charlene Becker- her blog

timeless textures by Charlene Bekker

Such a fun card! 


Love these ideas? You can purchase this stamp set through my ONLINE STORE! 

I hope you've enjoyed this week's "My Crafty Friends Monday" Make sure you visit the talented artist's featured on this post! Thanks for stopping by today!

Were you featured here? Here's a badge you can add to your blog is you choose!
My Crafty Friends Monday-featured-NEW-SM

saleabration freebies shop online new  

     signature

   March Hostess Code to use:  7VWRHYUG

jojopoints blog post footer

Read more

Easter treats

Posted on March 18, 2016May 2, 2016 by Josee

Good Morning! Happy Friday!

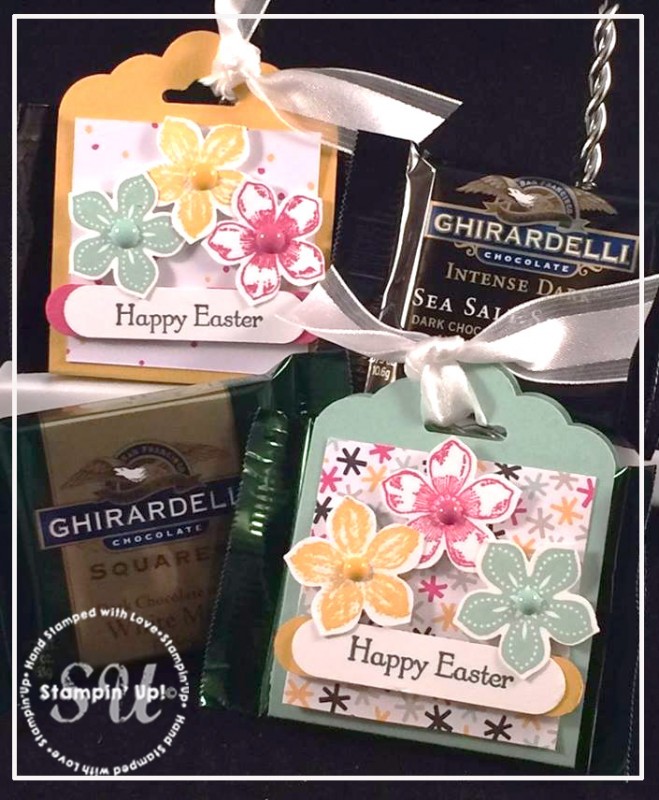
Today's project is a cute little Easter treat package for the Ghirardelli chocolates. Yum 🙂  It uses the Scallop Tag Topper and Petite Petals and Teeny Tiny Wishes!

Easter Treats, Stampin Up, Petite Petals, Teeny Tiny Wishes, Scallop Tag Topper Punch

How to Make It:
    
1.    Score one end of the 2” x 5-1/2”card stock at 2-5/8", flip it over and score on the other end at 2-5/8".  This will give you a nice 1/4" base for the candy.
2.    Punch each end of card stock using the Scallop Tag Topper Punch.
3.    Add the DSP to one side of the punched card stock (this will be your front).
4.    Wrap cardstock around candy.  Use a little SNAIL adhesive to attach the candy to the card stock, if desired.
5.    Stamp the desired flowers on the scrap Whisper White and punch out using Petal Punch.
6.    Stamp sentiment on Whisper White with Basic Black ink pad and punch out using Word Window punch.
7.    Punch out of desired colored card stock using the Word Window punch, cut in half and frame sentiment.
8.    Attach the sentiment and flowers on top of the DSP using Stampin Dimensionals.
9.    Add the candy dots to the centers of the flowers.
10.    Slip Ribbon thru top and tie in knot. 

Supplies:
Stamp Sets – Teeny Tiny Wishes W#128748, C#127802, Petite Petals W#133152, C#133155

Paper– Mint Macaroon #138337, Melon Mambo #115320, Crushed Curry #131199, Whisper White #100730, It’s My Party-Designer Series Paper #140552

Ink– Archival Basic Black #140931, Mint Macaron #138326, Melon Mambo #126948, Crushed Curry #131173

Other–Word Window Punch #119857, Petal Punch #133322,  White Organza Ribbon #114319, , Scallop Tag Topper #133324, Stampin Dimensionals #104430, SNAIL adhesive #104332, It’s My Party Enamel Dots #140554, Chocolate Squares (approximately 1-3/4”-2” squared candy)    


Measurements:   
•    5-1/2” x 2” Card Stock of Mint Macaron & Crushed Curry
•    1-3/4” x 1-3/4” Designer Series Paper (DSP)
•    7” White Organza Ribbon
•    Scrap Whisper White and Melon Mambo

Thanks for stopping by! Have a wonderful weekend!

saleabration freebies shop online new  

     signature


     March Hostess Code to use:  7VWRHYUG

jojopoints blog post footer

Read more

Botanical Builders

Posted on March 17, 2016May 2, 2016 by Josee

Good day! 

Happy St. Patricks day! Wishing you all the luck of the Irish for you today 🙂 

I don't make St.Patty's day cards, but I do have some green to show you today! 

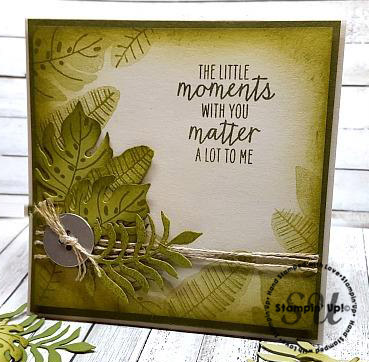
Botanical Blooms, Watercolor Wings, Stampin Up, hand made card, hand stamped,

How To Make It:


1.    From your Pear Pizzazz cardstock cut four leaves using the Botanical Builders Framelits set. Cut one fern, one feather and two medium leaves. Once cut, stamp leaf details on to pieces then dauber around their edges with Old Olive ink.  For the more detailed Leaf like the ferny type leaf you may like to use the Die Brush & Mat (140603) for easy removal. 
2.    Randomly stamp the medium and feather leaf backgrounds around the left hand and bottom edges of your small square of Sahara Sand in Pear Pizzazz Ink. Stamp leaf details on top in Old Olive Ink.  Dauber around the edges of this piece first in Pear Pizzazz and then in Old Olive. 
3.    Using Always Artichoke Ink stamp sentiment from Watercolor Wings Stamp set in the top right of the layer.
4.    Adhere your two medium leaves and feather leaf to the layer on the left approximately 1” from the bottom using Glue Dots. 
5.    Wrap your Linen Thread around your layer three times and tie in a knot at the back of the layer. 
6.    Adhere your fern type leaf on top of the linen thread on the left to keep it with the other leaves. 
7.    Using more Linen thread. Fold it over three times and thread through two of the holes on the silver button and tie in a knot at the front. Adhere your button over the leaf bases with 2 or 3 glue dots (you don’t want it falling off!)
8.    Score Sahara Sand Base Card at 4 1/8", fold and burnish.  Adhere Always Artichoke piece with Dimensionals.
9.    Adhere top Sahara Sand layer to Always Artichoke Layer with Dimensionals

Supplies Used:

Stamp Sets: Botanical Blooms (140757), Watercolor Wings (139424)


Inks: Pear Pizzazz (131180), Old Olive (126953), Always Artichoke (126972)


Paper: Sahara Sand (121695), Always Artichoke (108610), Pear Pizzazz (131290)


Other:  Botanical Builder Framelits (140625), Big Shot (113439), Big Shot die brush (140603), Linen Thread (104199), Silver Basic Metal Buttons (133319), Sponge Daubers (133773), Stampin Dimensionals (104330), Glue Dots (103683)


Measurements: 
Sahara Sand Card Stock: 4 1/8” x 8 ¼”, 3 13/16” x 3 13/16”
Always Artichoke Card Stock: 4” x 4” 
Pear Pizzazz Card Stock: 4 x 4

Thanks for stopping by!  Have a great day!

saleabration freebies shop online new  

     signature


     March Hostess Code to use:  7VWRHYUG
jojopoints blog post footer

Read more

Easter lamb

Posted on March 16, 2016May 2, 2016 by Josee

Hello! 

With Easter coming soon, I thought I would show you this cute Easter card! It uses the Easter Lamb stamp. 

Happy Easter card, Stampin Up, Easter Lamb stamp

How To Make It: 
1.    Before attaching stamp to wood block, carefully trim between lamb and greeting and then you can mount the greeting to the side of the wood block to use it separately. Alternately, mount the stamp as is and use a post-it note to cover up the parts you don't want to ink and then remove post-it note before stamping the images separately.
2.     Stamp Lamb with Basic Black Archival Ink on Thick Whisper White cardstock and punch with circle punch, use trimmer to square off the bottom (take off approximately 3/8") 
3.    Stamp Greeting on White and cut out with Banner Label framelit. 
4.    Add small bits of color to lamb image using Pink Pirouette ink and blender pen. 
5.    Add Chalk Marker swirling it over body and head to soften the look
6.    Run Pink Pirouette layer through Big Shot using Polka Dot Embossing Folder
7.    Assemble adding Ribbons and White Perfect Accents Dots as shown

Measurements: 
Wisteria Wonder 8 1/2 x 5 1/2, Pink Pirouette 5 1/4 x 4, Whisper White scrap 4 1/4 x 5 1/2


Supplies:

Stamps: Easter Lamb Stamp (140740)

Inks: Basic Black Archival (140931), Pink Pirouette (128956)

Paper:    Wisteria Wonder (122922), Pink Pirouette (111351), Thick Whisper White (140272)

Other: 2 3/8" Circle Punch (1188774), Polka Dot Textured Impressions Embossing Folder (133739), Big Shot (113439), Project Life Cards & Label Framelits (135707), Chalk Marker (132133), Blender Pen (102845), Stampin' Dimensionals (104430), Wisteria Seam Binding (134572), White Organza Ribbon (114319), Silver 1/8" Ribbon (132137) White Perfect Accents (138416)

Thanks for stopping by today! Don't forget to check out the NEW Weekly Deals! While supplies last!

saleabration freebies shop online new  

     signature


     March Hostess Code to use:  7VWRHYUG

jojopoints blog post footer

Read more

Posts pagination

  • Previous
  • 1
  • …
  • 259
  • 260
  • 261
  • 262
  • 263
  • 264
  • 265
  • …
  • 587
  • Next

go to store

Promos

Paper Bouquet Kit

josee smuck

Josée Smuck

Stampin’ Up! Canada Demonstrator since 2002
Ottawa, ON, Canada
Contact me with questions!
Josee@StampingJo.com
(613) 831-2917

Current Catalogues

Annual Catalogue (May2024-April2025)Stampin' Up! Annual CatalogueView Catalogue-ENG | Shop Online
View Catalogue- FR

——————

Looking for something?

Get the news


Click HERE to download Jo-Jo’s FREE Sketches & Tips Guide

Updates

Receive NEXT-DAY updates by email:

Receive SAME DAY updates by subscribing in a reader:
Click to Subscribe in a reader

Recent Posts

  • Embrace the Journey April 11, 2025
  • For the Books April 8, 2025
  • Beautiful Birthday April 5, 2025
  • Happy Retirement April 2, 2025
  • Frame & Flowers March 28, 2025

Categories

Proud Member…

Inky_Divas800

The content of this blog is the sole responsibility of Josee Smuck as a Stampin’ Up! Independent Demonstrator.  The use of and content of classes, services or products offered is not endorsed by Stampin’ Up! Unless otherwise indicated, images © Stampin’ Up! 1990 – present.

© 2025 Hand Stamped Cards with Josee Smuck-Stampin' Up! Canada Demonstrator | Powered by Superbs Personal Blog theme