Skip to content

Hand Stamped Cards with Josee Smuck-Stampin' Up! Canada Demonstrator

Stampin' Up! Canada Demonstrator; Rubber Stamps & Supplies for Cardmaking & Scrapbooking in Stittsville, Ontario (near Ottawa)

Menu
  • Home
  • JO JO POINTS
  • **Join**
  • Monthly Craft Kit
  • Weekly News
  • Shop Now
  • Contact Me
Menu
Spooky Fun Halloween card

Spooky Fun Halloween Card

Posted on October 4, 2016October 3, 2016 by Josee

Good Morning! 

Another Halloween card for you today! I love how this one uses the Swirly Scribbles Thinlits along with the Spooky Fun stamp set and of course I love the spooky tree from the Halloween Scenes Edgelits Die too! 

Spooky Fun Halloween card

How To Make It: 

Score the Whisper White card base at 5 ½” and fold in half.

Ink up the solid witch from the Spooky Fun stamp set with Archival Basic Black ink, stamp onto the Halloween Night Specialty Designer Series Paper, and cover with Clear Embossing Powder. Tap off excess powder and set using the Heat Tool on high making sure to move the heat tool to the next area as the powder melts. ⇒NOTE: if you overheat the embossing powder, it will eventually melt into the paper and will not give you the shine and raised texture of the image. Let it cool.

Adhere the Halloween Night Specialty Designer Series Paper to the Basic Gray cardstock piece; and add to the front of the cardbase.

Die cut the tree from the Basic Black cardstock piece using the Halloween Scenes Edgelits Die. Make sure to position the die close to the top edge so that your ground level has some height. Only add liquid glue to the ground portion of the die and add to the bottom of the matted layer on the card. ⇒NOTE: Not adding glue to the tree allows for it to pop up on its own and reflect a “spooky” shadow effect.

Tie some Pumpkin Pie/Basic Black Baker’s Twine around the tree and finish with a bow.

Die cut a Swirly Scribbles Thinlit from the Pumpkin Pie Glimmer Paper and center it around the embossed witch; adhering with Multipurpose Liquid Glue.

Stamp the tombstones image from the Spooky Fun stamp set onto the Smokey Slate cardstock with Archival Basic Gray ink. Die cut with the coordinating framelit from the Halloween Scenes Edgelits Dies. Add to the tree with Stampin’ Dimensionals.

Stamp the sentiment with Archival Basic Gray ink onto a scrap piece of Pumpkin Pie. Use Paper Snips to cut the sentiment into blocks and position onto the card front with Stampin’ Dimensionals.

Measurements:

Whisper White – 4-1/4” x 11”

Basic Gray – 5-1/4” x 4”

Halloween Night Specialty Paper – 5-1/8” x 3-7/8”

Basic Black – 4-1/4” x 2-3/4”

Pumpkin Pie Glimmer Paper – 3” x 3-1/8”

Smokey Slate Cardstock – 1-5/8” x 1”

Pumpkin Pie Cardstock – scrap piece for words

Stamps: 

Spooky Fun (142236)

Paper: 

Whisper White (100730); Basic Black (121045), Basic Gray (121044), Pumpkin Pie (105117), Smokey Slate (131202), Halloween Night Specialty Designer Series Paper (142022), Pumpkin Pie Glimmer Paper (142029)

Ink:

Archival Basic Gray (140932), Archival Basic Black (140931)

Other: 

Swirly Scribbles Thinlits Dies (141497), Halloween Scenes Edgelits Dies (141842), Halloween Night Baker’s Twine (142027), Clear Stampin’ Emboss Powder (109130), Heat Tool (129053), Stampin’ Trimmer (126889); Big Shot (143263), Paper Snips (103579), Stampin’ Dimensionals (104430), Multipurpose Liquid Glue (110755)

Have a wonderful day! 


blog signature holiday

wcmd_shareable-2_oct0116_na

sharable1_b3g1dsp_naspuk    hostess code graphic-monthly


Read more

My Crafty Friends Monday: Santa’s Sleigh

Posted on October 3, 2016September 30, 2016 by Josee

Welcome to "My Crafty Friends Monday!" 

My Crafty Friends Monday-NEW-SMI hope you enjoyed a great weekend and got to make tons of cards on World Card Making Day!!! Each Monday, I like to feature different projects that have inspired me and I know they'll inspire you too!
 
Each project was created by different & amazingly talented stampers- make sure you check out their blogs for more details and to check out their other amazing projects!!
(**Note…don't worry- I've contacted each of these stampers and allowed them to decline if they choose.) 
 

This week's featured stamp set is Santa's Sleigh (142057) and we have to include the Santa's Sleigh Thinlits Dies (140278) because you wouldn't want one without the other!  

Bundle and Save! 143499

I also suggest if you get these dies (as with any of our intricate dies!) you may want to have the Precision Plate and Die Brush! You will be glad you got them for all your intricate dies- especially the Die Brush- what a sanity saver that one has turned out to be! If you have ever spent time trying to get your die cut papers out of the dies, you know exactly what I mean!


Amy Koenders: her blog

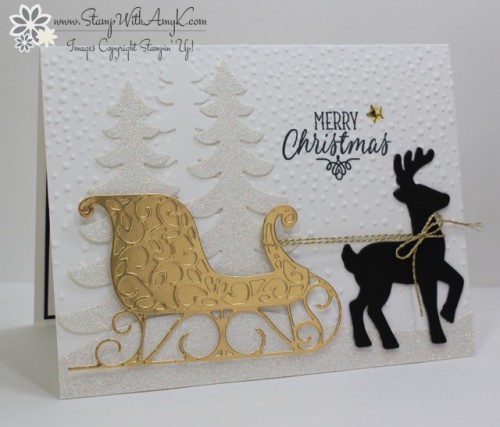
santas-sleigh-stamp-with-amy-k

Love the Gold Foil sleigh and the Glimmer Paper trees! Gorgeous!


Louise Sims: her blog

stampin-up-santas-sleigh-z-card-louise-sims

This Z fold card is perfect to display a fully reindeer led sleigh! The Santa's Sleigh Thinlits make cutting all those reindeer so easy!


Amanda Fowler: her blog

santas-sleigh-stampin-up-uk-inspiring-inkin-by-amanda-fowler

I love the simplicity of this card- Candy Cane Lane Designer Washi Tape and a Glimmer Paper reindeer die cut. So pretty!


Tracy Lawrence: her blog

santas-sleigh-by-tracy-lawrence

This is a wonderful idea to create some Christmas home decor! This would be perfect on my fireplace mantle 🙂 


Sharon Burkert: her blog

santas-sleigh-by-sharon-burkert

Another great version of the Z fold card– wonderful!


Kate Morgan: her blog

cards-by-kate-santas-sleigh-christmas-pines-woodland-diy-christmas-reindeer-holidaycatalogue2016-stampinup-cardsbykatemorgan2

Love the gold and red sleigh and the background using the Woodland Textured Impressions Embossing Folder is perfect!


Cindy Elam: her blog

santas-sleigh-by-cindy-elam

Love the colors on this card and the vintage feel! Notice the matching Delicate White Doilie? What a great idea to watercolor the dolies to match the card!


Love these ideas? You can purchase this stamp set through my ONLINE STORE! 

I hope you've enjoyed this week's "My Crafty Friends Monday" Make sure you visit the talented artist's featured on this post! Thanks for stopping by today!

Were you featured here? Here's a badge you can add to your blog!
My Crafty Friends Monday-featured-NEW-SM


blog signature holiday

wcmd_shareable-2_oct0116_nasharable10_b3g1dsp_na    hostess code graphic-monthly


Read more

Happy World Card Making Day!

Posted on October 1, 2016September 27, 2016 by Josee

Happy happy weekend! 

Happy World Card Making Day!

I don't usually post on the weekend, but I thought I would share these fun and easy templates with you in case you are making cards today on World Card Making Day! I can't think of a better excuse to carve some time into the day and get stamping! 

Do you remember the last time you received a card in the mail? In a sea of junk mail and bills, a card is a simple thing that really stands out to the person who receives it. Sending a card is a small gesture that shows just how much you care about that special someone in your life. With World Card Making Day today, celebrate by making and sending a handmade card to someone who could use a little recognition, love, or just a boost (which is anyone, really!).

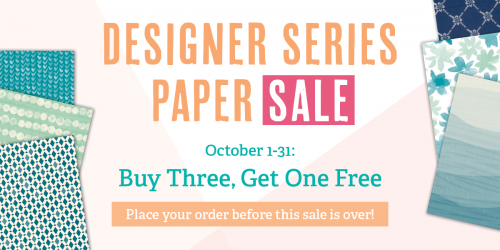
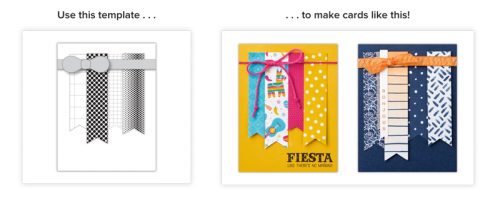
Check out these templates designed to maximize your Designer Series Papers (that you can stock up on during the sale!)

designer-paper-card-template-1-stampin-upUse as variety of paper strips and punch the ends with the Triple Banner Punch. Stamp a greeting and add ribbon for a quick, attractive card! 

designer-paper-card-template-2-stampin-upCreate a ‘window’ on your Designer Series Paper using framelits or punches, then layer an image or greeting underneath. Try this template with several papers from the same collection and get a different look every time.

designer-paper-card-template-3-stampin-upWhy throw away scraps when they’re this pretty? Instead, use them up on this great card design. Use designs from one paper collection, or mix and match for more possibilities.
For more card inspiration, check out my Facebook today, I will be sharing lots of card ideas to keep you stamping all day long! 

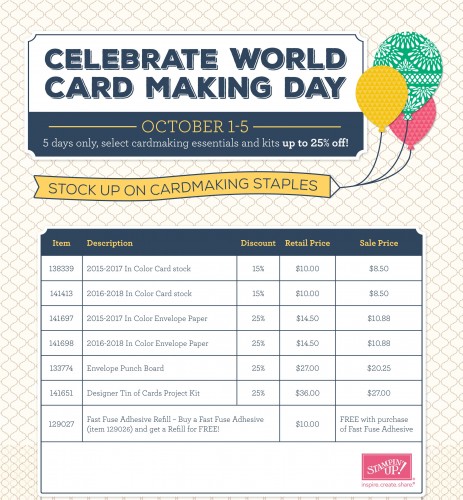
In celebration of World Card Making Day, from October 1-5, you can save up to 25% on cardmaking essentials that can be used to share your love all year long! 

wcmd_flyer_demo_oct0116_ca

And check out the Designer Series Papers that are on sale too!  Shop both sales here.

dsp-sale

I hope you enjoyed today's templates!! 

Enjoy the rest of your weekend! Happy Stamping!!! 

blog signature holiday


Read more
Halloween Scares and Spooky Fun, ombre card-Stampin Up

Ombre Halloween Scares Card

Posted on September 30, 2016September 27, 2016 by Josee

Happy Friday! 

Before I show you today's card, there is so much good stuff to tell you about, so I will get it out of the way first 🙂 But you'll be glad I did! Tomorrow is World Card Making Day! So, I do hope you get some time to stamp! Stampin' Up is celebrating by offering a SALE! wcmd_shareable-1_oct0116_na

This sale starts tomorrow, October 1st, so make sure you check back tomorrow for actual shopping. Plus, there is also a B3GO SALE on Designer Series Paper! sharable10_b3g1dsp_na

You can see full details of both these offers here. Or shop directly here starting tomorrow!

Thanks for bearing with me. Now, onto today's card….Well, this week on the blog was all about Halloween and Thanksgiving. If you missed any posts this week, make sure you check them out! You can see some gorgeous cards from Monday's Crafty Friends, this treat bag, this cute scarecrow card and this quick and easy card! 

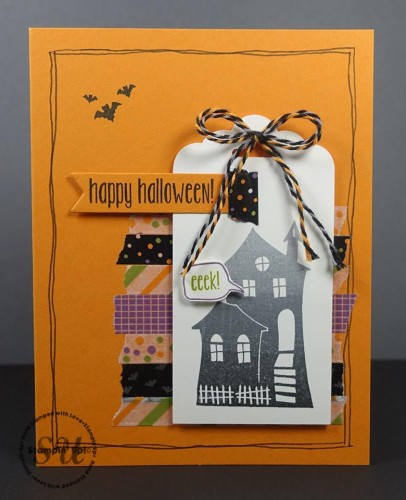
Now, I really love the simplicity of today's card because even though it seems simple it has a huge impact! Plus, using Washi Tape is actually a lot of fun- especially when you can use it to adhere the card layers- that is a bonus! 

Halloween Scares and Spooky Fun, ombre card-Stampin Up

How To Make It: 

Score the Pumpkin Pie card base at 4 ¼” and fold in half.

Grab your Basic Black Stampin’ Write Marker and draw a border around the card front leaving a ¼” border around each side. NOTE: You do not need to draw perfectly straight lines.

Using all 5 spools of Halloween Night Designer Washi Tape, add random lengths to the card base front.

Punch the 2” Whisper White cardstock piece using the Scalloped Tag Topper Punch.

Ink up the spooky house image from the Halloween Scares stamp set using the Black Ombre Stampin’ Pad and stamp onto the 2” Scalloped Tag. Add Stampin’ Dimensionals to the back and set in place on the Pumpkin Pie cardbase front.

Ink up the little word bubble image from the Halloween Scares stamp set using Perfect Plum ink and stamp onto a piece of Whisper White scrap cardstock.

Stamp the “eek” from the Spooky Fun stamp set onto the stamped word bubble using Old Olive ink. Hand cut the word bubble using Paper Snips. Add the word bubble with Stampin’ Dimensionals to the scalloped tag.

Stamp the sentiment “happy Halloween” from the Spooky Fun stamp set with Archival Basic Black ink onto the strip piece of Pumpkin Pie. Die cut using the Bunch of Banners Framelits Die and the Big Shot. Snip off the right portion of the banners and set in place with a piece of Halloween Night Designer Washi Tape.

Tie a bow using both colors of the Halloween Night Baker’s Twine, trim to desired length and add to the Whisper White tag using Multipurpose Liquid Glue.

Ink the smaller set of 3 bats from the Halloween Scares stamp set using Archival Basic Black ink and stamp onto the Pumpkin Pie card front.

Measurements:

• Pumpkin Pie Cardstock – 5-1/2” x 8-1/2” • Whisper White Cardstock – 2” x 4-1/8” • Whisper White Cardstock – scrap piece for word bubble • Pumpkin Pie Cardstock – 2-1/2” x ¾”scrap piece for words • Halloween Night Baker’s Twine – 8”

Stamps: 

Halloween Scares (142226 – Wood Mount; 142229 – Clear Mount); Spooky Fun (142236)

Paper: 

Whisper White (100730); Pumpkin Pie (105117)

Ink:

Black Ombre Stampin’ Pad (141850); Basic Black Archival Stampin’ Pad (140931), Perfect Plum (126963), Old Olive (126953)

Other: 

Scalloped Tag Topper (133324), Halloween Night Designer Washi Tape (142026), Halloween Night Baker’s Twine (142027), Basic Black Stampin’ Write Marker (100082), Bunch of Banners Framelits (141488), Stampin’ Trimmer (126889); Big Shot (143263), Paper Snips (103579), Stampin’ Dimensionals (104430), Multipurpose Liquid Glue (110755)

I hope you have an amazing weekend!


blog signature holiday    hostess code graphic-monthly


Read more
Halloween card using Jar of Haunts, Stampin Up

Jar of Haunts Quick and Easy Halloween Card

Posted on September 29, 2016September 27, 2016 by Josee

Good Morning! 

Guess what?! Stampin' Up has some sweet deals coming October 1st! Check them out here!

Today's card is inspired by the Designer Series Paper sale! It's a great way to make use of the patterned papers you will want to stock up on! wink What I love about this card is that right now it's a Halloween card using the Halloween Night Designer Series Papers and the Jar of Haunts stamp set, but with a switch of the Designer Series Papers to say the Warmth & Cheer Designer Series Paper Stack or the Presents & Pinecones Designer Series Papers and using the Jar of Cheer stamp set instead, you would get a Christmas card! So easy to switch things up when you use these patterned papers!

Halloween card using Jar of Haunts, Stampin Up

How To Make It: 

This card starts with a cardbase of Whisper White cardstock. Then add a layer of Halloween Night Designer Series Paper cut to 5-1/2” x 4-1/4” using SNAIL Adhesive.

Use the Project Life Corner Punch to round out the top right corner of both of the card layers.

Stamp the images from the Jar of Haunts stamp set onto Whisper White card stock– stamp the jar in Smokey Slate and the words and candy corn in Basic Black. Color in the candy corn images using the Pumpkin Pie and Daffodil Delight ink pads and a Blender Pen. Then cut out using the Everyday Jar Framelits and the Big Shot.

Cut a contrasting piece of Halloween Night Designer Series Paper using the Layering Circles Framelits. Then, adhere the circle cutout to the front of the card base using Stampin Dimensionals and add the jar cut out using Stampin' Dimensionals as well.

As a final touch, tie a bow with the Smoky Slate Ribbon and attach to the card front using a Glue Dot.

Stamps: 

Jar of Haunts #142247

Paper: 

Whisper White #100730, Halloween Night Designer Series Paper #142022

Ink:

Pumpkin Pie #1426945, Daffodil Delight #126944, Smokey Slate #131179, Basic Black #140931

Other: 

Smoky Slate Ribbon #141687, Blender Pens #102845, Big Shot 143263, Everday Jars Framelits #141490, Layering Circles Framelits #141705, Stampin Dimensionals #104430, Project Life Corner Punch #134346

I hope you enjoyed today's quick and easy card!


blog signature holiday    hostess code graphic-monthly


Read more

Posts pagination

  • Previous
  • 1
  • …
  • 231
  • 232
  • 233
  • 234
  • 235
  • 236
  • 237
  • …
  • 587
  • Next

go to store

Promos

Paper Bouquet Kit

josee smuck

Josée Smuck

Stampin’ Up! Canada Demonstrator since 2002
Ottawa, ON, Canada
Contact me with questions!
Josee@StampingJo.com
(613) 831-2917

Current Catalogues

Annual Catalogue (May2024-April2025)Stampin' Up! Annual CatalogueView Catalogue-ENG | Shop Online
View Catalogue- FR

——————

Looking for something?

Get the news


Click HERE to download Jo-Jo’s FREE Sketches & Tips Guide

Updates

Receive NEXT-DAY updates by email:

Receive SAME DAY updates by subscribing in a reader:
Click to Subscribe in a reader

Recent Posts

  • Embrace the Journey April 11, 2025
  • For the Books April 8, 2025
  • Beautiful Birthday April 5, 2025
  • Happy Retirement April 2, 2025
  • Frame & Flowers March 28, 2025

Categories

Proud Member…

Inky_Divas800

The content of this blog is the sole responsibility of Josee Smuck as a Stampin’ Up! Independent Demonstrator.  The use of and content of classes, services or products offered is not endorsed by Stampin’ Up! Unless otherwise indicated, images © Stampin’ Up! 1990 – present.

© 2025 Hand Stamped Cards with Josee Smuck-Stampin' Up! Canada Demonstrator | Powered by Superbs Personal Blog theme