Skip to content
Hand Stamped Cards with Josee Smuck-Stampin' Up! Canada Demonstrator
Menu
  • Home
  • JO JO POINTS
  • **Join**
  • Monthly Craft Kit
  • Weekly News
  • Shop Now
  • Contact Me
Menu

Category: Christmas Card Ideas

Yummy Little Christmas, stamped Christmas card, Stampin Up

Yummy Little Christmas Card

Posted on November 4, 2016November 1, 2016 by Josee

Hello! Happy Friday! 

After almost a full week of sneaking Halloween candies and chocolates, today's card reminds me of the baking that's coming next for the Christmas season! My waistline will not be thanking me that's for sure! Good thing I have a backup plan to help me stay on track 🙂 

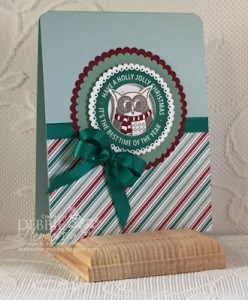
Today's card features the Yummy Little Christmas stamp set from the Stampin Up 2016 Holiday catalogue.  This stamp set actually coordinates with the 1" and 1 1/2" circle punches, the Layering Ovals Framelits Dies, the Layering Squares Framelits dies and the Cheerful Tags Framelits. I love when a stamp set coordinates with so many dies and punches- that means easy cutting! 

Yummy Little Christmas, stamped Christmas card, Stampin Up

How To Make It: 

Start with a cardbase of Shimmer White cardstock cut to 5 1/2” x 8 1/2” and scored at 4 1/4”.

Run the card front through the Big Shot using the Sparkle Embossing Folder. Fold the cardbase.

Use the Project Life Corner punch to round the right side corners as shown.

Stamp the mixer and whisks images from Yummy Little Christmas in Mint Macaron on a strip of Shimmer White cardstock. Cut out with the Layering Circles Framelits. (Use 1 5/8” plain edge for the mixer, 2 1/4” scallop edge for the whisks)

Stamp the greeting from Yummy Little Christmas on the Shimmer White cardstock strip and cut out with the 1 5/8” plain edge circle from the Layering Circles Framelits.

Cut out a 1 7/8" plain edge circle from the Blushing Bride Glimmer Paper.

Layer and adhere the cut circles to each other as shown using Fast Fuse Adhesive. Attach the greeting with a Stampin’ Dimensional.

Add Fast Fuse Adhesive to the back of the adhered layered circles and add the ribbon as shown to the back of the layered circles.

Adhere the whole set of layered elements to the card front with Stampin’ Dimensionals.

Stamps: 

Yummy Little Christmas (142128 w, 142131 c)

Paper: 

Shimmer White (101910)

Ink:

Mint Macaron (138326); Blushing Bride (131172)

Other: 

Blushing Bride Glimmer Paper (140550); Layering Circles Framelits (141705); Sparkle Embossing Folder (141468); 3/8” Ribbon Trio Pack (142021); Rhinestones (119246); Project Life Corner (135346) Stampin’ Dimensionals (104430)

I hope you have a wonderful weekend!


blog-signature-holidayshareableimage_3_na
    hostess code graphic-monthly


Read more
Stitched With Cheer, Cable Knit Embossing Folder, Stampin Up, stamped Christmas Card

Stitched With Cheer Christmas Card

Posted on November 3, 2016November 1, 2016 by Josee

Hello! 

Before I show you today's card- in case you missed the announcement- check out what's new and on SALE here! 

Now, today's card is pretty yet fairly simple card using the new Cable Knit Dynamic Textured Impressions Embossing Folder as well as the Stitched With Cheer stamp set. The Dynamic nature of the new embossing folder creates a deeper, dimensional impression on your paper. 

Stitched With Cheer, Cable Knit Embossing Folder, Stampin Up, stamped Christmas Card

How To Make It: 

Place the 5 ¼” x 4” piece of Very Vanilla in the Cable Knit Dynamic Textured Impressions Embossing Folder. Lay the folder directly on the platform, place ONE cutting pad on top and send it through the Big Shot – due to it’s thickness this Dynamic folder only needs ONE cutting pad, not two.

Punch out a Designer Label punch from Very Vanilla card stock.

Stamp the Holly Jolly greeting from the Stitched With Cheer stamp set on the Very Vanilla label with Cherry Cobbler ink.

Stamp the small holly leaf stamp on a scrap of Old Olive in Old Olive ink, and then punch it out. Repeat so that you have two holly leaves.

Stamp the berry stamp on a scrap of Cherry Cobbler in Cherry Cobbler ink. Punch it out.

Adhere the Cable Knit embossed piece to the card base.

Loop the Cherry Cobbler twine in a pile on the Cable Knit embossed piece. Secure it with Stampin' Dimensionals and attach the Holly Jolly Label on top of it.

Using Glue Dots, attach the holly leaves and berries to the label.

Stamps: 

Stitched With Cheer (142182)

Paper: 

Very Vanilla (101650), Old Olive (100702), Cherry Cobbler (119685)

Ink:

Cherry Cobbler (126966), Old Olive (126953)

Other: 

Designer Label Punch (120907), Holly Berry Builder Punch (141843), Big Shot Die-Cutting Machine (113439), Cable Knit Dynamic Embossing Folder (143537), Baker’s Twine Trio Pack – Cherry Cobbler (141999) , SNAIL Adhesive (104332), Glue Dot (103683), Dimensionals (104430), Bone Folder (102300)

I hope you have a stampin' good day! 


blog-signature-holidayshareableimage_3_na
    hostess code graphic-monthly


Read more
Cookie Cutter Christmas, santa, spinner card, Stampin Up

Cookie Cutter Christmas Santa Spinner Card

Posted on November 2, 2016November 1, 2016 by Josee

Good morning!

Today's card features the Cookie Cutter Christmas stamp set and coordinating Cookie Cutter Builder Punch to create this fun (& easy!) spinner card! Santa can be wound up before inserting into an envelope so that the card receiver opens it up to find Santa doing a little spin! Kids especially love these spinner cards!

Cookie Cutter Christmas, santa, spinner card, Stampin Up

How To Make It: 

Start with a cardbase of Real Red cardstock. Then cut a layer of Whisper White cardstock to fit on top. Do not adhere the layers yet.

Place the Real Red card base on the Big Shot cutting mat and then lay the Whisper White layer as they will be placed on your final card- you could use a small piece of washi tape and the Magnetic Platform to hold the layers together while you use the Big Shot and the Layering Squares Framelits to cut a scallop square from both layers at the same time (this will ensure the final cuts will fit together perfectly). Roll the sandwich through the Big Shot an extra time or two to ensure the die cuts through both layers of cardstock.  

Tip: Use a small piece of washi tape and the Magnetic Platform to hold paper layers together while die cutting.

Stamp the Santa from the Cookie Cutter Christmas stamp set twice using Basic Black Archival ink. Allow the ink to dry, then use an Aqua Painter filled with water to color both Santas with Real Red ink (from an ink pad lid or Stampin Write Marker as I've done here) and Basic Black ink (again use the ink pad or Stampin' Write marker). I used a Pink Pirouette Stampin' Write marker to color the santa's face to give him a bit of a flesh tone.

Once Santa is all colored, use the Clear Wink of Stella to add some glitter to all the white areas and then use the Gold Wink of Stella to color Santa's buckle.

Then take the two Santa punch outs and a strand of Gold Metallic Thread– add some Tear & Tape Adhesive to the back of one Santa, add the thread (about 2/3 of the way down the strand) and sandwich on the second Santa. You will have a two sided Santa on a string 🙂 

On the Whisper White layer, stamp the sentiment from the Greetings from Santa stamp set with Basic Black ink. 

Add more Tear & Tape Adhesive to the front of the card base, then lay the Gold Metallic Thread so that the Santa is lined up in the middle of the die cut square (as shown).

Tear & Tape adhesive on spinner card by StampingJo

Cut off any excess thread if it's hanging off the edge of the card. Now add the Whisper White layer to the taped up card front, very carefully lining up the die cut edges so that they are perfectly lined up.

To finish off the card, I decided to add an extra sentiment from the Greetings from Santa stamp set inside the card using Whisper White Stampin' Craft ink.  Alternatively you could add a layer of Whisper White inside the card and stamp a sentiment with Basic Black or just leave lots of room for handwriting your card- note however that adding the Whisper White inside the card will show on the cardfront too! 

inside the santa spinner card by StampingJo


Stamps: 

Cookie Cutter Christmas-142043, Greetings from Santa stamp set-143269 CM, 142069 wood

Paper: 

Real Red cardstock- 102482, Whisper White cardstock-100730

Ink:

Basic Black Archival Ink- 140931, Refill- 140928, Real Red Stampin’ Write Marker-141973 (Holiday catalogue marker duo), Basic Black Stampin Write marker- 100082, Pink Pirouette Stampin' Write marker- 131263 (Subtles Collection),Wink of Stella- Clear- 141897, Wink of Stella- Gold- 141898, Whisper White Craft Stampin' Ink- 101731 (Refill: 101780)

Other: 

Layering Squares Framelits- 141708, Aqua Painter- 103954, Cookie Cutter Builder Punch-140396, Metallic Gold Thread- 138401, Tear & Tape adhesive-138995, Magnetic Platform for Big Shot-130658

I hope you have a great day!


blog-signature-holidayshareableimage_3_na
    hostess code graphic-monthly


Read more

My Crafty Friends Monday: Holly Jolly Layers

Posted on October 31, 2016October 28, 2016 by Josee

Welcome to "My Crafty Friends Monday!" 

My Crafty Friends Monday-NEW-SMHappy Halloween! I hope you enjoyed a great weekend and are ready to trick or treat tonight for Halloween??? ?
 
Each Monday, I like to feature different projects that have inspired me and I know they'll inspire you too!
 
Each project was created by different & amazingly talented stampers- make sure you check out their blogs for more details and to check out their other amazing projects!!
(**Note…don't worry- I've contacted each of these stampers and allowed them to decline if they choose.) 
 

This week's featured stamp set is one of the Hostess stamp sets in the 2016 Stampin' Up Holiday Catalogue: Holly Jolly Layers (142220 wood, 142223 clear mount, also available in French-clear mount 143050).

holly-jolly-layers-stamp-set

It coordinates perfectly with the Layering Circles Framelits, Layering Ovals Framelits and the Layering Squares Framelits Dies– the framelits dies allow you to cut each stamped image into various layers to get the look you want. 

The hostess stamp sets are available to you with every order you place over $200 (before taxes and shipping) — you earn Stampin' Rewards you can use to purchase the hostess stamp sets and other Stampin' Up products! 


Debbie Naylor:  blogholly-jolly-by-deb-naylor

Wonderful card by Debbie-love how she used the little border stamp!


Jeanie Stark: blogHolly Jolly Layers, Stampin Up hostess stamp set

This stamp set is perfect to create Christmas gift tags! 


Teri Pocock: blogteri-pocock-holly-jolly-layers-1a

Love the colors and Delicate White Doilies used here- so pretty!


Yvonne Van Bruggen: blog
holly-jolly-by-yvonne-van-bruggen

Love all the layers on this one by Yvonne- the Metallic Foil Doilies, Seasonal Decorative Masks and Designer Series Papers are great additions to this card!


Amanda Bates: blogcandy-cane-lane-white-gift-box-by-amanda-at-the-cratf-spa-4

Love this Christmas gift box– so pretty!


BJ Peters: blogholly-jolly-by-bj-peters

A great gift card holder using the die cut layers on the Holly Jolly Layers stamp.


Nadine Koller: blogholly-jolly-layers-by-nadine-koller-christmas-800x539

Another gorgeous Christmas gift box and the layered stamp is perfect popped up with Stampin Dimensionals!


Debbie Henderson: blog

holly-jolly-layers-by-debbie-henderson

Love this one with the Cozy Critters owl in the center of all the wonderful layers! 


I found these by Stampin' Up and wanted to show you these great samples too!

holly-jolly-layers-by-stampin-upHolly Jolly Layers by Stampin Up


Love these ideas? You can purchase this stamp set through my ONLINE STORE! 

I hope you've enjoyed this week's "My Crafty Friends Monday" Make sure you visit the talented artist's featured on this post! Thanks for stopping by today!

Were you featured here? Here's a badge you can add to your blog!
My Crafty Friends Monday-featured-NEW-SM


blog signature holiday

>>>Today is the last day for this sale!! <<<
sharable8_b3g1dsp_naspuk    hostess code graphic-monthly


Read more
Santa buckle card using Layering Squares Framelits

Santa’s Belt Buckle Christmas Card

Posted on October 28, 2016October 27, 2016 by Josee

Happy Happy Friday! 

The card I have to show you today is a super simple, quick and easy Christmas card! All you need for this card is some Real Red and Basic Black cardstock, the Layering Squares Framelits and a sentiment of your choice- for this one I used the Greetings From Santa stamp set as I think it has the perfect sentiment to add to this card. 

Santa buckle card using Layering Squares Framelits

How To Make It: 

This card starts with a simple cardbase made of Real Red cardstock. Round the corners of the cardbase using the Project Life Corner punch. 

Cut a strip of Basic Black cardstock to fit across the cardfront and adhere with SNAIL Adhesive to the cardfront. 

Then use the Layering Squares Framelits to cut the 'buckle' from Silver Glimmer paper. Use the larger scalloped square as well as a small plain square to cut out the middle piece. Use the Magnetic Platform to keep the dies in place while you cut them.  Place over the Basic Black cardstock strip to use a guide to stamp the sentiment. 

Stamp the sentiment from the Greetings From Santa stamp set using Versamark ink and then pour White Stampin' Emboss Powder over the ink, shaking off the excess. Use the Heat Tool to melt the embossing powder. 

Finally, adhere the Glimmer Paper 'buckle' to the cardfront using the SNAIL Adhesive. 

Stamps: 

Greetings from Santa stamp set-143269 CM, 142069 wood

Paper: 

Real Red cardstock- 102482, Basic Black cardstock- , Silver Glimmer Paper-135314

Ink:

Versamark- 102283, Refill- 102193

Other: 

Layering Squares Framelits- 141708, SNAIL Adhesive- 104332, Refill- 104331, Heat Tool- 129053, White Embossing Powder- 109132, Project Life Corner punch- 135346, Magnetic Platform- 130658, Big Shot- 143263

Have a great weekend! 


blog signature holiday


sharable7_b3g1dsp_naspuk    hostess code graphic-monthly


Read more

Posts pagination

  • Previous
  • 1
  • …
  • 5
  • 6
  • 7
  • 8
  • 9
  • 10
  • 11
  • …
  • 14
  • Next

go to store