Skip to content

Hand Stamped Cards with Josee Smuck-Stampin' Up! Canada Demonstrator

Stampin' Up! Canada Demonstrator; Rubber Stamps & Supplies for Cardmaking & Scrapbooking in Stittsville, Ontario (near Ottawa)

Menu
  • Home
  • JO JO POINTS
  • **Join**
  • Monthly Craft Kit
  • Weekly News
  • Shop Now
  • Contact Me
Menu

Stampin’ Up! video: New colour collections

Posted on July 13, 2010July 12, 2010 by Josee

Join Carrie Cudney, one of Stampin' Up!'s amazing facilitators, as she discusses how to use Stampin' Up!'s exciting new colour collections from the 2010-2011 Idea Book & Catalogue.


Only 4 more days to register! Stamps, Inks, Accessories…oh my! I'm moving soon to Winnipeg and all my retired products need to find new homes!

Huge basket raffle, specials, great deals, etc! Don't miss it!    RSVP today! … READ MORE “Stampin’ Up! video: New colour collections”

Read more

Vintage Bitty Box

Posted on July 12, 2010July 12, 2010 by Josee

Wk July 12 SP 2

Vintage is definitely one of the hottest trends right now in stamping and scrapbooking, and this year's Idea Book and Catalog is packed full of amazing new vintage products. If you go to page 124 in the catalog, you can check out the Vintage Suite, which inspired this project, as it uses the Newsprint Designer Series Paper (117166), and the color combination of Basic Black, Cherry Cobbler and Very Vanilla.

This project also uses the new Perfect Punches (W117022/C120516) stamp set which is a definite must-have stamp set as all the greetings coordinate with different punches!

Step by Step Directions

For the Bitty Box:

  1. Using the Big Shot cut out a Bitty Box out of Basic Black Cardstock.
  2. Fold on all score lines, and add sticky strip to the last pieces of the side flaps, as these will fold in and hold your box together.
  3. Put aside the assembled box, and then punch out one scallop circle with the 2 3/8 Scallop Circle punch, and two scallop circles with the smaller Scallop Circle punch. Crumble your circles and then flatten them out.
  4. Take paper snips and cut into each scallop to create petals. Do this on all three scallop circle.
  5. Clear your area and then spray all three circles with a mixture of rubbing alcohol and Champagne Shimmer Paint. (Mix them together in a spray bottle from the Dollar Store.) Allow to dry.
  6. Punch out a ½ Circle out of Basic Black Cardstock. When circles are dry, layer them so the large scallop circle is on the bottom and the other two on top and adhere them all together using SNAIL. Attach basic black circle on top. Finish off by adding a Clear Rhinestone Brad. Curl up edges on flower to create dimension.
  7. Attach flower to box with Stampin' Dimensionals.Wk July 12 SP 3


    For the Bitty Card:

    1. Create card base by cutting a 2 x 4 piece of Cherry Cobbler Cardstock and folding it in half.
    2. Stamp "my friend" greeting in Cherry Cobbler Classic Ink on Very Vanilla Cardstock. Cut out with Curly Label Punch.
    3. Punch out small flower using the flower punch from Itty Bitty Shapes Punches. Attach to piece with greeting using SNAIL. Set small Clear Rhinestone Brad through centre of flower.
    4. Attach finished greeting/flower piece to card base with Stampin' Dimensionals.

    Stampin' Up Supply List

    • Stamps: Perfect Punches (W117022/C120516)
    • Ink: Cherry Cobbler Classic (119669)
    • Paper: Basic Black Cardstock (121045), Very Vanilla Cardstock (101650), Cherry Cobbler Cardstock (119685), Newsprint Designer Series Paper (117166)
    • Accessories: Clear Rhinestone Brads (113144), SNAIL (104332), Stampin' Dimensionals (104430)
    • Tools: Big Shot Die Cutting System (113439),Bitty Box & Envelope Die (115967), Paper Snips (103579) , Curly Label Punch (119851), 2 3/8 Scallop Circle Punch (118874), Scallop Circle Punch (119854), Itty Bitty Shapes Punches (118309), ½ Inch Circle Punch (119869)

    This size of box is perfect for four Hershey's nuggets, or any other small treat. It would also fit some special jewelery beautifully as well. The Big Shot makes projects like this a snap by doing the cutting and scoring for you! To order the Big Shot, Bitty Box & Envelope Die, or any of the items featured above, please visit my online store by clicking here.

      Don't forget to register for this Saturday's GARAGE SALE….tons of stamp sets, paper, ink, refills, ribbons and accessories to choose from! You don't want to miss it. RSVP today 

    Read more

    Tip of the Week: Get Organized Now for Scrapbooking Summer Memories

    Posted on July 10, 2010July 7, 2010 by Josee

    Photobucket

    During the summer, you are probably going to be looking for craft projects to keep your kids busy on the stinking hot (or rainy!) days. A great project for the beginning of July is to get organized so you can quickly and easily document summer memories as you go! Why not take the time to create a mini scrapbook with your kid(s) so they can add pictures and record memories this summer. Here's an easy one you can create using the Briefcase On Board Album and Island Oasis Designer Series Paper! Chipboard albums offer a low cost way to create a scrapbook with one or more kids!


    Read more

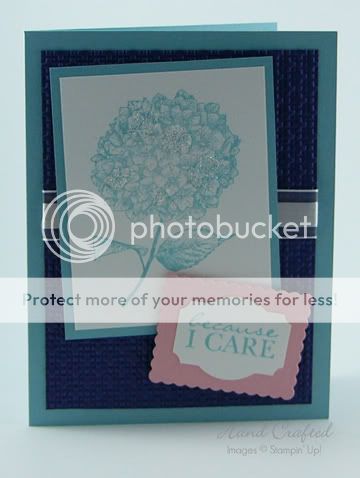
    Because I care…

    Posted on July 9, 2010July 7, 2010 by Josee

    Photobucket

    One of the best things about the new Idea Book & Catalogue are the hostess sets. There's 11 new sets as well as a package of 6×6 paper and a very cool card kit, all of which you can earn for free by hosting a workshop! Summer is the perfect time to hostess your party to take advantage of the excitement of all the new stamps, paper, ink and more in the catalog.

    The set used on this card is a Level 1 Hostess Set called Because I Care, which means it is only available to you if you host a Stampin' Up party OR you spend $200net! This card features two of the new In Colors, Concord Crush and Blushing Bride, as well as a returning In Color called Baja Breeze. Check out the Scalloped Rectangle – that's a new Clearlit for the Big Shot.

    Step by Step Directions

    1. Cut Baja Breeze card base to 8.5 x 5.5 and fold in half.
    2. Cut Concord Crush Cardstock to 3.75 x 5 inches and run through Big Shot using the Square Lattice Embossing Folder.
    3. Add Whisper White Organza Ribbon to embossed piece by tucking edges around the back, and attach to card base using SNAIL.
    4. Cut 3.5 x 2.75 piece of Whisper White Cardstock and stamp Hydrangea image in Baja Breeze Classic Ink.
    5. Cut 3.75 x 3 piece of Baja Breeze Cardstock and attach stamped image with SNAIL.
    6. Run a piece of Blushing Bride through Big Shot using Clearlit Scallop Rectangle.
    7. Stamp greeting in Baja Breeze on scrap of Whisper White cardstock; punch out with Designer Label punch and attach to scallop rectangle with SNAIL.
    8. Attach flower panel to cardbase with Stampin' Dimensionals. Layer greeting panel on top of flower panel using Stampin' Dimensionals (you may need to double them up on the bottom part).
    9. Take Two-Way Glue Pen and add randomly to flower image, sprinkle Dazzling Diamonds over top and tap off excess.

    Photobucket

    Stampin' Up Supply List

    • Stamps: Because I Care (Level 1 Hostess Set)
    • Ink: Baja Breeze Classic (105209)
    • Paper: Whisper White Cardstock (100730), Baja Breeze Cardstock (111352), Blushing Bride Cardstock (119796), Concord Crush Cardstock (119792)
    • Accessories: Whisper White Organza Ribbon (114319), Two-Way Glue Pen (100425), SNAIL (104332), Stampin' Dimensionals (104430), Dazzling Diamonds (102023)
    • Tools: Big Shot Die Cutting System (113439), Square Lattice Textured Impressions Embossing Folder (120175), Scallop Rectangle Clearlit (118872) Designer Label Punch (119862)

    To earn this lovely stamp set for yourself, contact me to schedule your workshop today. To order any of these new products, please visit my online store by clicking here.

    Don't forget about my JULY SPECIALS!

    Read more

    Technique Thursday: Embossed Wood Sheets

    Posted on July 8, 2010July 8, 2010 by Josee

    Photobucket

    Stampin' Up Supply List

    • Stamps: Perfect Punches (W117022/C120516)
    • Ink: Concord Crush Classic (119785)
    • Paper: Very Vanilla Cardstock (101650), Concord Crush Cardstock(119792)
    • Accessories: Basic Pearls (119247), Pretty in Pink 5/8 Satin Ribbon (117289), SNAIL (104332), Stampin' Dimensionals (104430), Wood Sheets (116309)
    • Tools: Big Shot Die Cutting System (113439), Top Note Bigz Die (113463), Vintage Wallpaper Textured Impressions Embossing Folder (120175), Scallop Oval Punch (119856), Wide Oval Punch (119859)

    Cardstock Dimensions for this Project

    • Concord Crush
      • Card Base: 8.5 x 5.5
      • Scrap for large oval punch
    • Very Vanilla
      • Scrap for stamped and punched greeting

    Technique Directions

    1. Cut a Top Note using the Big Shot out of a Wood Sheet.
    2. Take the Top Note and run it back through the Big Shot using the Vintage Wallpaper Textured Impressions Embossing Folder.

    Photobucket

    Finishing Touches

    1. Stamp greeting in Concord Crush Classic Ink on Very Vanilla and punch out with Scallop Oval Punch.
    2. Punch out piece of Concord Crush Cardstock with Wide Oval. Attach punched piece with greeting using SNAIL.
    3. Attach small piece of Pretty in Pink ribbon to Top Note using SNAIL, layer punched greeting overtop using Stampin' Dimensionals.
    4. Add three basic pearls as shown.
    5. Attach completed Top Note to cardbase with Stampin' Dimensionals.

    Just another great example of why everyone needs a Big Shot, so you can create WOW cards that look so much more complicated than they actually are. To purchase a Big Shot, or any of the supplies used in this project, please visit my online store.

    Read more

    Posts pagination

    • Previous
    • 1
    • …
    • 478
    • 479
    • 480
    • 481
    • 482
    • 483
    • 484
    • …
    • 587
    • Next

    go to store

    Promos

    Paper Bouquet Kit

    josee smuck

    Josée Smuck

    Stampin’ Up! Canada Demonstrator since 2002
    Ottawa, ON, Canada
    Contact me with questions!
    Josee@StampingJo.com
    (613) 831-2917

    Current Catalogues

    Annual Catalogue (May2024-April2025)Stampin' Up! Annual CatalogueView Catalogue-ENG | Shop Online
    View Catalogue- FR

    ——————

    Looking for something?

    Get the news


    Click HERE to download Jo-Jo’s FREE Sketches & Tips Guide

    Updates

    Receive NEXT-DAY updates by email:

    Receive SAME DAY updates by subscribing in a reader:
    Click to Subscribe in a reader

    Recent Posts

    • Embrace the Journey April 11, 2025
    • For the Books April 8, 2025
    • Beautiful Birthday April 5, 2025
    • Happy Retirement April 2, 2025
    • Frame & Flowers March 28, 2025

    Categories

    Proud Member…

    Inky_Divas800

    The content of this blog is the sole responsibility of Josee Smuck as a Stampin’ Up! Independent Demonstrator.  The use of and content of classes, services or products offered is not endorsed by Stampin’ Up! Unless otherwise indicated, images © Stampin’ Up! 1990 – present.

    © 2025 Hand Stamped Cards with Josee Smuck-Stampin' Up! Canada Demonstrator | Powered by Superbs Personal Blog theme