Skip to content

Hand Stamped Cards with Josee Smuck-Stampin' Up! Canada Demonstrator

Stampin' Up! Canada Demonstrator; Rubber Stamps & Supplies for Cardmaking & Scrapbooking in Stittsville, Ontario (near Ottawa)

Menu
  • Home
  • JO JO POINTS
  • **Join**
  • Monthly Craft Kit
  • Weekly News
  • Shop Now
  • Contact Me
Menu

Love You Sew

Posted on April 5, 2016April 4, 2016 by Josee

Good Morning! 

Today's card featured one of the Hostess Stamp sets available to you when you host a workshop or place an order over $200!  Love You Sew is only one of the stamp sets you can choose from. 

iloveyou sew

How to Make It: 

•    Place Crumb Cake piece and DSP piece in center of the Envelope Punch Board, punch on both sides.  Layer the smaller 'spool' onto the larger 'spool', adhere.
•    Cut 13" of Thick Baker's Twine.  Start from back of spool, wrap 4 times and tie in back.  Add Dimensionals to the top and bottom of the back of the spool, adhere to card.  Tie knot in the end of the yarn.
•    Stamp saying in Bermuda Bay ink, punch out with the scallop punch and adhere to the card.

Measurements:  
•      Whisper White base card: 5 1/2" x 8 1/2" scored at 4 1/4" 
•      DSP layer:  4" x 5 1/4"
•      Designer Series Paper, flip side:  1 1/4" x 1 3/4", cut two
•     Crumb Cake: 1 1/2" x 2", cut two
 

Supplies: 
•    Stamp Set – Love You Sew, Host set (141012)
•    Card Stock – Whisper White (#100730), Crumb Cake (#120953)
•    Designer Series Paper Stack – Love Blossoms (#140548)
•    Stamp Pad – Bermuda Bay (131171
•    Misc. – Envelope Punch Board (#133774), Bermuda Bay Thick Baker's Twine (#138413), Very Vanilla Thick Baker's Twine (#1388411), 1 3/4" Scallop Punch (#119854), Dimensionals (#104430)

Thanks for coming by the blog today! Have yourself a great day! Don't forget to check out what's NEW in this week's Weekly Deals!!
 

shop online new

     signature


     April Hostess Code to use:  DBBZ2AUS

jojopoints blog post footer

Read more

My Crafty Friends Monday: Rose Wonder

Posted on April 4, 2016April 3, 2016 by Josee

Welcome to "My Crafty Friends Monday!" 

2016 Occasions Catalogue

My Crafty Friends Monday-NEW-SMI hope you enjoyed a great weekend! Each Monday, I like to feature different projects that have inspired me and I know they'll inspire you too!
 
Each project was created by different & amazingly talented stampers- make sure you check out their blogs for more details and to check out their other amazing projects!!
(**Note…don't worry- I've contacted each of these stampers and allowed them to decline if they choose.) 
 

This week's featured stamp set is 'Rose Wonder' (140697)- a simply gorgeous stamp set with matching coordinated Rose Garden Thinlits (140619)! Bundle and SAVE! (140804) 

Use the Precision Plate (139684) and the handy Big Shot Die Brush (140603) to help get perfect die cuts! 


Hannah Wilks- her blog

rose-wonder-wedding-wishes-2

Love the tone on tone look- so gorgeous as a wedding card!


Genna Gifford: her blog

rose garden by genna gifford

I love the bright colors and the mix of die cuts- so pretty!


Carol Payne: her blog

rose garden by carol payne

I just love this stained glass look- amazing!


Sara Levin: her blog

rose wonder by Sara Levin

Love the watercolor look- beautiful!


Jan Farring: her blog

rose wonder by Jan farring

I love the way Jan used the different die cuts and the color combo is so very pretty! 


Check out the samples I created with this stamp set too!  Sympathy card and this No Layer Card


Love these ideas? You can purchase this stamp set through my ONLINE STORE! 

I hope you've enjoyed this week's "My Crafty Friends Monday" Make sure you visit the talented artist's featured on this post! Thanks for stopping by today!

Were you featured here? Here's a badge you can add to your blog is you choose!
My Crafty Friends Monday-featured-NEW-SM

    shop online new  

     signature

   April Hostess Code to use: DBBZ2AUS  

jojopoints blog post footer

Read more

World of Dreams Sunset Card

Posted on April 1, 2016March 31, 2016 by Josee

Hello! Happy Friday!

I've got a gorgeous card to share with you today! 

World of Dreams, Sheltering Tree, sunset background, hand stamped, hand-made card

How to Make It: 
1.    Cut and score your Crumb Cake card base.
2.    Adhere Basic Black layer to card base with dimensionsals
3.    Using your circle punch – punch out a circle from your post-it note – ensure that when you punch it’s at the tacky side.
4.    Position punched out circle to the right of half way. Using your sponges and inks sponge in a circular motion around your post-it circle gradually increasing the colour. Start with Saffron, then curry, then pumpkin then Cajun.  Go back over with the lighter colours for a smooth look. 
5.    When happy remove your post it and light sponge So Saffron to soften the ‘sun’.  
6.    Stamp your silhouette stamp in Jet Black Stazon on the left hand side with it slightly overlapping the sun. Then on the right just do a couple of the branch ends – this gives you card continuation or the illusion of a treeline. Stamp sentiment of choice at the bottom in Jet Black Stazon – this  sentiment is from the Sheltering Tree Stamp Set
7.    Adhere this layer to card using Dimensionals. 

Supplies Used:
•    Stamp Sets: World of Dreams #134186 clear-mount, 134183 wood mount, Sheltering Tree #137163
•    Inks: Jet Black Stazon #101406, So Saffron #126957, Pumpkin Pie #126945, Cajun Craze #126965, Crushed Curry #131173
•    Paper: Crumb Cake #121685 , Basic Black #121688, Shimmery White #121717
•    Other: 1 ¼” Circle Punch #119861, Post It Notes, Stampin Sponges #101610, Stampin Dimensionals #104430

Measurements: 
Crumb Cake –  (4 1/8” x 8 ¼”)
Basic Black –  (3 7/8” x 3 7/8”)
Shimmery White –  (3 5/8” x 3 5/8”)

Thanks for stopping by! Have a wonderful weekend!
 

    shop online new  

     signature


     April Hostess Code to use:  DBBZ2AUS

jojopoints blog post footer

Read more

Faux Dry Embossing & Last day of Sale-A-Bration!

Posted on March 31, 2016March 31, 2016 by Josee

Hello! 

This is it. It's the last day of SALE-A-BRATION! I can't believe it's over 🙁 but as they say, all good things must come to an end! So make sure you get your orders placed by end of today to get your Sale-A-Bration freebies!

Today's card is fun and super easy Faux Dry technique and actually doesn't use any stamps! 

faux dry embossing

How To Make It:

1.    Take Real Red card stock and punch out 7 large stars and 7 small stars with the Medium Star and Itty Bitty Star punch. 
2.    Run remaining Real Red through Big Shot using the Mini Thinlit Bag die – ‘For You’ sentiment. Repeat this step so you have 2 ‘For you’ sentiments. 
3.    Adhere these 2 ‘For You’ sentiments on top of each other using the 2-Way Glue Pen. Then adhere the sentiment onto the Real Red card front in the bottom right hand side. 
4.    Adhere all the Real Red stars onto the Real Red card front using 2-Way Glue Pen. Adhere stars in a random order. Some stars will overlap the edge of the card front. Trim any overhanging stars. 
5.    Adhere Real Red card front onto the Whisper White Card Stock. 
6.    Adhere the Real Red & Whisper White layers to another Real Red mat layer.  Then place a good covering of Stampin’ Dimensionals to the back of this now 3 layered card front and mount on the Real Red card base.

Supplies: 
•    Card Stock – Real Red cardstock #106578, Whisper White cardstock #106549 
•    Tools & Misc. – Medium Start Punch  #138293, Itty Bitty Accents Punch Pack (star) #133787, Mini Treat Bag Thinlits (‘For you’ sentiment) #137547, Big Shot Die-Cutting Machine #113439, 2-Way Glue Pen #100425, Stampin’ Dimensionals #104430.
 

Thanks for stopping by the blog today! Don't forget to get your final Sale-A-Bration orders in today! Have a great day!

saleabration freebies shop online new  

     signature


     March Hostess Code to use:  DBBZ2AUS

jojopoints blog post footer

Read more

Timeless Textures and Perfect Pairings- A Perfect Pair

Posted on March 30, 2016March 29, 2016 by Josee

———Tomorrow is the last day to get your Sale-A-Bration orders in!! ———

Good day!

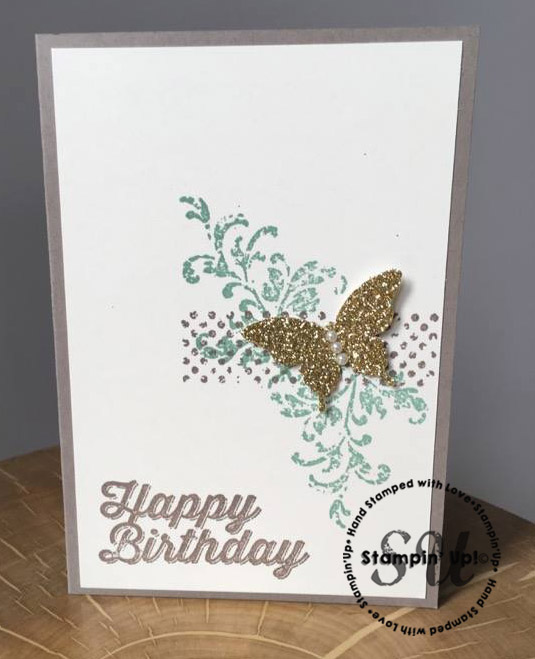
Today's card features a great set from the Sale-A-Bration brochure- Perfect Pairings, as well as one of my personal favorites from the Occasions Catalogue- Timeless Textures. Along with the gold buttefly punch out, they make a gorgeous birthday card!

Timeless Textures, Perfect Pairings, hand stamped, hand made, birthday card, stampin up, butterfly

How to Make It:

1.    Stamp the sentiment in Tip Top Taupe in the bottom left hand corner, this will help with placement of the other stamping.
2.    Stamp the 2 flourishes one facing up and the other down in Mint Macaron ink as shown.
3.    Over stamp the flourishes using the dots with Tip Top Taupe ink.
4.    Punch out a butterfly from the Gold Glimmer paper.
5.    Scratch a little of the glitter off the centre of the butterfly and adhere the pearls.
6.    Adhere the butterfly to the front layer and assemble the card as shown.
 

Supplies: 

•    Stamp Sets – Timeless Textures 140514 wood, 140517 clear mount and Perfect Pairings (SAB) 141258 wood, 141261 clear mount
•    Paper –Tip Top Taupe-138336,Very Vanilla-101650, Gold Glimmer Paper -133719
•    Ink– Tip Top Taupe 138325, Mint Macaron 138326
•    Other –Elegant Butterfly Punch 127526, Pearls Basics- 119247

Measurements:  

•    Tip Top Taupe card base: 5 ¾ ” x 8”, then score in half
•    Very Vanilla Front and inside layer 5 ½” x 3 ¾”
•    Gold Glimmer Paper scraps for punching

Thanks for stopping by today! Have a great day!

saleabration freebies shop online new  

     signature


     March Hostess Code to use:  7VWRHYUG

jojopoints blog post footer

Read more

Posts pagination

  • Previous
  • 1
  • …
  • 257
  • 258
  • 259
  • 260
  • 261
  • 262
  • 263
  • …
  • 587
  • Next

go to store

Promos

Paper Bouquet Kit

josee smuck

Josée Smuck

Stampin’ Up! Canada Demonstrator since 2002
Ottawa, ON, Canada
Contact me with questions!
Josee@StampingJo.com
(613) 831-2917

Current Catalogues

Annual Catalogue (May2024-April2025)Stampin' Up! Annual CatalogueView Catalogue-ENG | Shop Online
View Catalogue- FR

——————

Looking for something?

Get the news


Click HERE to download Jo-Jo’s FREE Sketches & Tips Guide

Updates

Receive NEXT-DAY updates by email:

Receive SAME DAY updates by subscribing in a reader:
Click to Subscribe in a reader

Recent Posts

  • Embrace the Journey April 11, 2025
  • For the Books April 8, 2025
  • Beautiful Birthday April 5, 2025
  • Happy Retirement April 2, 2025
  • Frame & Flowers March 28, 2025

Categories

Proud Member…

Inky_Divas800

The content of this blog is the sole responsibility of Josee Smuck as a Stampin’ Up! Independent Demonstrator.  The use of and content of classes, services or products offered is not endorsed by Stampin’ Up! Unless otherwise indicated, images © Stampin’ Up! 1990 – present.

© 2025 Hand Stamped Cards with Josee Smuck-Stampin' Up! Canada Demonstrator | Powered by Superbs Personal Blog theme