Skip to content

Hand Stamped Cards with Josee Smuck-Stampin' Up! Canada Demonstrator

Stampin' Up! Canada Demonstrator; Rubber Stamps & Supplies for Cardmaking & Scrapbooking in Stittsville, Ontario (near Ottawa)

Menu
  • Home
  • JO JO POINTS
  • **Join**
  • Monthly Craft Kit
  • Weekly News
  • Shop Now
  • Contact Me
Menu

Moroccan Nights Ombre Thank You

Posted on June 22, 2016June 21, 2016 by Josee

Good Morning!

Today's card features another NEW stamp set- Moroccan Nights. This stamp set is part of the Moroccan Suite on page 66 of the Annual Catalogue which includes Moroccan Designer Washi Tape and Moroccan Designer Series Paper, as well as the Moroccan Cardstock pack. This stamp set and full suite lends itself to some really gorgeous cards! 

Moroccan Lantern


How To Make It: 

Stamp the Lanterns from Moroccan Nights and Thank You from One Big Meaning in Black archival ink on Very Vanilla cardstock and allow it to dry.

Sponge Crushed Curry ink starting inside the lanterns (will be the darkest) out across the card stock (lighter as it moves away from the lanterns) using Sponge Daubers.

Start at the top edge sponging Cajun Craze (will be the darkest) moving to blend with the lighter Crushed Curry color

Start at the bottom edge of the card stock sponging Dapper Denim ink and getting lighter as you move up the card. Leave room for the Emerald Envy and blend from the Dapper Denim side (darkest) into the Crushed Curry above (lighter).

Splatter water from your Aqua Painter onto the ombre background. Allow the water to sit for 15-25 seconds and blot excess water off. Let it dry.

Stamp the star from Moroccan Nights around the lanterns with Crushed Curry ink.

Layer and assemble card with the Designer Series Paper, as shown.

Stamps: 

Moroccan Nights (w-141715, c-141718); One Big Meaning (w-138788, c-139420)

Paper: 

Emerald Envy (141415); Dapper Denim (141414); Very Vanilla (101650)

Ink:

Basic Black Archival (140931), Crushed Curry (131173), Cajun Craze (126965), Dapper Denim (141394), Emerald Envy (141396)

Other: 

Moroccan Designer Series Paper (DSP) (141645); Sponge Daubers (133773); Aqua Painters (103954)

Thanks for stopping by the blog today! Have a great day!   su blog signature


    hostess code graphic

jojopoints blog post footer

Read more

You’re Sublime Shaker Card

Posted on June 21, 2016June 21, 2016 by Josee

Hello! 

In case you missed it in the new Annual Catalogue, Stampin' Up now carries Foam Adhesive Strips and the Layering Squares Framelits that make making shaker cards super easy!! I LOVE easy!

You're Sublime Shaker Card by StampingJo


How To Make It: 

First I made the cardbase from Flirty Flamingo and embossed it with the Softly Falling Textured Impressions Embossing Folder.  

Then, I die cut the scallop squares from Peekaboo Peach cardstock using the new Layering Squares Framelits. I cut the Vellum cardstock square to fit just inside the square 'window'. 

On the Vellum cardstock, I used the Black Stazon to stamp the little wheel barrow from You're Sublime. While that dried, I used the Tree Builder punch to punch out several small flowers from Flirty Flamingo, Emerald Envy and Peekaboo Peach cardstock. 

The Vellum square was adhered to the Peekaboo Peach frame and then the shaker card was assembled by adding the Foam Adhesive strips around the frame piece. Add the punched flowers to the scallop square base, then add the frame piece. 

Before adding the shaker frame to the card base, tie some Silver Metallic Thread around it several times. Then I used some Tear & Tape Adhesive to make sure the shaker frame stays on! 

Some of the punched flowers were added the stamped image with some Glue Dots and some details were added with a black Project Life Journalling Pen. Some of the stamped flowers were colored in with the Gold Wink of Stella.

As a final touch, the banner frame and the sentiment from Thoughtful Banners were stamped on Whisper White using Basic Black and Emerald Envy ink. Then it was punched with the Duet Banner punch and adhered to the front. 

Stamps: 

You’re Sublime-138732 wood, 139309 clear-mount;  Thoughtful Banners-141614 photopolymer;

Paper: 

Vellum Cardstock-101856, Whisper White-100730, Emerald Envy-141415, Flirty Flamingo-141416, Peekabook Peach-141417

Ink:

Black Stazon- 101406, Emerald Envy- 141396, Memento Tuxedo Black- 132708, Refill-133456, Project Life Journalling Pens- 135304

Other: 

Gold Wink of Stella-141898 , Softly Falling TIEF-139672, Layering Squares Framelits- 141708, Silver Metallic Thread-138402, Tree Builder Punch-138295, Duet Banner punch -141483; Foam Adhesive Strips-141825, Tear & Tape Adhesive- 138995, Mini Glue Dots- 103683

I hope you enjoyed today's card! Have a wonderful day!
su blog signature


    hostess code graphic

jojopoints blog post footer

Read more

My Crafty Friends Monday: Foxy Friends

Posted on June 20, 2016June 21, 2016 by Josee

Welcome to "My Crafty Friends Monday!" 

NEW! 2016-2017 Annual Catalogue Edition

My Crafty Friends Monday-NEW-SMI hope you enjoyed a great weekend! Each Monday, I like to feature different projects that have inspired me and I know they'll inspire you too!
 
Each project was created by different & amazingly talented stampers- make sure you check out their blogs for more details and to check out their other amazing projects!!
(**Note…don't worry- I've contacted each of these stampers and allowed them to decline if they choose.) 
 

This week's featured stamp set is Foxy Friends (142326) and coordinates with the Fox Builder Punch (141470) and Perfect Pines Framelits Dies (139665)

Bundle and SAVE! Foxy Friends and Fox Builder Punch Bundle: 142326


Julie Japes: her blog

Foxy Friends Baby 1

I Just the the peekaboo window on this one and the colors are just perfect!


Amy Koenders: her blog

foxy friends by Amy K

I love how Amy used the little mushrooms fromt this stamp set to create a fun card that actually doesn't use the coordinating punch! 


Rosanne Mulhern: her blog

Foxy Friends by Rosanne Mulhern Watermarked-Photo-1-2016-06-05-2003

Love this as a kid's card with the Large Numbers Framelits! So cute!


Shelly Johnson: her blog

foxy friends by Shelly Johnson

This card is perfect using the coordinating A Little Foxy Designer Series Paper! So cute!!


Brigitte Keiling: her blog

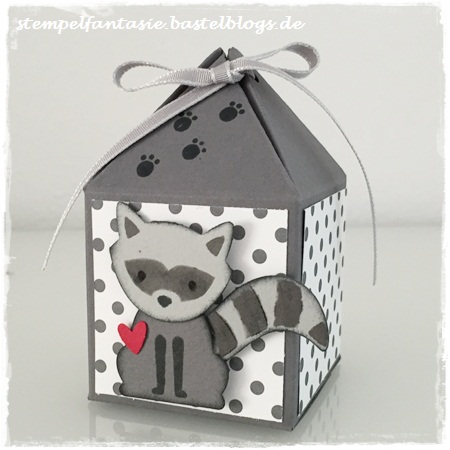
Stampin-Up_Box-mit-Pyramidendeckel_Pretty-Petal-Box_Foxy-Friends_Waschbaer_Fuchs-Elementstanze_Punkte_Kinder_Stempelfantasie

Not only do I love this racoon, but I love it on the packaging! 


Holly Stene: her blog

foxy friends by holly stene

This is stinkin' cute! Love this cat made with the Foxy Friends bundle and paired with the Weather Together Bundle! 


Brenda L. : her blog

foxy friends by Brenda L

Although this isn't a card, I love how Brenda was totalling thinking outside the 'fox' on these human versions of the Fox Builder Punch! I can't wait to see the cards made with these! 


You can also check out the video showcasing how you can use the Foxy Friends stamp set and Fox Builder punch for great results!


Love these ideas? You can purchase this stamp set through my ONLINE STORE! 

I hope you've enjoyed this week's "My Crafty Friends Monday" Make sure you visit the talented artist's featured on this post! Thanks for stopping by today!

Were you featured here? Here's a badge you can add to your blog!
My Crafty Friends Monday-featured-NEW-SM


su blog signature


    hostess code graphic

jojopoints blog post footer

Read more

NEW In Color Rose Garden Thinlits and Layering Love Card Set

Posted on June 17, 2016June 13, 2016 by Josee

Happy Friday!! 

I thought it would be fun to create a set of cards using all the NEW 2016-2018 In Colors. I wanted it to be quick and easy though, so I chose to use the Rose Garden Thinlits to cut out one rose from each of the new colors and then use a different sentiment from Layering Love to make each card a little different. 

Rose Garden & Layering Love In Color cards by StampingJo

How To Make It: 

I started by cutting one card base from each of the NEW In Colors: Emerald Envy, Peekaboo Peach, Sweet Sugarplum, Flirty Flamingo and Dapper Denim. 

Then I cut five Whisper White layers to fit each card base. 

With the Big Shot set up and ready to go, I started cutting all my roses from the Rose Garden Thinlits and cut one of each color.  I then used the Fine Tip Glue Pen to glue them all to the Whisper White layer. 

I allowed those to dry for a few minutes, then with each color I chose a different sentiment from Layering Love and fit the sentiment as needed, stamping some as portrait orientation and some as landscape. 

Then, each card got a few final touches- I used some Rhinestones and Pearls on some of the cards, used Clear Wink of Stella on others and I even used the Fine Tip Glue pen to add details to one of the cards. That one needed longer to dry of course!

Stamps: 

Layering Love- 141962 wood, 141965 clear-mount

Paper: 

Whisper White- 100730 , Peekaboo Peach-141417, Dapper Denim-141414 , Flirty Flamingo- 141416, Sweet Sugarplum-141418 , Emerald Envy-141415

Ink:

Peekaboo Peach-141417, Dapper Denim- 141394, Flirty Flamingo-141397 , Sweet Sugarplum-141395 , Emerald Envy- 141396

Other: 

Big Shot- 143263, Rose Garden Thinlits-140619 , Rhinestones Basic Jewels -119246, Pearls Basics Jewels-119247 , Wink of Stella Clear-141897, Fine Tip Glue Pen-138309

Thanks for stopping by the blog today! I hope you have a great weekend!!     su blog signature


    hostess code graphic

jojopoints blog post footer

Read more

Birthday Banners Birthday Card

Posted on June 16, 2016June 13, 2016 by Josee

Hello! 

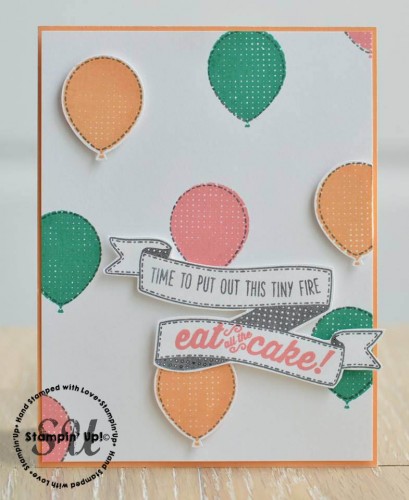
I've got another look at some of the NEW products from the new 2016-2017 Annual Catalogue! Today's card features the Birthday Banners stamp set, with the NEW coordinating Bunch of Banners Framelits Dies and Balloon Bouquet Punch. I just love when stamp sets have so many coordinating dies and punches! 

Birthday Banners, Stampin Up

How To Make It: 

1. Stamp the balloon from Birthday Banners in three colors randomly on the Whisper White layer- here we used Emerald Envy, Peekaboo Peach and Flirty Flamingo. Stamp three additional balloons with Peekaboo Peach on a scrap Whisper White sheet.

2. Stamp the Basic Black balloon outlines on all the balloons.

3. Stamp the banner and words from Birthday Banners on a scrap of Whisper White.

4. Use the Magnetic Platform on the Big Shot to cut out the the banner using the Bunch of Banners Framelits. Then punch the balloons using the Balloon Bouquet Punch.

5. Attach the Whisper White panel to the card base using SNAIL Adhesive.

6. Attach the punched out balloons and die cut banner with Stampin' Dimensionals.

Stamps: 

Birthday Banners Stamp Set #141506

Paper: 

Whisper White #100730, Peakaboo Peach #141417

Ink:

Emerald Envy #141415, Peekaboo Peach #141417, Flirty Flamingo #141397, Basic Black #121045

Other: 

Bunch of Banners Framelits #141488, Big Shot #143263, Balloon Bouquet Punch #140609, Stampin Dimensionals #104430, Snail Adhesive #104332, Magnetic Platform #130658

Thanks for stopping by!     su blog signature


    hostess code graphic

jojopoints blog post footer

Read more

Posts pagination

  • Previous
  • 1
  • …
  • 246
  • 247
  • 248
  • 249
  • 250
  • 251
  • 252
  • …
  • 587
  • Next

go to store

Promos

Paper Bouquet Kit

josee smuck

Josée Smuck

Stampin’ Up! Canada Demonstrator since 2002
Ottawa, ON, Canada
Contact me with questions!
Josee@StampingJo.com
(613) 831-2917

Current Catalogues

Annual Catalogue (May2024-April2025)Stampin' Up! Annual CatalogueView Catalogue-ENG | Shop Online
View Catalogue- FR

——————

Looking for something?

Get the news


Click HERE to download Jo-Jo’s FREE Sketches & Tips Guide

Updates

Receive NEXT-DAY updates by email:

Receive SAME DAY updates by subscribing in a reader:
Click to Subscribe in a reader

Recent Posts

  • Embrace the Journey April 11, 2025
  • For the Books April 8, 2025
  • Beautiful Birthday April 5, 2025
  • Happy Retirement April 2, 2025
  • Frame & Flowers March 28, 2025

Categories

Proud Member…

Inky_Divas800

The content of this blog is the sole responsibility of Josee Smuck as a Stampin’ Up! Independent Demonstrator.  The use of and content of classes, services or products offered is not endorsed by Stampin’ Up! Unless otherwise indicated, images © Stampin’ Up! 1990 – present.

© 2025 Hand Stamped Cards with Josee Smuck-Stampin' Up! Canada Demonstrator | Powered by Superbs Personal Blog theme