Skip to content

Hand Stamped Cards with Josee Smuck-Stampin' Up! Canada Demonstrator

Stampin' Up! Canada Demonstrator; Rubber Stamps & Supplies for Cardmaking & Scrapbooking in Stittsville, Ontario (near Ottawa)

Menu
  • Home
  • JO JO POINTS
  • **Join**
  • Monthly Craft Kit
  • Weekly News
  • Shop Now
  • Contact Me
Menu

You’re Sublime Camper

Posted on July 6, 2016July 6, 2016 by Josee

Hello! 

I must totally have summer on the brain this week, as you will see that all the cards on the blog this week are summer themed 🙂 What can I say, it was a long winter and now that summer is finally here I LOVE IT!! 😉

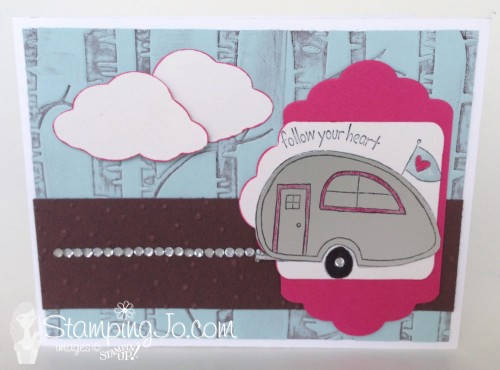
Do you get out camping? It's been a little while for us, but something I would love to do again with the family! Today's card using the camper from You're Sublime, reminds me of those good times at the lake. 

You're Sublime camper by StampingJo

How To Make It: 

Cut and score the Whisper White Thick card base

Ink up the raised side of the Woodland Textured Impressions Embossing Folder with Chocolate Chip ink and run the Soft Sky piece in it through the Big Shot

Stamp the trailer image from You're Sublime with Black Stazon on Shimmer White cardstock and again on a Silver Foil sheet

Cut out the Silver Foil with Paper Snips following the shape of just the trailer

Color the window trim on the Foil sheet using the Melon Mambo marker, then heat set with the Heat Tool

Cut the stamped Shimmer White sheet with the Tags & Labels Die making sure the flag and sentiment do not get cut off

Use the Stampin’ Write markers to color the flag and tire on the Shimmer white stamped image and add a Rhinestone to the center of the tire

You're Sublime happy camper by StampingJo

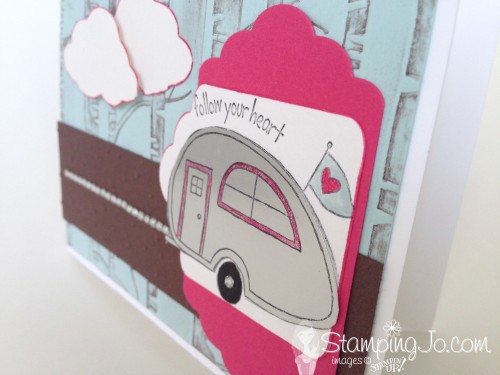
Adhere the silver trailer cut out to the Shimmery stamped die cut

Put the Melon Mambo strip through only the top of the Tags & Labels die and run through the Big Shot making sure not to cut the whole strip; repeat on the other end to die cut each end of the strip

Run the Chocolate Chip strip through the Softly Falling Textured Impressions Embossing Folder and adhere to the Soft Sky layer

Add the Melon Mambo die cut and the trailer layer

Punch two ‘clouds’ from Shimmer White cardstock using the Tree Builder punch, ink the edges with the Melon Mambo marker and adhere to the card front, one with SNAIL and the other with a couple of Stampin’ Dimensionals

Add a strip of Rhinestones Basics Jewels to finish it off

Stamps: 

You’re Sublime: 138732 wood, 139309 clear-mount

Paper: 

Whisper White Thick-140272 ,Shimmery White-101910, Soft Sky-131203 , Melon Mambo-115320 , Chocolate Chip- 102128, Silver Foil Sheet-132178

Ink:

Stazon Black-101406 , Chocolate Chip- 126979, Stampin’ Write Markers: Basic Black-100082 , Melon Mambo-131259(Brights Collection) , Soft Sky- 131263 (Subtles Collection)

Other: 

Softly Falling TIEF- 139672, Woodland TIEF-139673 , Tags & Labels Framelits Dies-138282, Rhinestones Basics Jewels-119247 , Tree Builder Punch-138295 , Heat Tool- 129053, SNAIL Adhesive- 104332, Refill- 104331, Stampin’ Dimensionals-104430, Paper Snips- 103579

Make sure you stop by tomorrow for an awesome special offer for July!!  Have a great day! 
su blog signature


    hostess code graphic

jojopoints blog post footer

Read more

Picture Perfect at the beach

Posted on July 5, 2016July 4, 2016 by Josee

Hello!

I hope everyone enjoyed a great long weekend. We've had a great start to summer! We got a 'little' rain on Canada Day (aka: it poured!!) but it was some much needed rain and didn't damper the spirits of those celebrating! All in all, a great start to the summer! 

Today's card just screams summer, the beach, holidays and just relaxing time! The Picture Perfect stamp set is the perfect stamp set for summer!

Picture Perfect starfish on beach


How To Make It: 

1. Score the Crumb Cake card base at 4 1/4" and fold.

2. Use the tiny splatter stamp from Gorgeous Grunge and stamp the Soft Sky background and the Soft Sky & Marina Mist cardstock strips using both Soft Sky and Marina Mist ink.

3. Run the Soft Sky background thru the Big Shot with the Seaside Embossing Folder.

4. Run both the Soft Sky & Marina Mist strips thru the Big Shot using the border thinlit from Swirly Scribbles.

5. Roughly tear the top off the Crumb Cake strip and then use the tiny splatter stamp with Crumb Cake ink and stamp this strip.

6. Glue the Crumb Cake strip onto the Soft Sky background and then glue the swirly borders above that with the Marina Mist in the middle & the Soft Sky slightly covering the Crumb Cake. Trim the edges of the swirly strips and then glue the Soft Sky background to the Basic Black mat and glue this onto the card base.

7. Rub Embossing Buddy over both the Crumb Cake square and the Basic Black strip.

8. Use Versamark and stamp the starfish onto Crumb Cake square, sprinkle with Clear Embossing Powder and use the Heat Tool to emboss.

9. Use Versamark on the Thinking of You sentiment from the Sheltering Tree stamp set and stamp on the Basic Black strip, sprinkle with White Embossing Powder and use the Heat Tool to emboss. Use the Banner Triple Punch to trim the end of the strip.

10. Attach both of the above items with Stampin’ Dimensionals.

11. Add Gold Sequins to finish.

Stamps: 

Picture Perfect (140520); Gorgeous Grunge (130517); Sheltering Tree (137163)

Paper: 

Crumb Cake (120953); Basic Black (121045); Soft Sky (131203); Marina Mist (119682)

Ink:

Crumb Cake (126975); Soft Sky (131181); Marina Mist (126962); Versamark (102283)

Other: 

Banner Triple Punch (138292), Swirly Scribbles Thinlits (141497); Seaside Embossing Folder (141481); Gold Sequin Trim (132983); Clear Embossing Powder (109130); White Embossing Powder (109132); Embossing Buddy (103083); Heat Tool (129053); Stampin’ Dimensionals (104430); SNAIL adhesive (104332); Big Shot (143263)

Thanks for stopping by the blog today!  su blog signature


    hostess code graphic

jojopoints blog post footer

Read more

My Crafty Friends Monday: Bella and Friends & Pretty Kitty

Posted on July 4, 2016June 30, 2016 by Josee

Happy-4th-july-heart-with-fireworks

For my U.S friends — Happy Independence Day! 


Welcome to "My Crafty Friends Monday!" 

NEW! 2016-2017 Annual Catalogue Edition

My Crafty Friends Monday-NEW-SMI hope you enjoyed a great weekend! Each Monday, I like to feature different projects that have inspired me and I know they'll inspire you too!
 
Each project was created by different & amazingly talented stampers- make sure you check out their blogs for more details and to check out their other amazing projects!!
(**Note…don't worry- I've contacted each of these stampers and allowed them to decline if they choose.) 
 

This week's featured stamp set is Bella and Friends (141867 wood, 141870 clear mount) AND because they are so cute together Pretty Kitty (141861 wood, 141864 clear mount).


Juan Ambida: her blog

pretty_kitty_3-Juana Create

This Pretty Kitty card is gorgeous with all the white space and all the lovely details!


Wendy Cranford: her blog

bellabdaycard1-1024x669-wendy cranford

Wendy combined both stamp sets perfectly and her coloring is wonderful! She even used the little gift stamps from the new Weather Together stamp set!


Connie Babbert: her blog

Pretty-Kitty by Connie Babbert

I just love the colors and the coloring on this one! 


Maria Willis: her blog

pretty kitty by Maria Willis

I love all the details on this one- just gorgeous!


Cindy Ellam: her blog

Bella & Friends 001-Cindy Ellam

The colors on this one are perfect for today! So cute!


Kristine Lutrario: her blog

Bella and Friends- Kristine

These cards using the new Layering Circles Framelits are perfect!! I just love that color combo too!


Love these ideas? You can purchase this stamp set through my ONLINE STORE! 

I hope you've enjoyed this week's "My Crafty Friends Monday" Make sure you visit the talented artist's featured on this post! Thanks for stopping by today!

Were you featured here? Here's a badge you can add to your blog!
My Crafty Friends Monday-featured-NEW-SM


su blog signature


     hostess code graphic

jojopoints blog post footer

Read more

Detailed Floral Thinlit Card

Posted on July 1, 2016June 30, 2016 by Josee

Happy Canada Day by StampingJo

Happy Canada Day! to my Canadian friends! 

We are off to some Canada Day festivities today, so this post will be quick, with a quick and super easy card! The Detailed Floral Thinlits make this card super easy and quick to make a gorgeous card. 

Detailed Floral Thinlits


How To Make It: 

Start with a Whisper White card stock base.

Place the smaller Detailed Floral Thinlit at the top of the right side of the Whisper White card stock and run it through the Big Shot. Repeat this step at the bottom. Use the Die Brush to remove all the pieces.

Stamp the sentiment in the center of the card with Archival Black Ink.

Carefully add Tombow Multi glue to the inside of the card base and adhere the Melon Mambo piece to the inside.

With the Bone Folder, tap the edge of the Wink of Stella brush (Gold and Clear) to add a spatter to the front of the card.

Finish by adding Rhinestones to the card. How's that for quick and easy?!

Stamps: 

Birthday Blossoms (139471)

Paper: 

Whisper White (100730); Melon Mambo (115320)

Ink:

Archival Basic Black (140931)

Other: 

Big Shot (143263);Detailed Floral Thinlit Die (141482); Jewels Basic Rhinestones (119246); Tombow Multi Glue (110755); Clear Wink of Stella (141897); Gold Wink of Stella (141898); Bone Folder (102300), Big Shot Platform (142802), Die Brush (140603)

Have a wonderful weekend! Hopefully it's a long weekend for you!
su blog signature


hostess code graphic    jojopoints blog post footer

Read more

Layering Love and Timeless Textures Masculine Card

Posted on June 30, 2016June 27, 2016 by Josee

Hello! 

Today's card uses the new Stampin' Up In Colors, as well as the new Layering Love stamp set to add a bit of a masculine touch to the Timeless Textures stamp set.

Timeless Textures and Layering Love by Stamping Jo

How To Make It: 

I started this card with a simple Dapper Denim cardbase and a layer of Whisper White on top.

On the Whisper White layer, I stamped the designs from the Timeless Textures stamp set in Dapper Denim, Emerald Envy and Peekaboo Peach.

Timeless Textures and Layering Love and BYOB by StampingJo

The sentiment from Layering Love was stamped on a scrap of Whisper White cardstock and die cut with the Tags & Labels Framelits, and a layer of Dapper Denim was also cut to mat the sentiment.

The heart from the B.Y.O.P. stamp set was then stamped with Flirty Flamingo. 

Before the sentiment was adhered with Stampin' Dimensionals, some Silver Metallic Thread was added to the card front and then the sentiment was adhered on top of that to keep it in place.

Stamps: 

Layering Love (for sentiment)-141962 wood mount, 141965 clear-mount; Timeless Textures-140514 wood-mount, 140517 clear mount; B.Y.O.P (for the heart)-137159

Paper: 

Dapper Denim-141414, Whisper White cardstock- 100730

Ink:

Flirty Flamingo-141397, Dapper Denim-141394, Emerald Envy-141396, Peekaboo Peach-141398

Other: 

Silver Metallic Thread- 138402, Tags and Labels Framelits- 138282, SNAIL Adhesive- 104332, Refill- 104331, Stampin’ Dimensionals- 104430

Thanks for stopping by the blog today!  su blog signature


    hostess code graphic

jojopoints blog post footer

Read more

Posts pagination

  • Previous
  • 1
  • …
  • 244
  • 245
  • 246
  • 247
  • 248
  • 249
  • 250
  • …
  • 587
  • Next

go to store

Promos

Paper Bouquet Kit

josee smuck

Josée Smuck

Stampin’ Up! Canada Demonstrator since 2002
Ottawa, ON, Canada
Contact me with questions!
Josee@StampingJo.com
(613) 831-2917

Current Catalogues

Annual Catalogue (May2024-April2025)Stampin' Up! Annual CatalogueView Catalogue-ENG | Shop Online
View Catalogue- FR

——————

Looking for something?

Get the news


Click HERE to download Jo-Jo’s FREE Sketches & Tips Guide

Updates

Receive NEXT-DAY updates by email:

Receive SAME DAY updates by subscribing in a reader:
Click to Subscribe in a reader

Recent Posts

  • Embrace the Journey April 11, 2025
  • For the Books April 8, 2025
  • Beautiful Birthday April 5, 2025
  • Happy Retirement April 2, 2025
  • Frame & Flowers March 28, 2025

Categories

Proud Member…

Inky_Divas800

The content of this blog is the sole responsibility of Josee Smuck as a Stampin’ Up! Independent Demonstrator.  The use of and content of classes, services or products offered is not endorsed by Stampin’ Up! Unless otherwise indicated, images © Stampin’ Up! 1990 – present.

© 2025 Hand Stamped Cards with Josee Smuck-Stampin' Up! Canada Demonstrator | Powered by Superbs Personal Blog theme