Skip to content

Hand Stamped Cards with Josee Smuck-Stampin' Up! Canada Demonstrator

Stampin' Up! Canada Demonstrator; Rubber Stamps & Supplies for Cardmaking & Scrapbooking in Stittsville, Ontario (near Ottawa)

Menu
  • Home
  • JO JO POINTS
  • **Join**
  • Monthly Craft Kit
  • Weekly News
  • Shop Now
  • Contact Me
Menu

Happy Birthday To You

Posted on June 21, 2017June 19, 2017 by Josee

Today's card is a stamped birthday card using the Happy Birthday Gorgeous stamp set from Stampin' Up's NEW 2017-2018 Annual Catalogue.

Happy Birthday card using Happy Birthday Gorgeous stamp set, Stampin Up

How To Make This Hand Stamped Birthday Card:

This stamped birthday card starts with a cardbase made of Daffodil Delight cardstock. On a layer of Whisper White cardstock, I started stamping the flowers from the Happy Birthday Gorgeous stamp set, using Daffodil Delight ink and Peekaboo Peach ink for the solid stamped flowers, and Peekaboo Peach ink and Calypso Coral ink for the flower outlines.

On a strip of Whisper White cardstock, the 'Happy Birthday', the line and the 'To You' from the Happy Birthday Gorgeous stamp set were stamped with Basic Black ink.

The tip fo the Whisper White greeting piece was punched with the Banner Triple Punch. A strip of Peekaboo Peach cardstock was cut to mat the greeting layer and the end punched with the same punch and adhered together with SNAIL Adhesive.

A piece of Daffodil Delight 1/4" Double Stitched Ribbon was tied to the greeting strip and adhered to the cardfront.

As a final touch, some of the new Gold Faceted Gems were added to give the card some bling!

Stampin' Up Stamps:

Happy Birthday Gorgeous stamp set

Stampin' Up Paper:

Daffodil Delight cardstock, Whisper White cardstock, Peekaboo Peach cardstock

Stampin' Up Ink:

Basic Black, Daffodil Delight Stampin' Pad, Peekabook Peach Stampin' Pad, Calypso Coral Stampin' Pad

Other Stampin' Up Supplies and Tools:

Banner Triple Punch, Gold Faceted Gems, Daffodil Delight 1/4" Double Stitched Ribbon, SNAIL Adhesive

Thanks for stopping by today to check out the hand stamped birthday card using the new Happy Birthday Gorgeous stamp set!


QUICK LINKS: 

NEW! 2017-2018 ANNUAL CATALOGUE– Download the PDF version or check out the new products in store

NEW! MEMORIES AND MORE and PLANNER KIT product line- check them out here!

CLEARANCE RACK– Save up to 60% —NEW products added!!

JO JO POINTS– Earn free stamps with my Jo Jo Points Program    

NEW to STAMPIN' UP? Check out my tips here.

Read more

For A Great Friend Card

Posted on June 20, 2017June 19, 2017 by Josee

Today's card is a fun, stamped friendship card using the Lovely Inside and Out stamp set from Stampin' Up's NEW 2017-2018 Annual Catalogue. I LOVE the color combination on this card!

Lovely Inside and Out, Stampin Up 

How To Make This Hand Stamped Card:

First, I started this card with a base of Thick Whisper White cardstock. Then, I used Lemon Lime Twist ink to stamp the circle design and Berry Burst ink to stamp the sprinkles- both from the Lovely Inside and Out stamp set.

Next, I took a strip of Berry Burst cardstock and ran it through the Big Shot in the Oh My Stars Textured Impressions Embossing Folder. Before adhering this piece to the card base with SNAIL Adhesive, I tied some Lemon Lime Twist 1/2" Finely Woven Ribbon to it.

The 'friend' die from the Lovely Words Thinlits and the larger oval die from the Stitched Shape Framelits were used together to die cut the Whisper White cardstock. An oval was then die cut from Lemon Lime Twist cardstock using the Layering Ovals Framelits. A Fine Tip Glue Pen was used to glue the 'friend' die cut to the Lemon Lime Twist oval and both were added to the cardfront with Stampin' Dimensionals.

Lastly, the 'For a great' stamp from the Lovely Inside and Out stamp set was stamped with Berry Burst ink on a piece of Whisper White and then punched out with the Classic Label punch. (Which is totally becoming a classic punch for me!) This was added to the cardfront using some Mini Stampin' Dimensionals!

Stampin' Up Stamps:

Lovely Inside and Out stamp set

Stampin' Up Paper:

Thick Whisper White cardstock, Berry Burst cardstock, Lemon Lime Twist cardstock

Stampin' Up Ink:

Berry Burst ink, Lemon Lime Twist ink

Other Stampin' Up Supplies and Tools:

Lovely Words Thinlits, Stitched Shape Framelits, Layering Ovals Framelits, Oh My Stars Textured Impressions Embossing Folder, Big Shot, Lemon Lime Twist 1/2" Finely Woven Ribbon, Classic Label Punch, Stampin Dimensionals, Mini Stampin' Dimensionals, SNAIL Adhesive, Fine Tip Glue Pen

I hope you enjoyed today's card as much as I enjoyed putting it together! Thanks for stopping by!


QUICK LINKS: 

NEW! 2017-2018 ANNUAL CATALOGUE– Download the PDF version or check out the new products in store

NEW! MEMORIES AND MORE and PLANNER KIT product line- check them out here!

CLEARANCE RACK– Save up to 60% —NEW products added!!

JO JO POINTS– Earn free stamps with my Jo Jo Points Program    

NEW to STAMPIN' UP? Check out my tips here.

Read more

Cards That Move: You Move Me stamp set

Posted on June 19, 2017June 19, 2017 by Josee

There are so many amazing new products in Stampin' Up's NEW 2017-2018 Annual Catalogue. Today I want to show you the You Move Me Bundle- which includes the You Move Me stamp set and Move Me Thinlits Dies.  This bundle is a pretty darn creative way to make cards that move and I think the recipients of these cards are really going to love playing with their cards!!

You Move Me stamp set, cards that move

Since the images flutter when you take them out of their envelope you have to watch the magic in action!

Some tips to use the You Move Me bundle to create cards that move:

  • ⇒Use two colors of ink that complement each other
  • ⇒If using only one color 'stamp off' one of the images to get a lighter image
  • ⇒Stamp the darker image first, then the lighter image
  • ⇒Line the striped images up by aligning the heads of the images
  • ⇒There are some solid images included in the You Move Me stamp set to get more variety out of this stamp set
  • ⇒Use the Precision Plate to easily cut the detailed window die cut
  • ⇒Place Washi Tape or post-it notes to hold the die in place
  • ⇒The Mini Treat Bag Thinlits are perfect to create a pocket card
  • ⇒The half circle die in the Move Me Thinlits dies is to create a notch at the top of the envelope
  • ⇒Add a postcard or folded card inside the pocket card
  • ⇒For a different look, add the holographic image behind the card front of a standard card with a pull out piece instead of creating a pocket

I can see myself having a lot of fun making cards that move with the You Move Me bundle- but even better, I can see my friends and family having more fun watching these cards move!


QUICK LINKS: 

NEW! 2017-2018 ANNUAL CATALOGUE– Download the PDF version or check out the new products in store

NEW! MEMORIES AND MORE and PLANNER KIT product line- check them out here!

CLEARANCE RACK– Save up to 60% —NEW products added!!

JO JO POINTS– Earn free stamps with my Jo Jo Points Program    

NEW to STAMPIN' UP? Check out my tips here.

Read more
Happy Birthday Gorgeous, stamped birthday card

Stamped Birthday Card: Hooray It’s Your Day

Posted on June 16, 2017June 13, 2017 by Josee

Today's card is a simple, hand stamped birthday card using the Happy Birthday Gorgeous stamp set from Stampin' Up's NEW 2017-2018 Annual Catalogue. This new stamp set coordinates with the Balloon Bouquet Punch which I also used to create this card.

Happy Birthday Gorgeous, Stampin Up, hand stamped birthday card

How To Make This Hand Stamped Birthday Card:

First, I started this card with a base of Thick Whisper White cardstock– one of my favorites to use because it is such a sturdy cardbase.

Then, I add a few strips of the Fresh Florals Designer Series Paper– in Berry Burst and Lemon Lime Twist. These papers decided the color theme for this card- love these two colors together!

Next, with the Stitched Shape Framelits, I cut the larger square out of Berry Burst cardstock and then cut a mat square out of Whisper White cardstock using the next size in the Layering Squares Framelits.  Both were adhered to the cardfront with SNAIL Adhesive.

Happy Birthday Gorgeous, stamped birthday card

Making the card focal point

The next step was to make the balloons. The balloon stamps from the Happy Birthday Gorgeous stamp set were stamped using Lemon Lime Twist and Berry Burst ink and then punched out using the Balloon Bouquet Punch. The balloon punchouts were turned over and some SNAIL Adhesive was added to the backs of each balloon, then a string of Silver Metallic Thread was added to hang down like a balloon string. The two Lemon Lime Twist balloons were adhered using more SNAIL Adhesive and the 'Hooray' balloon was added using Stampin' Dimensionals to give it more focus than the other balloons.

Then, the balloon strings were gathered together and the Lemon Lime Twist In Color Bitty Bow was added over top to tie them together.

Finally, the greeting from the Happy Birthday Gorgeous stamp set was stamped with Berry Burst ink on the cardfront.

Stampin' Up Stamps:

Happy Birthday Gorgeous stamp set

Stampin' Up Paper:

Thick Whisper White cardstock, Fresh Florals Designer Series Paper, Whisper White cardstock, Berry Burst cardstock

Stampin' Up Ink:

Berry Burst Stampin Pad, Lemon Lime Twist Stampin Pad

Other Stampin' Up Supplies and Tools:

Layering Squares Framelits, Stitched Shape Framelits, Balloon Bouqet Punch, 2017-2019 In Color Bitty Bows, Silver Metallic Thread, Stampin' Dimensionals, SNAIL Adhesive

I hope today's card gives you some inspiration to get stamping and create some hand stamped birthday cards!


QUICK LINKS: 

NEW! 2017-2018 ANNUAL CATALOGUE– Download the PDF version or check out the new products in store

NEW! MEMORIES AND MORE and PLANNER KIT product line- check them out here!

CLEARANCE RACK– Save up to 60% —NEW products added!!

JO JO POINTS– Earn free stamps with my Jo Jo Points Program    

NEW to STAMPIN' UP? Check out my tips here.

Read more
Lovely Words thinlits, Stampin Up

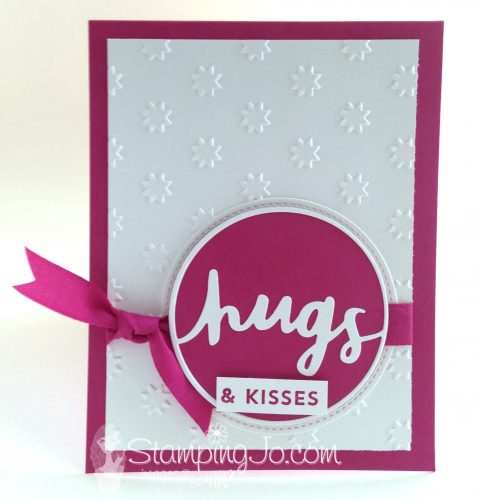
Hugs & Kisses Big Shot Card

Posted on June 15, 2017June 19, 2017 by Josee

I am back with another hand stamped card using the Lovely Inside and Out stamp set and the must have coordinating Lovely Words Thinlits from Stampin' Up's NEW 2017-2018 Annual Catalogue.

Lovely Words thinlits, Stampin Up

How To Make This Big Shot Card:

First, this card starts with some Berry Burst cardstock to create the cardbase.

Then, a layer of Whisper White cardstock was run through the Big Shot in the Oh My Stars Textured Impressions Embossing Folder.  Set this aside for now while you die cut a large circle from Whisper White cardstock and the Stitched Shape Framelits. Adhere this circle to the Whisper White layer and then add a single strip of Berry Burst 1/2" Finely Woven Ribbon adhering it to the back of the Whisper White layer. Now adhere these to the cardfront. Add another little strip of Berry Burst 1/2" Finely Woven Ribbon to tie onto the front of the ribbon so it looks like like the ribbon has been tied around the card.

Out of Whisper White cardstock, die cut the 'Hugs' Lovely Words Thinlit, add the next size circle die from the Layering Circles Framelits to full cut out the die cut. See my tip here about this. With the same circle die, die cut a circle from Berry Burst cardstock. Use the Fine Tip Glue Pen to adhere the Hugs die cut to the Berry Burst circle. Now, add some Stampin' Dimensionals to the back of this die cut group and adhere it to the Whisper White die cut circle already on the card front.

Lastly, stamp the '& Kisses' stamp from the Lovely Inside and Out stamp set and use Paper Snips to cut around the words to create a little rectangle. Add this to the die cut circle layers using a few Stampin' Dimensionals.

Stampin' Up Stamps:

Lovely Inside and Out stamp set

Stampin' Up Paper:

Berry Burst cardstock, Whisper White cardstock

Stampin' Up Ink:

Berry Burst Stampin' Pad

Other Stampin' Up Supplies and Tools:

Stitched Shape Framelits, Lovely Words Thinlits, Big Shot, Layering Circles Framelits, Oh My Stars Textured Impressions Embossing Folder, Berry Burst 1/2" Finely Woven Ribbon, Stampin' Dimensionals, SNAIL Adhesive, Fine Tip Glue Pen, Paper Snips

Thanks for stopping by the blog today! Now, get your Big Shot out and get cardmaking! 😉


QUICK LINKS: 

NEW! 2017-2018 ANNUAL CATALOGUE– Download the PDF version or check out the new products in store

NEW! MEMORIES AND MORE and PLANNER KIT product line- check them out here!

CLEARANCE RACK– Save up to 60% —NEW products added!!

JO JO POINTS– Earn free stamps with my Jo Jo Points Program    

NEW to STAMPIN' UP? Check out my tips here.

Read more

Posts pagination

  • Previous
  • 1
  • …
  • 194
  • 195
  • 196
  • 197
  • 198
  • 199
  • 200
  • …
  • 587
  • Next

go to store

Promos

Paper Bouquet Kit

josee smuck

Josée Smuck

Stampin’ Up! Canada Demonstrator since 2002
Ottawa, ON, Canada
Contact me with questions!
Josee@StampingJo.com
(613) 831-2917

Current Catalogues

Annual Catalogue (May2024-April2025)Stampin' Up! Annual CatalogueView Catalogue-ENG | Shop Online
View Catalogue- FR

——————

Looking for something?

Get the news


Click HERE to download Jo-Jo’s FREE Sketches & Tips Guide

Updates

Receive NEXT-DAY updates by email:

Receive SAME DAY updates by subscribing in a reader:
Click to Subscribe in a reader

Recent Posts

  • Embrace the Journey April 11, 2025
  • For the Books April 8, 2025
  • Beautiful Birthday April 5, 2025
  • Happy Retirement April 2, 2025
  • Frame & Flowers March 28, 2025

Categories

Proud Member…

Inky_Divas800

The content of this blog is the sole responsibility of Josee Smuck as a Stampin’ Up! Independent Demonstrator.  The use of and content of classes, services or products offered is not endorsed by Stampin’ Up! Unless otherwise indicated, images © Stampin’ Up! 1990 – present.

© 2025 Hand Stamped Cards with Josee Smuck-Stampin' Up! Canada Demonstrator | Powered by Superbs Personal Blog theme