I love the way today's card turned out as a cute wedding card. It features my new favorite host stamp set the In the City stamp set from Stampin' Up's NEW 2017-2018 Annual Catalogue. This card would be great for a summer wedding! If you haven't seen my other cards using this set, check them out: baby card , welcome card and friendship card. Such a versatile stamp set!
How To Make This Hand Stamped Wedding Card:
Start this card with a base of Thick Whisper White cardstock, cut lengthwise to 4 1/4"x11" so that it can be run through the Big Shot in the Fluttering Textured Embossing Folder.
Stamp the church, trees and little pebble pathway from the In the City stamp set using Basic Black ink on a piece of Whisper White cardstock. Then run it through the Big Shot with the square Stitched Shape Framelits. Fill in the trees with the matching stamp and Old Olive ink.
Stamp the greeting and the limo from the In the City stamp set in Basic Black on Whisper White cardstock and punch it out using the Pretty Label punch. Use the Pretty Label punch to punch out two labels out of Old Olive ombre Color Theory Designer Series Paper. These will be used to mat under the stamped punch out.
Cut two strips of Berry Burst Fresh Florals Designer Series Paper and punch the ends using the Banner Triple Punch. Adhere the strips as shown to the cardbase and start layering the other stamped elements on top, starting with the square die cut and then the greeting layers. The greeting layer was adhered with Stampin' Dimensionals, while the rest was just with SNAIL Adhesive.
As a final touch, add a Berry Burst 2017-2019 In Color Bitty Bow to the greeting. (These are self adhesive so no need to add any other adhesive.)
Stampin' Up Stamps:
In The City stamp set
Stampin' Up Paper:
Thick Whisper White cardstock, Color Theory Designer Series Paper, Fresh Florals Designer Series Paper Stack
Stampin' Up Ink:
Basic Black ink, Old Olive Stampin' Pad
Other Stampin' Up Supplies and Tools:
Pretty Label Punch, Banner Triple Punch, Stitched Shape Framelits, 2017-2019 In Color Bitty Bows, Fluttering Textured Impressions Embossing Folder, Big Shot
I hope you enjoyed today's handmade wedding card using the In The City stamp set.
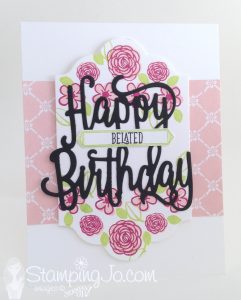
Today's card is a pretty stamped birthday card using the Colorful Seasons stamp setandtheLabel Me Pretty stamp setfrom Stampin' Up's NEW 2017-2018 Annual Catalogue.
How To Make This Hand Stamped Birthday Card:
This card really is easy to make! Start with a base of Thick Whisper White cardstock. Then cut the Old Olive ombre Color Theory Designer Series Paper for the next layer.
On this layer, stamp the tree branch from the Colorful Seasons stamp set in Chocolate Chip ink and then stamp the little blossoms from the same stamp set in Berry Burst ink. Adhere this layer to the cardbase.
Next, take some Berry Burst cardstock and die cut the blossoms using the Seasonal Layers Thinlits in the Big Shot. Add these to the branch using Mini Glue Dots.
Add a strip of Berry Burst paint crackle Color Theory Designer Series Paper to the card front.
Stamp the 'Happy Birthday to you' greeting from the Label Me Pretty stamp set using Basic Black ink on Whisper White cardstock and then punch it out using the Pretty Label Punch. Color in the flowers and leaves in the greeting using an Aqua Painter and the Berry Burst and Old Olive ink pads to watercolor them. Adhere this greeting to the card front along the Designer Series Paper strip.
As a final touch, add some of the Berry Burst colored Glitter Enamel Dots.
Stampin' Up Stamps:
Colorful Seasons stamp set, Label Me Pretty stamp set
Stampin' Up Paper:
Thick Whisper White cardstock, Color Theory Designer Series Paper Stack, Berry Burst cardstock
Stampin' Up Ink:
Basic Black ink, Berry Burst Stampin' Pad, Chocolate Chip Stampin' Pad, Old Olive Stampin' Pad
Other Stampin' Up Supplies and Tools:
Pretty Label Punch, Seasonal Layers Thinlits, Aqua Painter, Glitter Enamel Dots, Mini Glue Dots
Thanks for stopping by the blog today! I hope you enjoyed the stamped birthday card and are inspired to get stamping!
Are you new to stamping or just new to Stampin Up? Then I have some stamping tips for you to get started with Stampin Up! If you have been a Stampin Up fan for some time, keeping reading as you just may learn something new!
Stamping Tips to get started with Stampin Up
Choosing Stamps
If you have browsed the Stampin Up catalogues or my online store you may have noticed there are hundreds of products to choose from! That may make it more difficult for a newbie to figure out where to start! But, it’s all good, I promise!
First, if you are not sure where to start with stamping, start by deciding what kind of cards you want to make. Do you want to make birthday cards? Christmas cards? Thank you cards? Sympathy cards? Baby Shower invites and favors? Kids cards and party invitations? Wedding invitations? Pretty feminine cards? Or masculine cards? You get the idea. Start with an occasion or season in mind. You may notice that the Stampin Up Annual Catalogue is divided into sections based on some of these card occasions to make it easier to find what you are looking for.
Then, your next step is to decide whether or not you want to be able to color in your stamps. This is important to know because Stampin Up offers bold, solid stamps that are meant to be stamped with various ink colors.
If you prefer this look, you will want to choose a few different colors of ink pads to start with.
If you love the look of watercolored stamped images, Stampin Up also offers outline stamps that are meant to be stamped with (usually) a Basic Black ink and then colored in. Options include using our new Watercolor Pencils, Stampin Write Markers or our ink pads and Aqua Painters to watercolor. If you prefer this look, start with the Archival Basic Black ink pad and the coloring option of your choice.
Another option is the greeting or sentiment stamp sets that offer various wording options for your cards. These are great for the Stampin Up stamp sets that have only images (and no sentiments) or for someone who loves to create cards with their own drawings or materials (such as Designer Series Paper) but prefers to add a stamped sentiment.
Deciding on your preference will help you narrow down your decision on which stamps to start with. You can then build your stamp collection from there 😉
Product Suites
Of course, you may still find yourself not sure of where to start or just can’t decide where to start. My suggestion is to choose one of the many product suites to start with. For example, in the 2017 Occasions Catalogue on page 8 and 9 you will see the Cupcakes & Carousels Suite- if you love the look of this suite, you can start with that stamp set, the Designer Series Paper and cardstock and ink that match. The work of deciding on colors has already been done for you!
Why are there different prices for each stamp set?
One thing to note as well is that Stampin Up stamps come in two styles of material for the stamps themselves. Classic Rubber and Photopolymer. When you are deciding on stamps, you will often see the reference to wood or clear mount.
Classic Rubber on Wood Mount Stamps
When you see ‘wood’ that means the stamps are the Classic Rubber, ready to be mounted on the wood blocks provided with the stamp set. Wood mount stamps cost more because they come with their own wood blocks. You will need to peel the backing off the rubber stamps and mount them onto the wood blocks yourself, but you will only do this once. Many find this advantageous because the stamps can be trimmed further if desired in order to keep any stray rubber from leaving ink where it shouldn’t when stamping.
A tip: punch out all the rubber stamps and before peeling off the sticky backing, place them on each wood block to make sure they are a good fit before sticking them on because once they are on they are staying! That stuff is super sticky!!
Classic Rubber on Clear Mount Stamps
When you see the reference to Clear Mount- that means they are the Classic Rubber stamps with a non-adhesive backing on them to be used on clear acrylic blocks that you buy separately. Each time you stamp you will ‘mount’ these stamps on the proper sized block and remove them after cleaning your stamps.
Photopolymer on Clear Mount Stamps
Then there are the Photopolymer stamps- these also need the clear acrylic blocks to mount on before stamping. The best part of photopolymer stamps is that you can see exactly where you are stamping!
I made this video some time ago, but I think it’s still helpful today.
What else do I need to get other than stamps and ink?
Of course you need something to stamp on! You will want to have a look at the cardstock and envelopes.
Stampin Up cardstock and inks are color coordinated. In fact, most of the Stampin Up products are color coordinated which makes stamping so much easier when you don’t have to worry about colors matching. Trust me on this one. I had one customer who started stamping with me many years ago who loved the stamps, but rarely bought the cardstock or ink, only stamps for the most part. After a year or so of this she told me she had wasted so much time and money on trying to buy cheaper inks, paper and ribbon at the local craft store only to sit frustrated every time she stamped because NOTHING matched! She would buy a pink ink, pink cardstock and pink ribbon only to realize they were never the same pinks! Needless to say she became my biggest advocate for buying the coordinated Stampin Up products!
Cut it out!
On top of having some good cardstock and ink, you will want an effective method to cut and score your cardstock. The Stampin Trimmer is my go to tool as it allows me to measure the cardstock and cut! With the use of a Bone Folder, you can also use your Stampin Trimmer for scoring your cardstock, but I prefer to use my Simply Scored Scoring Board– love this tool as it makes lining up the cardstock so easy and you can mark your most used measurements (like 4.25″ and 5.5″ for your standard card centers). Check out the Ultimate Cutting Guide here.
More stamping tips
?Stampin Up offers ink refills. You don’t have to worry about ink pads or Stampin’ Write markers drying up. One Stampin’ Up refill bottle with last you quite a long time and you can reink anytime you need to. Plus, the reinkers can be used for dyeing products with the Stampin’ Spritzers or dip dyeing.
?All of Stampin’ Up’s Designer Series Papers (aka Patterned Papers) are also color coordinated! If you are not sure what colors to start with, try choosing a set of Designer Series Papers that catch your eye and then choose the colors from that set of papers.
?Ribbon, buttons, washi tape and other accessories are all made to coordinate with the Stampin Up colors! This makes it so easy to find the perfect embellishment for your cards!
?You can find all the adhesives you need to get started and Stampin Up has all kinds of adhesives for differents jobs as one adhesive does not fit all!
•Use a dry adhesive like the SNAIL Adhesive or Fast Fuse Adhesive for sticking papers together
•Mini Glue Dots are for quick sticking power for small items like small die cuts, buttons or ribbon
•Use Tear & Tape Adhesive for projects that need a strong adhesive, like this one
•Use Stampin’ Dimensionals and Mini Stampin’ Dimensionals to make elements on your cards pop!
•Foam Adhesive Strips are perfect for making shaker cards
•Multi Purpose Liquid Glue and the Fine Tip Glue Pen are great for small items that need strong glue power and can be left to dry
•Use Multipurpose Adhesive Sheets to create your own stickers with die cuts or accessories
?Most of the Stampin Up Framelits and Thinlits coordinate with the stamp sets. Got a Big Shot? (or other die cutting machine?) Or want one? You will love that many of the stamp sets you buy have coordinating dies to make cutting out images so easy!!
Not sure where to start? Having a set of basic shape dies like the Layered Circles or Layered Ovals Framelits are a great set to start with as they will work with most stamp sets. Get creative with your dies too- cut out shapes, use the dies to create different shapes out of the cutouts or use your imagination to use the dies in different ways!
The Big Shot can also be used to dry emboss your cardstock too for amazing texture and dimension on your cards! (See the samples below)
Not sure what the Big Shot is? Check out this how to video to get you started.
These cards were all created with the Big Shot and dies and embossing folders!
?The Stampin Up punches also coordinate with many of the stamp sets, so when checking out the catalogue, take note of the coordinating punches and dies (if any) listed with the stamp set information and check them out!
?Broken stamp case? You can purchase replacement stamp cases on page 183 of the Annual catalogue (or find them in store here) but did you know the stamp cases can also be used for more than just stamps? You can use them to store and organize your Watercolor Pencils, Stampin Write Markers, your clear acrylic blocks, keep completed cards safe or keep your cardstock scraps organized. These stamp cases have been used for many non- stamping related uses too like keeping desk supplies organized or makeup and nail supplies together in kits.
?Love wood stamps but can never line them up properly? The Stamp-a-ma-jig was made for just that!! If you are not sure how to use it, check out this video.
?Stampin’ Up offers project kits and Paper Pumpkin kits to make crafting easy to take where ever you go!
Hello! There are some exciting things happening with Stampin' Up this summer! Woot woot! Here's what's going on:
Every $60 you spend before taxes and shipping in July- earns you a $6 Bonus Day coupon to use in August! So get that wish list together and get shopping now!
Plus, when you become a demonstrator this month with Stampin' Up, you will receive this amazing Essentials Gift Pack for FREE!
This FREE Essentials Gift Pack is worth $94 and includes:
>>>D-Block- Acrylic Block (2 of them) to mount your stamps
>>>Grid Paper
>>>Paper Snips
>>>SNAIL Adhesive
>>>Bone Folder
—all the tools you will need to get started with your stamping business. On top of that, you will also get the NEW, not yet released Carols of Christmas Stamp Set!! This stamp set is currently on pre-order for us demonstrators and will only be available to customers August 1st as part of a pre-holiday catalogue preview! If you've ever thought about joining Stampin' Up, July is a great time to get your business ready for our peak holiday season!
Do you love a great deal? For 24 hours only- today only June 30th, new Paper Pumpkin customers can receive their first-month subscription for only $7 CAD. That’s a crazy 75% off the regular price!
Paper Pumpkin is the perfect way to bring your crafts with you to the cottage or even just to sit on your deck and enjoy the sunshine while you craft! Every kit includes an exclusive stamp set, ink spot, and embellishments to create a predesigned project.
Subscribe here and make sure to use promo code: ONEDAY0717