Skip to content

Hand Stamped Cards with Josee Smuck-Stampin' Up! Canada Demonstrator

Stampin' Up! Canada Demonstrator; Rubber Stamps & Supplies for Cardmaking & Scrapbooking in Stittsville, Ontario (near Ottawa)

Menu
  • Home
  • JO JO POINTS
  • **Join**
  • Monthly Craft Kit
  • Weekly News
  • Shop Now
  • Contact Me
Menu

Category: Stamping Ideas

Party Pop Up Thinlit Birthday Card

Posted on February 19, 2016February 19, 2016 by Josee

Good Morning! Happy Friday!

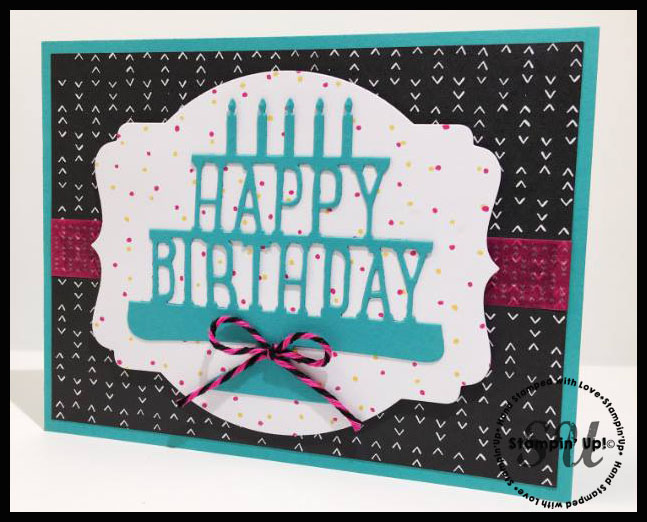
The Party Pop Up Thinlits are amazing dies to create, just as the name says, Pop Up cards- but you can also use them for the front of the card too!

party pop up thinlit

How to Make It:

  1. Place a strip of It’s My Party Washi Tape in the middle of  the It’s My Party Designer Series Paper panel as shown. Fold excess tape around to the backside of the panel. Adhere prepared panel to the front of the Bermuda Bay card base with SNAIL Adhesive.
  2. Run a scrap piece of It’s My Party Designer Series Paper through the Big Shot Machine using the largest Deco Labels Die. Run the scrap Bermuda Bay through the Big Shot Machine using the scrap of Bermuda Bay card stock.
  3. Adhere the birthday cut out to the deco label cut out with a few taps from your Stampin’ Glue Stick. 
  4. Tie a bow with the Basic Black and Melon Mambo Baker’s Twine and attach to the front of your cake stamp stand with a glue dot.
  5. Attach to your completed birthday label die cut to the front of your card with dimensionals. A quick and easy card!!

Supplies Used:

  • Stamps – Party with Cake stamp set can be Bundled with Party Pop-Up Thinlit Dies if desired WM Bundle: 140815, CM Bundle: 140814
  • Paper – Bermuda Bay #131197, It’s My Party Designer Series Paper #140552
  • Tools & Misc. – Big Shot #113439, Deco Labels Framelits #130102, Party Pop-Up Thinlit Dies (on their own if you don’t get the bundle) #140620, It’s My Party Washi Tape #140556, Baker’s Twine Combo Pack #140555, Glue Dots #103683, Stampin’ Dimensionals #104430, SNAIL #104332, Stampin’ Glue Sticks #130654

Thanks for stopping by today! Have a wonderful weekend!!

saleabration freebies shop online new


     signature


     February Hostess Code to use:  Q27EAVTX

jojopoints blog post footer

Read more

What I Love…

Posted on February 18, 2016February 16, 2016 by Josee

Hello!  

If you have gotten some of your Sale-A-Bration freebies already, you may have gotten this one- What I Love. It is such a pretty stamp set, and this card just emphasizes that. 🙂 

What I Love, Sale-A-Bration, StampingJo.com

How to Make It:

  1. Stamp the 2 mutli-step flower images on scrap White: Solid Image in Blushing Bride, Middle in Calypso Coral, Outline in Watermelon Wonder
  2. Stamp with leave images separately on the scrap White
  3. Cut out the flower images
  4. Stamp the greeting in Bermuda Bay ink on scrap White
  5. Cut out the greeting with the Bitty Banner framelits on the Big Shot
  6. Cut Tea Lace Doiley in half
  7. Cut end of the Shine on DSP at an angle
  8. Assemble card using Snail adhesive and Stampin Dimensionals

Supplies Used:

Stamp Set: Know what I love S-A-B Stamp Set #141276

Ink: Bermuda Bay #131171, Watermelon Wonder #138523, Calypso Coral #126983, Blushing Bride #131172, Mint Macaron #138326, Cucumber Crush #138224

Paper: Crumb Cake, Whisper White #100730; Shine  On Specialty DSP #140579, Cherry  On Top DSP #138443

Misc: Tea Lace Doilies #129399, Big Shot #113439, Bitty Banner Framelits #1290267, Snail #104331, Dimensionals #104430

Don't forget, for every $60 you spend before taxes and shipping, you get to choose one Sale-A-Bration product for free!! You can shop my store here.  

sale-a-bration freebies saleabration freebies shop online new


     signature


     February Hostess Code to use:  Q27EAVTX

jojopoints blog post footer

Read more

Petal Pusher- NEW Sale-A-Bration Freebie

Posted on February 17, 2016February 16, 2016 by Josee

Hello!  

Are you still digging yourself out? If you are not in the Ottawa area, you may not know, but we got a dumping of snow yesterday! It was crazy. It snowed ALL day! Buses were canceled for the kids, and it's a good thing because the buses would have gotten stuck for sure! The good news is that it wasn't -40 degree wind chill like the few days before the snow storm! It is days like this where I truly appreciate not having to drive to work each day. 🙂

A friend of mine shared this photo and I had to share. This was only taken mid-afternoon, and it was still snowing! 

On to some thoughts of Spring….The card(s) I have to show you today are made with the NEW Petal Pusher stamp set, now available for FREE with every $60 you spend before taxes and shipping during Sale-A-Bration!

petal pusherI wanted to show you all three of these cards together, because I think it's great to see how the same card design can look SO different just by changing the patterned paper and embellishments! 

Instructions (refer to photos):

  1. Stamp a bicycle on Watercolor Paper piece and center as shown. Add extras that you like (basket, basket contents, bird, etc…) Color in bicycle with markers of your choice. Lighter markers work best to allow the definition of the image to show.
  2. Take Smoky Slate ink pad and, while closed, gently squeeze lid into ink so ink will pool a little on it. Open pad. Using very slightly damp Aqua Painter (no need to fill, just wet the tip), dab the Smoky Slate ink and lightly brush under bicycle for shadow. My brush was almost dry and it created a cool streaking/shadowing.
  3. Stamp your favorite sentiment with Memento Pad.
  4. Affix DSP to corresponding colored card base using SNAIL.
  5. Using photos as your guide, finish the watercolor paper parts:
    1. Card on right: pierce one straight line across bottom, tie ribbon around just above pierced area, adhere to card front allowing a little of the top of the DSP to peek through and scatter/adhere sequins on front.
    2. Card in center: Using Tear & Tape, adhere the Hello Honey ribbon with some overlap on each side then with a light touch adhere lace to ribbon with some overlap on each side with liquid glue & allow to dry. Snip ribbon that is hanging off to align with edges of card. Using liquid glue, adhere wooden heart to card front. When dry adhere to card front so the watercolor piece reaches the top edge of the card.
    3. Card on left: pierce two straight lines across bottom leaving a gap wide enough for the 1/8” ribbon, tie ribbon so it rests in between the two pierced lines. Adhere strand of sequins to front with liquid glue and allow to dry. When dry, adhere to card front allowing a little of the top of the DSP to peek through.

Supplies:

  • Main Stamp Set: Pedal Pusher (141312, FREE through March 31 with a $60 purchase)
  • Most cards use: Watercolor Paper (122959), Tuxedo Black Memento Pad (132708), Smoky Slate Stampin’ Pad (131179) and Aqua Painters (103954), your choice of Stampin’ Write Markers, SNAIL Adhesive (104332), Tear & Tape Adhesive (138995), Multipurpose Liquid Glue (110755), Stampin’ Trimmer (126889) & Paper Snips (103579)
  • Card on right: Happy Home (for the sentiment – 140500 w or 140503 c), Bermuda Bay Card Stock (131197), Shine On Specialty Designer Series Paper (140579), Bermuda Bay 1/8” Stitched Ribbon (140569), Bermuda Bay Sequin Trim (137910), Paper-Piercing Tool (126189), Stampin’ Pierce Mat (126199) & Updated Essentials {Paper Piercing} (138371).
  • Card in center: Greatest Greetings (for the sentiment – 140703 w or 140706 c), Hello Honey Card Stock (133678), Wildflower Fields Designer Series Paper (141022, FREE through March 31 with a $50 purchase), Hello Honey 5/8” Striped Cotton Ribbon (138417), Venetian Crochet Trim (134581), Love Blossoms Embellishment Kit (140551)
  • Card on left: Beautiful Ride (for the sentiment – 140738), Mossy Meadow Card Stock (133676), Birthday Bouquet Designer Series Paper (140557), Gold Sequin Trim (132983), Gold 1/8” Ribbon (134583)

Thanks for stopping by today! I hope you have a wonderful day!

sale-a-bration freebies saleabration freebies shop online new


     signature


     February Hostess Code to use:  Q27EAVTX

jojopoints blog post footer

Read more

New Sale-A-Bration products available today!

Posted on February 16, 2016February 16, 2016 by Josee

Good Morning!

Today is the first day that the NEW Sale-A-Bration products are available to add to your qualifying orders! We had to say goodbye to a few great freebies, but check out what you can now get for FREE until March 31st with every $60 you spend before taxes and shipping!

sale-a-bration freebies

You can download the flyer here.

Check out what you can do with the NEW Glitter Tape!

While you are here today, check out the NEW Weekly Deals too!

Have a great day!!

   Download the NEW 2016 Occasions Catalogue here!

Shop the New products here!

View the Sale-A-Bration Brochure here!

View the NEW Sale-A-Bration Freebies

    signature


     February Hostess Code to use:  Q27EAVTX

jojopoints blog post footer


Read more

Party Wishes Birthday Card

Posted on February 12, 2016February 8, 2016 by Josee

Hello! Happy Friday!

As we head into the weekend, I've got a no layer card to end our week of class cards. This card features the Party Wishes Stamp Set and the Confetti Textured Impressions Embossing Folder!

Party Wishes, Confetti TIEF, Baker's Twine, Pearls, Party Punch Pack, Wink of Stella, Stampin Up, hand stamped, hand made card, no layer card, simple card, quick & easy card

How to Make It:

  1. Use the Big Shot to run the Thick Whisper White card base through with the Confetti Embossing folder , try to keep the oval centered
  2. Stamp the cake base in Basic Gray
  3. Stamp the cake in Watermelon Wonder
  4. Use Bermuda Bay and Pumpkin Pie markers to color the candles on the stamp, then stamp on the cake
  5. Stamp the confetti and the sentiment over top the stamped cake- use Bermuda Bay and Watermelon Wonder markers to ink up the stamp
  6. Stamp the larger candle using Bermuda Bay and Pumpkin Pie markers, on a scrap of Whisper White and punch out using the candle punch in the Party Punch Pack
  7. Adhere the candle punch out in the middle of the smaller stamped candles using 2 Way Glue Pen
  8. Add some shine to the cake stand and candle flames with the Wink of Stella pen
  9. Add a strip of Pearls Basics to the bottom of the cake
  10. Wrap Bermuda Bay Baker’s Twine around the card front and tie a bow  

Supplies Used:

Stamps: Party Wishes-140651 wood, 140961 clear-mount

Paper: Whisper White Thick- 140272, Whisper White- 100730 (for punching)

Ink: Stampin’ Write Markers: Bermuda Bay, Pumpkin Pie, Watermelon Wonder, Watermelon Wonder ink-138323,Basic Gray Archival ink-140932; Refill-140929, Wink of Stella-clear-141897

Other: Party Punch Pack-140608, Confetti TIEF- 140592, Pearls Basics Jewels-119247, Bermuda Bay Baker’s Twine-134575, Mini Glue Dots- 103683, Two-Way Glue Pen-100425

Shop for what you need by clicking on each item below, make sure to scroll through to see all the supplies:  


Have a wonderful weekend! I will be back on Monday with the Stamper's Dozen Blog Hop!! 

saleabration footer

   Download the NEW 2016 Occasions Catalogue here!

Shop the New products here!

View the Sale-A-Bration Brochure here!

    signature


     February Hostess Code to use:  Q27EAVTX

jojopoints blog post footer


Read more

Posts pagination

  • Previous
  • 1
  • …
  • 128
  • 129
  • 130
  • 131
  • 132
  • 133
  • 134
  • …
  • 297
  • Next

go to store

Promos

Paper Bouquet Kit