Skip to content

Hand Stamped Cards with Josee Smuck-Stampin' Up! Canada Demonstrator

Stampin' Up! Canada Demonstrator; Rubber Stamps & Supplies for Cardmaking & Scrapbooking in Stittsville, Ontario (near Ottawa)

Menu
  • Home
  • JO JO POINTS
  • **Join**
  • Monthly Craft Kit
  • Weekly News
  • Shop Now
  • Contact Me
Menu

Category: Stamping Ideas

Honeycomb Happiness- Mini Card Set

Posted on February 26, 2016February 22, 2016 by Josee

Happy Friday!! 

I've got a cute and sweet set of cards to show you today using Honeycomb Happiness. This would be a great little set to make as a little gift for someone, or just to have when you need a quick card. 

Honeycomb Happiness, hand stamped, hand made cards, quick & easy card, Stampin Up, StampingJo.com

These cards are SO simple to make!!

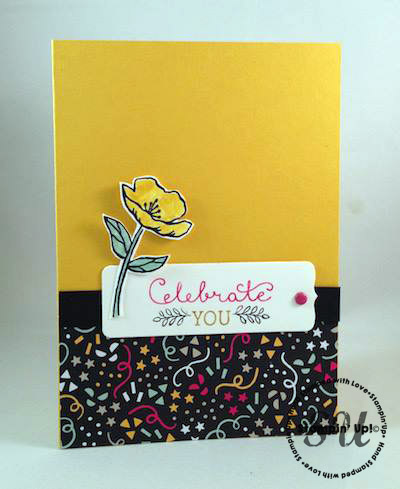
I used various Stampin' Write markers from the Brights and Neutrals sets to ink up the image stamps- colouring each section of the stamp, giving it a little huff to moisten the ink again before stamping onto the Whisper White Thick card bases.

The sentiments were stamped with a basic black ink- I used Memento Tuxedo Black, but you could use any of our black inks.  

The cardbases were punched on the bottom corners using the Project Life Corner Punch. 

The final touch is to colour in some of the stamped images and the edges of the cards using the clear Wink of Stella pen! So easy and so fun! Love the Wink of Stella!! 

Supplies:

Stamps: Honeycomb Happiness (Sale-A-Bration freebie)- 141288 wood, 141291 clear-mount

Paper: Whisper White Thick- 140272

Ink: Stampin' Write Markers: Brights-131259, Neutrals-131261, Memento Tuxedo Black Ink- 132708, Clear Wink of Stella-141897

Other: Project Life Corner Punch-135346

Thanks so much for dropping by today! I hope you have a wonderful weekend! Enjoy!

saleabration freebies shop online new


     signature


     February Hostess Code to use:  Q27EAVTX

jojopoints blog post footer

Read more

Rose Wonder Wedding Cutout Card

Posted on February 25, 2016February 22, 2016 by Josee

Hello!

I've got an amazing card for you today using Rose Wonder and the Rose Garden Thinlits! This would make a wonderful wedding card! 

Rose Wonder, Rose Garden Thinlits, Stampin Up, StampingJo.com, wedding card, hand made card, hand stamped card, Big Shot

How to Make It:

  1. Using Rose Garden thinlits and Big Shot, cut out rose image from edge of Gold Foil Sheet and punch out the Decorative Label from the leftovers. Use Die Brush to remove small pieces from the rose.
  2. Adhere gold rose to front left side of black card stock with Fine Tip Glue Pen (a little goes a long way!) Don’t worry if glue oozes out…it will dry clear. You may need to set a heavy object on top to make it stick…if so, use a piece of cellophane over rose so it doesn’t glue to the object!
  3. Stamp “Wedding Wishes” with Memento Black ink on Whisper White card stock scrap and cut out with the label thinlit.
  4. Adhere the sentiment to the gold label with Stampin' Dimensionals.
  5. When glue is dry on the front of card, cut out around the rose image, leaving a black edge.
  6. Adhere white inside layer with gold foil strip behind the card stock on right edge. Stamp “Wishing You” sentiment in black in lower left corner (covered by card front) and add label to top right corner
  7. Adhere the large pearl to the flower center and smaller pearls to edge of Wedding Wishes (the edge of sentiment label may be covered by the flower, but that’s okay!)

Supplies:

  • Stamp Sets: Rose Wonder Bundle (#140804-photopolymer stamp set AND Rose Garden Thinlit Dies)
  • Inks: Memento Black (#132708)
  • Paper: Whisper White (#100730), Basic Black (#121045), Gold Foil Sheet (#132622)
  • Other: Pearl Basic Jewels (#119247), Big Shot (#113439), Die Brush (#140603), Decorative Label punch (#120907), Fine Tip Glue Pen (#138309), Stampin' Dimensionals (#104430)

Of course, you could change up the colors on this and get a totally different look for a different occasion too!

Measurements:

  • Basic Black card stock: 8-1/2” x 5-1/2” scored at 4-1/4”
  • Whisper White card stock: 3-3/4” x 5-1/4” (inside layer) and scrap to stamp/cut wedding wishes
  • Gold Foil Sheet: 4”x 6” and 1/2” x 5-1/4” strip for inside edge

Thanks for coming on by!

saleabration freebies shop online new


     signature


     February Hostess Code to use:  Q27EAVTX

jojopoints blog post footer

Read more

In the Meadow All Occasion/Just Because card

Posted on February 24, 2016February 22, 2016 by Josee

Hello! 

Thanks for coming by the blog today! I've got a pretty card today, showcasing In the Meadow.

In the Meadow, Stampin Up, StampingJo.com; hand stamped, hand made card, watercolors, all occasion card

How to Make It:

  1. Stamp images onto Shimmery White paper using Black Archival Ink.
  2. Squeeze your ink pads to get some ink on the inside of the lids. This is where you will get your color from.  Optionally, you can add color with a reinker.
  3. Using an Aqua Painter, paint the background in Soft Sky, then the deer and tree trunks in Chocolate Chip. Paint the grass and trees in Wild Wasabi using varying amounts of ink to create depth. Paint the mountains in Smoky Slate. Add Wisteria Wonder to both the mountains and sky to give them more depth.
  4. Stamp the sentiment onto the Crumb Cake banner. Use paper snips to flag the right side and wrap linen thread around the left side securing the ends in the back with either Fast Fuse or a glue dot. Attach banner to water colored image.
  5. Attach the image to the Chocolate Chip mat using Fast Fuse
  6. Attach the Chocolate Chip mat to the Crumb Cake mat using Dimensionals.

Supplies:

  • Stamp Sets: In the Meadow (C: 140754) & Cottage Greetings (C: 139962)
  • Inks: Archival Black (140931), Chocolate Chip (126979), Wild Wasabi (126959), Soft Sky (131181), Smoky Slate (131179), Wisteria Wonder (126985)
  • Paper: Shimmery White (101910), Chocolate Chip (102128), Crumb Cake (120953)
  • Other: Aqua Painters (103954), Fast Fuse (129026), Dimensionals (104430), Linen Thread (104199)

Measurements:

  • Card Base in Crumb Cake: 5-1/2” x 8-1/2” and scored at 4-1/4”
  • Chocolate Chip Mat: 5-1/8” x 3-7/8”
  • Shimmery White Mat (with Images): 5” x 3-3/4”
  • Crumb Cake Banner: ½” x 4-1/4”

If you would like to see more cards made using this stamp set, check out this My Crafty Friends Monday post. Have a great day!

saleabration freebies shop online new


     signature


     February Hostess Code to use:  Q27EAVTX

jojopoints blog post footer

Read more

Birthday Blooms: Celebrate You

Posted on February 23, 2016February 22, 2016 by Josee

Good Morning! 

I have a cute and simple card to show you today- using Birthday Blooms- this can be a birthday card, or a congralutions card- whatever you want to celebrate! 

Birthday Blooms, Celebrate, Birthday card, hand stamped, hand made card, Stampin Up, StampingJo

How to Make It:

1.    Adhere It’s My Party paper to front of Crushed Curry card base. Add Basic Black strip.

2.    Ink 'Celebrate You'  using Crushed Curry, Melon Mambo and Basic Black markers and stamp onto Whisper White card stock. Die-cut using Chalk Talk framelit. Adhere to card front.

3.    Ink flower using Basic Black ink and stamp onto Whisper White card stock. Color using Blender pens and ink pads. Cut out using Paper Snips. Add to card front using SNAIL adhesive and Stampin’ Dimensional.

4.    Add Regals Candy Dot to complete.

Supplies:

  • Stamp Sets: Birthday Blooms (clear 140658, wood 140655), Suite Sayings (clear 140712, wood 140709)
  • Ink: Crushed Curry (131173), Basic Black (140931), Melon Mambo (126948), Mint Macaron (138326)
  • Markers: Basic Black (100082), Regals (131262)
  • Paper: Crushed Curry (138426), It’s My Party paper stack (140552), Basic Black (121045), Whisper White (100730)
  • Other: Stampin’ Dimensionals (104430), SNAIL adhesive (104332), Chalk Talk framelits (129983), Big shot (113439), Magnetic Platform (130658), Blender Pens (120845), Regals Candy Dots (130932), Paper Snips (103579)

Measurements: 

  • Crushed Curry – 5 ½” x 8 ½” (card base)
  • It’s My Party – 4 1/2 x 2”
  • Whisper White – 3 1/4 x 1 1/4”, 2 1/2 x 1 3/4”
  • Basic Black – 1/4 x 4 1/4”

Make sure you check out the NEW Weekly Deals while you are here today!! 

Thanks for stopping by! Have a wonderful day!

saleabration freebies shop online new


     signature


     February Hostess Code to use:  Q27EAVTX

jojopoints blog post footer

Read more

My Crafty Friends Monday: Picture Perfect

Posted on February 22, 2016February 19, 2016 by Josee

Welcome to "My Crafty Friends Monday!" 

2016 Occasions Catalogue & Sale-A-Bration Edition


My Crafty Friends Monday-NEW-SMI hope you enjoyed a great weekend! Each Monday, I like to feature different projects that have inspired me and I know they'll inspire you too!
 
Each project was created by different & amazingly talented stampers- make sure you check out their blogs for more details and to check out their other amazing projects!!
(**Note…don't worry- I've contacted each of these stampers and allowed them to decline if they choose.) 
 

This week's featured stamp set is 'Picture Perfect' (140520 Photopolymer). 


Michelle Long: her blog

picture-perfect-stampin365

So soft and pretty! Love it used with Gorgeous Grunge!


Patty Bennett: her blog

picture perfect by Patty Bennett

Love the colours and the texture from Timeless Textures. So pretty! 


Amy K: her blog

picture-perfect-stamp-with-amy-k

Love these colours and the simplicity! 


Anna Smith:  her blog

Picture Perfect by Anna Smith

I love this cracked glass technique and it looks amazing with this stamp set!


Love these ideas? You can purchase this stamp set through my ONLINE STORE! 

I hope you've enjoyed this week's "My Crafty Friends Monday" Make sure you visit the talented artist's featured on this post! Thanks for stopping by today!

Were you featured here? Here's a badge you can add to your blog is you choose!
My Crafty Friends Monday-featured-NEW-SM


saleabration freebies shop online new


     signature


     February Hostess Code to use:  Q27EAVTX

jojopoints blog post footer

Read more

Posts pagination

  • Previous
  • 1
  • …
  • 127
  • 128
  • 129
  • 130
  • 131
  • 132
  • 133
  • …
  • 297
  • Next

go to store

Promos

Paper Bouquet Kit