Skip to content

Hand Stamped Cards with Josee Smuck-Stampin' Up! Canada Demonstrator

Stampin' Up! Canada Demonstrator; Rubber Stamps & Supplies for Cardmaking & Scrapbooking in Stittsville, Ontario (near Ottawa)

Menu
  • Home
  • JO JO POINTS
  • **Join**
  • Monthly Craft Kit
  • Weekly News
  • Shop Now
  • Contact Me
Menu

Author: Josee

Bravo & Timeless Textures Congratulations Card

Posted on April 27, 2016April 25, 2016 by Josee

social_retired2016_demo_Apr1816_NA_3 (1)

Good Morning!!

Today's card is the second of the cards from my Creativ Festival card class. This one uses one of the stamp sets that will be retiring soon- Bravo, plus Timeless Textures which I'm happy to say is sticking around in the new catalogue wink

Bravo, congratulations card, Stampin Up, Glitter ribbon, Timeless Textures

How To Make It: 

  1. Stamp the sentiment from Bravo using Tuxedo Black ink on a Thick Whisper White card base
  2. Stamp the Timeless Textures stamp in Watermelon Wonder around the sentiment
  3. Attach a strip of In Color Designer Series Paper (Watermelon Wonder) to the side of the stamped sentiment
  4. Attach a strip of Pool Party Glitter Ribbon (RETIRING!) with some Tear & Tape Adhesive and tie a small piece to that piece
  5. Color in the outlined part of the sentiment with a Pool Party Stampin' Write marker and then color over top of that with the clear Wink of Stella 

Supplies Used: 

Stamps:

Bravo-135380, Timeless Textures- w)140514, c) 140517

Paper:

Thick Whisper White-140272, In Color Designer Series Paper-138432 

Ink:

Memento Tuxedo Black ink-132708 , Pool Party Stampin' Write Marker-131904 , Clear Wink of Stella-141897 , Watermelon Wonder ink-138323

Other:

Pool Party Glitter Ribbon- 140561 , Tear & Tape Adhesive-138995, SNAIL adhesive-104332 


Thanks for stopping by the blog today!! Enjoy the rest of your day!!

retiring products

     signature


     April Hostess Code to use:  DBBZ2AUS

jojopoints blog post footer

Read more

You’ve Got This Butterfly Thanks card

Posted on April 26, 2016May 2, 2016 by Josee

social_retired2016_demo_Apr1816_NA_2 (1)

Good Morning!!

Today's card is brought to you from Creativ Festival! This is one of the cards we made in my classes held at the festival using the You've Got This and One Big Meaning stamp sets.

A special thanks to all those that came to class and stopped by my booth! It was a great weekend! I wanted to say a special thank you too, to the volunteers that helped out with running my booth! I couldn't have done it without these awesome volunteers! Thank you!! 

You've Got This, Butterfly punch, hand stamped, thank you card, Stampin' Up, Fluttering TIEF,

How To Make It: 

  1. Emboss the Pink Pirouette cardstock base with the Fluttering Textured Impressions Embossing Folder
  2. Stamp the background with the textured stamped from the You've Got This stamp set and Pink Pirouette ink on Whisper White cardstock
  3. Stamp the sentiment from One Big Meaning in Black ink and then adhere the layer to the card front
  4. Punch the Subtles Designer Series Paper with the Elegant Butterfly punch and use a glue dot to attach it to the card front using some Glue Dots
  5. For a final touch, add some Rhinestones Basics Jewels to the center of the butterfly and lift the wings up a bit for some added dimension!You've Got This, butterfly punch, One Big Meaning

Supplies Used: 

Stamps:

You've Got This-w) 139572, c)139575, One Big Meaning-w)138788, c)139420

Paper:

Pink Pirouette-111351, Whisper White-100730, Subtles Designer Series Paper (Pool Party)-138437

Ink:

Pink Pirouette-126956, Basic Black-140931

Other:

Elegant Butterfly punch-127526, Fluttering TIEF-139304, Rhinestones Basics Jewels-119246, Big Shot-113439, Glue Dots-103683, SNAIL-104332

Thanks for stopping by!! Have a great day!!

retiring products

     signature


     April Hostess Code to use:  DBBZ2AUS

jojopoints blog post footer

Read more

Sprinkles on Top Birthday Card

Posted on April 22, 2016April 25, 2016 by Josee

social_retired2016_demo_Apr1816_NA_2 (1)

Good Morning and Happy Friday!! 

Through the magic of being able to schedule blog posts ahead of time, I am sharing today's card, but I am actually at Creativ Festival in Toronto today and tomorrow! If you are in the Toronto area and plan to be at the festival, come on by my booth! I've got a make and take and you can sign up for my card class too! I will be sharing those card class cards with you next week! 

For today, a quick and easy card using the Sprinkles on Top stamp set from the Annual catalogue. 

Sprinkles On Top, hand stamped, birthday card, Stampin' Up

This card is super easy to make. Cut your card base from Bermuda Bay cardstock. Add a layer of Whisper White cardstock to layer on top. Line up a piece of Cherry On Top Designer Series Paper along the bottom, and then start layering some Cherry on Top Washi Tape. 

Stamp the doughnuts with Bermuda Bay ink and punch them out using the 3/4" Circle Punch and add them on top of the washi tape strips with Stampin' Dimensionals. 

Stamp your sentiment and you are done!!

Supplies Used: 

Stamps:

Sprinkles on Top (wood 138648, clear 139569)

Paper:

Bermuda Bay (131197), Cherry on Top Designer Series Paper (138443), Whisper White (100730)

Ink:

Bermuda Bay (131171)

Other:

3/4" circle punch (119873), Cherry On Top Washi Tape (138384), Stampin' Dimensionals (104430)

Thanks for stopping by!! Have a wonderful weekend!

retiring products

     signature


     April Hostess Code to use:  DBBZ2AUS

jojopoints blog post footer

Read more

Rose Wonder Paper Pieced Birthday Card

Posted on April 21, 2016April 18, 2016 by Josee

TH_social_retired2016_demo_Apr1816_NA_4

Hello! 

Thanks for stopping by today! I think you are going to love the technique used in today's card! Using the Rose Wonder stamp set and the Rose Garden Thinlits Dies, this card comes together beautifully!

Rose Wonder, paper piecing, hand stamped Birthday card, Stamin' Up


How To Make It: 


1.    Adhere the Typeset Specialty designer paper (newsprint design) directly to the Blushing Bride cardstock base.
2.    Using the Stampin’ Paper Snips, banner cut both the Watermelon Wonder cardstock strip and the Typeset Specialty designer paper (striped design).  Layer these two strips with the Watermelon Wonder layer offsetting the top edge of the Typeset designer paper layer.  Adhere to each other, and then, to the card.
3.    Take the leaves thinlit from the Rose Garden Thinlits dies set and die cut from the Mossy Meadow cardstock piece.
4.    Adhere the Typeset Specialty designer paper (grid design) to the Mossy Meadow cardstock.
5.    Die cut the single Rose thinlit from each of the following: scrap piece of Watermelon Wonder cardstock and the Love Blossoms designer paper.  Be careful not to lose any of the little pieces from the Love Blossoms rose.
6.    Brush on some clear Wink of Stella onto the leaves and Watermelon Wonder rose die cuts.
7.    Adhere the Watermelon Wonder rose ‘frame’ die cut onto the Typeset grid layer, then, glue and paper piece the inner rose pieces from the Love Blossoms designer paper die cut.
8.    Add Stampin’ Dimensionals to the back of the Mossy Meadow panel.
9.    Position the leaves onto the banner strip, followed by the paper pieced Rose Wonder panel.
10.    Ink up the sentiment with Basic Black Archival ink and stamp in place onto the Blushing Bride cardbase.

Supplies:

Stamp Sets: Rose Wonder (140697)
Inks: Basic Black Archival (140931)
Paper: Blushing Bride cs (131198), Mossy Meadow cs (133676), Watermelon Wonder cs (138334), Typeset Specialty Designer Series Paper (133704), Love Blossoms Designer Series Paper Stack (140548)
Other:  Rose Garden Thinlits Dies (140619), Wink of Stella brush – clear (141897), Big Shot (113439), Big Shot die brush (140603), Paper Snips (103579), Multipurpose Liquid Glue (110755), Stampin’ Dimensionals (104430)

Measurements: 

Blushing Bride card stock: 5 ½” x 8 ½”, score at 4 ¼”
Mossy Meadow card stock: 3 ¼” x 3”
Watermelon Wonder card stock:  4 ¾” x ½”, Watermelon Wonder scrap piece:  2 ¾” x 2 ½”
Love Blossoms Designer paper:  2 ¾” x 2 ½”
Typeset Specialty Designer paper (newsprint design): 4” x 1 ¾” , Typeset Specialty Designer paper (grid design): 3-1/8” x 2-7/8”, Typeset Specialty Designer paper (striped design): 4 ¾” x ¾”


I hope you give this technique a try and I hope it inspires you to give it a try with some different dies! Which dies would you try this technique with?

retiring products

     signature


     April Hostess Code to use:  DBBZ2AUS

jojopoints blog post footer

Read more

Spiral Flower and Flower Patch Gift Jar

Posted on April 20, 2016April 18, 2016 by Josee

social_retired2016_demo_Apr1816_NA_5

Good Morning! 

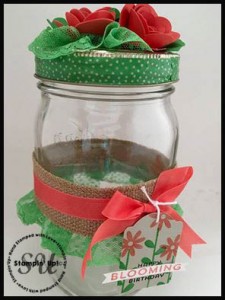
Today's project is an amazing gift idea that can be put together fairly quick. The hardest part may be deciding what you will put inside the jar! wink (I would suggest candy or chocolates, or even a makeup 'kit' or nail 'kit', or you might be able to fit a small clothing item in there) This gift jar uses the Flower Patch stamp set and the Spiral Flower Originals Die, along with some wonderful ribbons to create a gift that looks like you spent alot more time making it than you actually will!

Flower Patch, Spiral Flower Die, Stampin Up, Gift Jar, Mothers Day

How to Make It:

1.    Trace lid onto Cucumber crush card stock, cut and adhere to lid. Wrap jar ring with washi tape.
2.    Cut 3 spiral flower dies from the Calypso Coral card stock. Curl die with bone folder and twist into flower shape and secure with hot glue. TIP – Use a pair of needle nose pliers and hold the smallest end of the die, then twist the rest of the flower around the pliers with the smallest piece in the center. 
3.    Punch 3 pansy flowers from Cucumber Crush card stock. Cut each into two pieces: one with 3 petals/leaves and the other with 2 petals/leaves. Fold each into leaf shapes (fold down the center of each petal)
4.    Adhere 3 flowers to the top of the jar lid with hot glue. Tuck a folded piece of ribbon trim into the empty spaces and adhere “leaves” around flowers. 
Top of gift jar, Mother's day, gift idea5.    Lay a strip of Tear & Tape adhesive along the top and bottom edges of the burlap trim (long sides). Remove backing from bottom edge and fold ribbon into pleats along the edge. Lay another strip of Tear & Tape over the pleats to hold in place. Remove all backing and carefully wrap around the jar. 
6.    Tie Calypso ribbon around the burlap band, with bow in front. bottom of gift jar, Flower Patch, Mother's day, gift idea
7.    Punch Note Tag from Sahara Sand card stock. Stamp flower petals (Cucumber) and flowers (Coral) at the top of the tag. Stamp “Happy Blooming Birthday” (Espresso) toward the bottom of the tag. Clean word stamp and stamp “Blooming” on white card stock scrap with Calypso Coral. Snip banner ends and adhere over tag. 
8.    Punch 1/16” hole at top of tag, thread 5” white baker’s twine through hole and tie to front of bow on the jar.


Supplies:

Stamp Sets: Flower Patch  (134207)
Inks: Cucumber Crush (138324), Calypso Coral (126983), Early Espresso (126974)
Paper: Calypso Coral (122925), Cucumber Crush (138335), Sahara Sand (122959)
Other:  Spiral Flower Originals Die (129379), Big Shot (113439), Calypso Coral Seam Binding Ribbon (134569), Cucumber Crush Dotted Lace Trim (138423),  1-1/4” Burlap ribbon (132140), Pansy Punch (130698), Cherry on Top Washi Tape (138384), Tear & Tape adhesive (138995), White Baker’s Twine (124262), Note Tag Punch (135860), 1/16” circle punch (134363), Bone Folder (102300), Glue gun and quart jar with lid (wide mouth is best)


Measurements:

Burlap Ribbon: 13”
Ribbon trim: 26” and two 4” pieces
Seam Binding ribbon: 26”
Calypso Coral card stock: 3- 4” squares
Cucumber Crush card stock: 2” x 6” and 4” square (trace lid, cut out and adhere to flat lid)
Sahara Sand card stock: 2” x 2-1/2” 

Thanks for stopping by! Have a wonderful day!

retiring products

     signature


     April Hostess Code to use:  DBBZ2AUS

jojopoints blog post footer

Read more

Posts pagination

  • Previous
  • 1
  • …
  • 254
  • 255
  • 256
  • 257
  • 258
  • 259
  • 260
  • …
  • 587
  • Next

go to store

Promos

Paper Bouquet Kit