
![]()
Good Morning!
Welcome to this month's 'Christmas in July' Blog Hop! I know, I know…Christmas in July? Who wants to think about Christmas when Summer just finally arrived (because our Christmas time means SNOW!!), and I have to admit, I didn't want to break out the Christmas stamp sets for this one! I decided to get a little creative and use only the new products I had in front of me. I hope this will inspire you to use non-traditional supplies on your next holiday cards 🙂

I started this card out with a base of Thick Whisper White cardstock. I really needed the THICK cardstock for this one to hold the weight of all the cardstock I ended up adding 🙂
I used the Brick Wall Textured embossing folder to emboss the Thick Whisper White- if you haven't tried the Thick Whisper White cardstock yet, you are going to love the way it embosses so nicely!
Now, forgive me here, as I ended up using many supplies to make this card. But, I think you can get creative with whatever you have on hand. I love finding new ways to use the supplies I have in front of me!
The Fireplace & Fire: I used the same embossing folder on some Basic Gray cardstock and cut it into the shape for my fireplace just using my Stampin' Trimmer following the lines of the bricks. I used a strip of Soft Suede and the Woodgrain Textured embossing folder to create the mantle, which I also ran some Basic Gray ink over to make it look more realistic. The logs were punched from Soft Suede using the Tree Builder Punch and inked up a bit for some dimension. The flames were cut from Real Red and Tangerine Tango using one of the leaf dies from Flower Fair Framelits and also inked up a bit.
The kids: The girl and the boy are from Hey, Girl and Skating By. I stamped them on regular Whisper White with Tuxedo Black ink (and in hindsight, I would use the Thick Whisper White the next time I want to cut them out). I colored them in using my alcohol and Stampin' Write marker technique. You can see that here. The colors I used were Cucumber Crush, Real Red, Crushed Curry, Night of Navy, Chocolate Chip, Crumb Cake and Pink Pirouette.
Now for the girl, I actually cut off her pony tail and repositioned it so that the hair would hang out from under the Santa hat better 🙂
The Santa hats: I used the Tree punch to cut the 'hats' from Real Red cardstock, then used the Washi Label punch and Dazzling Diamonds Glimmer Paper for the hat trim. After I punched out a Washi Label, I cut it in half length wise to have a thinner trim. The Tree Builder punch was used for the pom poms on the top of their hats. I folded the Real Red tree punch to bend the hat. Everything was stuck together with glue dots.
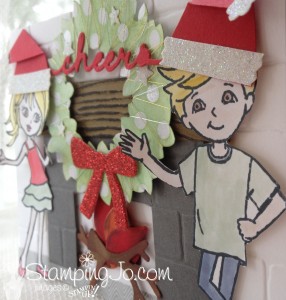
The Wreath: Now, I resisted using Christmas stamps, but I needed something Christmas-y for the over the mantle. I opted to add a wreath. I cut one out of White Color Me Irristible Specialty Designer Series Paper with the Wonderful Wreath Framelits– and then colored it with alcohol and a Cucumber Crush Stampin' Write marker and then added a bit of sponged Cucumber Crush ink as well, wiping the ink off the glossy dots on the paper with a tissue. Then, I took some Silver Metallic Thread and Gold Metallic Thread and wrapped it around the wreath securing it with a glue dot on the back. I added some Dazzling Diamond Glimmer Paper stars punched with the Confetti Star punch, as well as bow cut from the Wonderful Wreath die set and Red Glimmer paper.
The 'Cheers' cut out is from the NEW Greetings Thinlits and was cut from Real Red cardstock and glued on with a 2 Way Glue Pen.
Now, before everything was adhered to the card base, I added some 'flooring' using the Everyday Chic Designer Washi Tape. All the layers were then added using Stampin' Dimensionals to give the whole card lots of dimension.
Here is a list of the supplies I used to create this project:
Thanks for stopping by! Now click Next Blog to hop on over to Laura Milligan's blog to check out what crafty goodness she has in store for us! 


July Hostess Code to use: FFR9ASVZ
Earn FREE stamps! Use this monthly Hostess Code to earn JO JO POINTS for every $40 you spend (before taxes & shipping)!
Click here to learn more about this updated Loyalty Program!

>>How to use the hostess code:
a. Enter your items into cart
b. At Check out- Look under the "Special Offers" box (bottom left)
c. Enter HOSTESS CODE in box and hit apply, then complete your order
d. After you receive your order confirmation, keep track of your JO JO POINTS earned on your JO JO POINTS Tracking Sheet! Earn 1 JO JO POINT for every $40 you spend before taxes and shipping!
e. Once you have 10 JO JO POINTS, email me your Tracking Sheet and choice of photopolymer or clear-mount stamp set FREE!!
NOTE: If your order is over $200, do not use the Hostess Code so that you to claim the Stampin' Rewards (more FREE items!) on your order! You will still earn JO JO POINTS on that order!
Love your card. Think I will case it. Thank you for sharing
I just love your card. Your fireplace is gorgeous. Thank you for sharing.
AMAZING!!!
WOW – FABULOUS! Love your out of the box thinking! All the detail and love that went into this card blows me away.
TFS!
Jenny
Awesome card. I am going to case this for personal use not my club and switch the girl for a second boy. I have two grandson's. It's perfect.