Skip to content

Hand Stamped Cards with Josee Smuck-Stampin' Up! Canada Demonstrator

Stampin' Up! Canada Demonstrator; Rubber Stamps & Supplies for Cardmaking & Scrapbooking in Stittsville, Ontario (near Ottawa)

Menu
  • Home
  • JO JO POINTS
  • **Join**
  • Monthly Craft Kit
  • Weekly News
  • Shop Now
  • Contact Me
Menu

Thank You with Artistically Inked

Posted on May 5, 2021May 16, 2021 by Josee

I hope you’ve been enjoying the new catalogue! There are so many new stamp sets and products to fall in love with. My favourite new products line is Artistically Inked which features unique watercolour looks with the images!!! In the suite, you’ll find beautiful Designer Paper, a stamp set, coordinating dies and an embellishment pack. You can see the entire line HERE

Measurements:

  • Card Stock 1: Pale Papaya- 8 1/2” x 5 1/2” 3 ¾” x 5”
  • Card Stock 2: Basic White- 4” x 2 ¾”
  • Expressions in Ink Specialty DSP: 5 ½” x 2 ¼”

Instructions:

  1. Fold your card base in half on the long side at 4 ¼” and set aside.
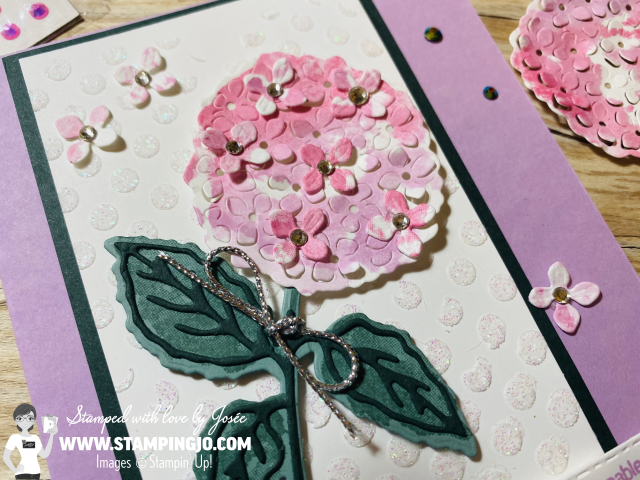
  2. Emboss the 3 ¾” x 5” piece of Pale Papaya cardstock with the Macrame Embossing Folder then cut it in 1 ¼” x 5” strips. Glue those strips to your card front in a messy fashion. They may overlap each other in some places.
  3. Take your Basic White piece of cardstock and place it on a piece of scrap paper. Lay the decorative mask on top and use your blending brush and Pale Papaya ink to make the pattern shown. Then, stamp the sentiment using Memento Black ink. Attach that piece to the card front at an angle using Stampin’ Dimensionals.
  4. Die-cut the leaf stem shown using the Artistic Dies and the Expressions in Ink DSP.
  5. Attach the die-cut to the card front using Multipurpose Liquid Glue. I used a few mini glue dots on the parts that fall on the Pale Papaya cardstock to hold it down.
  6. Lastly, add a few In Color Jewels to the card front.


Product List

Artistically Inked Cling Stamp Set

Artistically Inked Cling Stamp Set
[154542]
$33.00

Artistically Inked Bundle (English)

Artistically Inked Bundle (English)
[155456]
$72.75

Pale Papaya 8 1/2" X 11" Cardstock

Pale Papaya 8 1/2″ X 11″ Cardstock
[155668]
$12.00

Basic White 8 1/2" X 11" Cardstock

Basic White 8 1/2″ X 11″ Cardstock
[159276]
$13.25

Expressions In Ink 12" X 12" (30.5 X 30.5 Cm) Specialty Designer Series Paper

Expressions In Ink 12″ X 12″ (30.5 X 30.5 Cm) Specialty Designer Series Paper
[155464]
$20.00

Pale Papaya 8 1/2" X 11" Cardstock

Pale Papaya 8 1/2″ X 11″ Cardstock
[155668]
$12.00

Tuxedo Black Memento Ink Pad

Tuxedo Black Memento Ink Pad
[132708]
$8.25

Plenty Of Patterns Decorative Masks

Plenty Of Patterns Decorative Masks
[155553]
$11.00

Stampin' Cut & Emboss Machine

Stampin’ Cut & Emboss Machine
[149653]
$163.00

Artistic Dies

Artistic Dies
[155371]
$48.00

Blending Brushes

Blending Brushes
[153611]
$16.25

2021–2023 In Color Jewels

2021–2023 In Color Jewels
[155571]
$9.50

Macrame 3 D Embossing Folder

Macrame 3 D Embossing Folder
[155435]
$12.25

Stampin' Seal

Stampin’ Seal
[152813]
$11.00

Stampin' Dimensionals

Stampin’ Dimensionals
[104430]
$5.50

Multipurpose Liquid Glue

Multipurpose Liquid Glue
[110755]
$5.50

Mini Glue Dots

Mini Glue Dots
[103683]
$7.25

MAY HOSTESS CODE FOR SHOPPING >> XUBRQH97 <<

Qualify for JO JO POINTS

QUICK LINKS & PROMOS:

            1. 2021-2022 Annual Catalogue –
              View PDF here: English  French  See products online
            2. Join Stampin’ Up Promotion (May 4-31) – Spend $135 and you’ll get $165  $206 worth of products + FREE shipping!
            3. January-June 2021 Mini Catalogue –
              View PDF here: English   French    See products online
            4. JO JO POINTS: Earn free stamps with my VIP reward program!
            5. Jo-Jo’s Stamping Essentials– click here
            6. Clearance Rack  – click here
            7. WEEKLY NEWSLETTER & TUTORIALS: Sign up for my newsletter to get updates, specials & card ideas!
            8. New to Stampin’ Up? Check out my STAMPING 101 TIP
Read more

Hydrangea Haven smooched background

Posted on May 3, 2021 by Josee

Dimensions

  • Fresh Freesia: 4 1/4″ x 8 1/2″, scored at 4 1/4″
  • Evening Evergreen: 3″ x 5 1/2″
  • Basic White: 2 3/4″ x 5 1/4″

Supplies

  • Stamp Set: Hydrangea Haven Bundle (159519)
  • Cardstock: Fresh Freesia (155613), Polished Pink (155712), Evening Evergreen  (155574), Basic White (159276), Soft Succulent (155776)
  • Ink: Fresh Freesia (155611), Polished Pink (155712), Soft Succulent (155778)
  • Accessories: Stampin’ Cut & Emboss Machine (149653), Rhinestone Basic Jewels (144220), 2021-2023 In Color Jewels (155571), Simply Elegant Trim (155766), Stampin’ Spritzers (126185), Basic Patterns Decorative Masks (150697), Shimmery White Finish Embossing Paste (145645), Palette Knives (142808), Mini Glue Dots (103683), Multipurpose Liquid Glue (110755), Stampin’ Dimensionals (104430)

Directions:

  1. Place the Polka Dot Decorative Mask on the Basic White cardstock. Use a Palette Knife to add the Shimmery Paste to the card by applying it over the mask and scraping off the excess. Let dry. Adhere the layer to the Evening Evergreen cardstock then add both to the card.
  2. Press the Fresh Freesia and the Polished Pink ink pads into a larger Stampin’ Block. Spritz the block with water until the colours start to mix together. Press the circular background stamp onto the block to pick up the colour, then stamp it on Basic White cardstock. Do this a few times so you can use it for the smaller flowers. Let dry.
  3. Cut out using the coordinating Die.
  4. Stamp the stem and leaves onto a piece of Soft Succulent cardstock, then cut out using the coordinating die.
  5. Cut out the detailed leaves and stem using die with the Evening Evergreen cardstock. Adhere it to the Soft Succulent cardstock.
  6. Tie a piece of the Trim around the stem in a knot and then a bow.
  7. Add the flower and the stem to the card using Dimensionals.
  8. Use the extra coloured cardstock to cut out small flower, then adhere them to the card using Glue Dots.
  9. Add Rhinestones to the center of the small flowers.
  10. Add some In Color Jewels to the card.

MAY HOSTESS CODE FOR SHOPPING >> XUBRQH97 <<

Qualify for JO JO POINTS

QUICK LINKS & PROMOS:

            1. January-June 2021 Mini Catalogue –
              View PDF here: English   French    See products online
            2. JO JO POINTS: Earn free stamps with my VIP reward program!
            3. Jo-Jo’s Stamping Essentials– click here
            4. Clearance Rack  – click here
            5. WEEKLY NEWSLETTER & TUTORIALS: Sign up for my newsletter to get updates, specials & card ideas!
            6. New to Stampin’ Up? Check out my STAMPING 101 TIP
Read more

Hand-Penned Petals Thanks

Posted on April 26, 2021April 22, 2021 by Josee

Happy Wednesday! Here is another sneak peek on products coming out in the new Annual Catalogue next month. On this card, I used all 5 of the new In Colors.

Dimensions:

  • Polished Pink: 5 1/2″ x 8 1/2″, scored at 4 1/4″
  • Soft Succulent: 3 3/4″ x 5″
  • Basic White: 3 1/2″ x 4 3/4″
  • Rectangle Dies: 2 5/8″ x 4″ and 1″ x 2 3/8″

Supplies: 

  • Stamp Set/Bundles: Hand-Penned Petals stamp set (155070),  Hand-Penned Petals Bundle (155492), Hand-Penned Suite (155503)
  • Cardstock: Polished Pink (155710), Soft Succulent (155776), Hand-Penned 12″ x 12″ Designer Paper (155499), Basic White (159276)
  • Ink: Memento Black ink (132708), Soft Succulent (155778), Fresh Freesia (155611), Polished Pink (155712), Evening Evergreen (155576), Pale Papaya (155670)
  • Accessories: Stampin’ Cut & Emboss Machine (149653),  Penned Flowers Dies (155557), Stitched Rectangles Dies (151820), 2021-2023 In Color Jewels (155571),  Multipurpose Liquid Glue (110755), Dimensionals (104430)

Directions

  1. Adhere the designer series paper to the Soft Succulent cardstock.
  2. Cut out a 2 5/8? x 4? Stitched Rectangle opening from the Basic White cardstock. Adhere to the card.
  3. Stamp greeting on to scrap Whisper White cardstock, cut out using the 1? x 2 3/8? Stitched Rectangle Die. Add to the card using dimensionals.
  4. Stamp the flowers onto Basic White cardstock using Memento Black ink.
  5. Stamp the flowers and leaves using In Color Ink Pads.
  6. Cut out using the coordinating die. Add to the card using Dimensionals.
  7. Add In-Color Gems to the center of the flowers.

APRIL HOSTESS CODE FOR SHOPPING >> 2MXFRDYW <<

Qualify for JO JO POINTS

QUICK LINKS & PROMOS:

            1. January-June 2021 Mini Catalogue –
              View PDF here: English   French    See products online
            2. JO JO POINTS: Earn free stamps with my VIP reward program!
            3. Jo-Jo’s Stamping Essentials– click here
            4. Clearance Rack  – click here
            5. WEEKLY NEWSLETTER & TUTORIALS: Sign up for my newsletter to get updates, specials & card ideas!
            6. New to Stampin’ Up? Check out my STAMPING 101 TIP
Read more

Birthday Card with Blossoms in Bloom

Posted on April 23, 2021April 22, 2021 by Josee

Here’s another fun card using a stamp set coming out in the next Annual Catalogue! We are less than 2 weeks away from the launch and you will love it! 🙂
This card is fairly simple to make, but I’ve made some others that I will share soon that are stepped up!

Dimensions: 

  • Soft Succulent: 5 1/2″ x 8 1/2″, scored at 4 1/4″
  • Polished Pink: 4″ x 5 1/4″
  • Basic White: 3 3/4″ x 5″

Supplies: 

  • Stamp Set/Bundles: Blossoms in Bloom stamp set (158283),  Blossoms in Bloom Bundle (159526)
  • Cardstock: Soft Succulent (155776), Polished Pink (155710), Basic White (159276)
  • Ink:  Soft Succulent (155778), Polished Pink (155712),  Daffodil Delight (147094)
  • Accessories: Simply Elegant Trim (155766), Rhinestone Basic Jewels (144220), Multipurpose Liquid Glue (110755), Dimensionals (104430)

Directions:

  1. Stamp the flower bundle onto Basic White cardstock using the Polished Pink ink pad.
  2. Stamp the leaves around using the Soft Succulent ink pad.
  3. Stamp the middles using the Daffodil Delight ink pad.
  4. Stamp the small flower by inking it on the Polished Pink ink pad, then stamping it on scrap paper first before stamping on the card. This will create a lighter shade of pink.
  5. Adhere the layers to the card.
  6. Add Rhinestones to the card.
  7. Stamp the greeting on the Polished Pink ink pad. Cut ends in a “V”.
  8. Cut ends of the Soft Succulent strip in a “V”, then add the greeting and the Soft Succulent strip on the card using Dimensionals.
  9. Cut a piece of Silver Trim and tie around the center of the card and tie in a bow.

APRIL HOSTESS CODE FOR SHOPPING >> 2MXFRDYW <<

Qualify for JO JO POINTS

QUICK LINKS & PROMOS:

            1. January-June 2021 Mini Catalogue –
              View PDF here: English   French    See products online
            2. JO JO POINTS: Earn free stamps with my VIP reward program!
            3. Jo-Jo’s Stamping Essentials– click here
            4. Clearance Rack  – click here
            5. WEEKLY NEWSLETTER & TUTORIALS: Sign up for my newsletter to get updates, specials & card ideas!
            6. New to Stampin’ Up? Check out my STAMPING 101 TIP
Read more

Pansy Patch Hello

Posted on April 22, 2021 by Josee

This card uses new products from the upcoming 2021-2022 Annual Catalogue. The bundle includes dies that will cut out shapes from the stamp set and from the designer paper. The only stamping on this card is the greeting.

Dimensions

  • Pale Papaya: 5 1/2″ x 8 1/2″, scored at 4 1/4″
  • Fresh Freesia: 4″ x 5 1/4″
  • Designer Paper: 2 1/2″ x 4″ (floral) and 1/2″ x 4″ (checkered)
  • Basic White: 3/8″ x 3 1/8″

Supplies

    • Stamp Set/Bundles: Pansy Patch stamp set (154999), Pansy Patch Bundle (155674), Pansy Petals Suite (155810)
    • Cardstock: Pale Papaya (155668), Fresh Freesia (155613), Pansy Petals 12″ x 12″ Designer Paper (155807), Basic White (159276)
    • Ink: Soft Succulent (155778)
    • Accessories: Stampin’ Cut & Emboss Machine (149653), Genial Gems (155500), Paper Snips Scissors (103579), Multipurpose Liquid Glue (110755), Dimensionals (104430)

Directions:

  1. Adhere the layers together using Multipurpose Liquid Glue.
  2. Use the coordinating dies to cut out the 3 pansies and the leaves from the Designer Paper. Place the flowers and leaves grouped together the way you would like them. Tip: you can use Washi Tape to keep them together and turn the bunch upside down to place Dimensionals on the back. Place flower bunch onto the card.
  3. Stamp the greeting on the bottom of a piece of Basic White cardstock, then cut out using a Paper Trimmer. Use Paper Snips to cut the ends. Add to the card using Dimensionals.
  4. Add Gems to the middle of the flowers.


APRIL HOSTESS CODE FOR SHOPPING >> 2MXFRDYW <<

Qualify for JO JO POINTS

QUICK LINKS & PROMOS:

            1. January-June 2021 Mini Catalogue –
              View PDF here: English   French    See products online
            2. JO JO POINTS: Earn free stamps with my VIP reward program!
            3. Jo-Jo’s Stamping Essentials– click here
            4. Clearance Rack  – click here
            5. WEEKLY NEWSLETTER & TUTORIALS: Sign up for my newsletter to get updates, specials & card ideas!
            6. New to Stampin’ Up? Check out my STAMPING 101 TIP
Read more

Posts pagination

  • Previous
  • 1
  • …
  • 71
  • 72
  • 73
  • 74
  • 75
  • 76
  • 77
  • …
  • 587
  • Next

go to store

Promos

Paper Bouquet Kit

josee smuck

Josée Smuck

Stampin’ Up! Canada Demonstrator since 2002
Ottawa, ON, Canada
Contact me with questions!
Josee@StampingJo.com
(613) 831-2917

Current Catalogues

Annual Catalogue (May2024-April2025)Stampin' Up! Annual CatalogueView Catalogue-ENG | Shop Online
View Catalogue- FR

——————

Looking for something?

Get the news


Click HERE to download Jo-Jo’s FREE Sketches & Tips Guide

Updates

Receive NEXT-DAY updates by email:

Receive SAME DAY updates by subscribing in a reader:
Click to Subscribe in a reader

Recent Posts

  • Embrace the Journey April 11, 2025
  • For the Books April 8, 2025
  • Beautiful Birthday April 5, 2025
  • Happy Retirement April 2, 2025
  • Frame & Flowers March 28, 2025

Categories

Proud Member…

Inky_Divas800

The content of this blog is the sole responsibility of Josee Smuck as a Stampin’ Up! Independent Demonstrator.  The use of and content of classes, services or products offered is not endorsed by Stampin’ Up! Unless otherwise indicated, images © Stampin’ Up! 1990 – present.

© 2025 Hand Stamped Cards with Josee Smuck-Stampin' Up! Canada Demonstrator | Powered by Superbs Personal Blog theme