Skip to content

Hand Stamped Cards with Josee Smuck-Stampin' Up! Canada Demonstrator

Stampin' Up! Canada Demonstrator; Rubber Stamps & Supplies for Cardmaking & Scrapbooking in Stittsville, Ontario (near Ottawa)

Menu
  • Home
  • JO JO POINTS
  • **Join**
  • Monthly Craft Kit
  • Weekly News
  • Shop Now
  • Contact Me
Menu

this calls for doughnuts

Posted on November 12, 2024April 12, 2025 by Josee

Supplies: 

  • Stamp Sets – More Than Autumn Bundle (164076); More Than Autumn stamp set (164228)
  • Card Stock – Pretty in Pink (163793); Berry Burst (144243); Basic White (159276)
  • Ink – Tuxedo Black Memento (132708); Pretty in Pink (163807); Berry Burst (147143)
  • Misc. – Pretty in Pink Stampin’ Blends Combo Pack (163807); Berry Burst Stampin’ Blends Combo Pack (161681); Flirty Flamingo Stampin’ Blends Combo Pack (154884); Silver & White ½” Sheer Ribbon (162149); Stampin’ Cut & Emboss Machine (149653); Nested Essentials Dies (161597); Rhinestone Basic Jewels (144220); Stampin’ Dimensionals (104430); Multipurpose Liquid Glue (110755)

SHOP FOR THESE PRODUCTS HERE

Measurements:  

  • Pretty in Pink: 5 1/2″ x 8 1/2″, scored at 4 1/4″
  • Berry Burst: 3 3/4″ x 5″
  • Basic White: 3 1/2″ x 4 3/4″  and  2 1/4″ x 3″ die

Instructions:

  1. Adhere the Berry Burst cardstock to the card.
  2. Stamp the donuts randomly on the Basic White cardstock using Pretty in Pink ink.
  3. Stamp the sprinkles randomly on the Basic White cardstock using Berry Burst ink.
  4. Place a ribbon on top of the stamped cardstock and adhere the ends to the back. Loop another ribbon around it and tie it in a bow. Cut ends.
  5. Adhere the layer to the card.
  6. Cut out a 2 1/4″ x 3″ rectangle with the Nested Essentials Die.
  7. Stamp the greeting using Berry Burst ink, then adhere the layer to the card.
  8. Stamp 3 donuts on scrap Whisper White cardstock with Memento Black ink. Colour the donut part using the Med. Combo Stampin’ Blend (#600), then each frosting using Pretty ink Pink, Berry Burst and Flirty Flamingo Stampin’ Blends.
  9. Adhere the donuts directly to the card and the Berry Burst donut with Dimensionals.
  10. Add Rhinestones to the card.

Qualify for JO JO POINTS

QUICK LINKS & PROMOS:

        1. May 2024-Apr 2025 Annual Catalogue –
          View PDF here: English  French  See products online  Card Recipes
        2. Online Exclusive Products:  click here
        3. Clearance Products – click here
        4. JO JO POINTS: Earn free stamps with my VIP reward program!
        5. Jo-Jo’s Stamping Essentials– click here
        6. WEEKLY NEWSLETTER & TUTORIALS: Sign up for my newsletter to get updates, specials & card ideas!
Read more

Little Bit Festive

Posted on November 5, 2024April 12, 2025 by Josee

Supplies: 

  • Stamp Sets – Christmas Labels Bundle (164101)
  • Paper – Little Bit Festive Mix & Match Designer Series Paper (DSP (164107)); Crumb Cake Card Stock (120953); Cherry Cobbler Card Stock (119685); Pecan Pie Card Stock (161717)
  • Ink Pads – White Craft Ink Pad (147277)
  • Misc. – Mini Cut & Emboss Machine (150673); Basics WOW! Embossing Powder (165679); Heat Tool (129053); Dimensionals (104430); Multipurpose Liquid Glue (110755)

SHOP FOR THESE PRODUCTS HERE

Measurements:  

  • Cherry Cobbler card stock: Four- 5 ¼” x 3 ¾” (note: white card stock shows where photos would be placed, and is optional)
  • Pecan Pie card stock: 2” x 3” 
  • Crumb Cake Card Stock: Two 8 ½” x 11” sheets
  • Gingham DSP: 10 ½” x 6”, torn in half vertically. 
  • Mix & Match pieces needed from packet: Truck with tree, wintery evergreens on the snow, cups of hot cocoa, evergreen & pinecone sprig, tree and present cookies, Pool Party circle snowflake.

 Instructions:

  1. Adhere gingham DSP to left side of one Crumb Cake card stock (leaving ¼” around top, bottom and left) and mirror the other piece on the second page. 
  2. Stamp “It’s a Hot Cocoa Day” on Pecan Pie card stock with white craft ink, then emboss with white embossing powder. Let cool, then cut out label with coordinating dies. 
  3. Adhere trees over gingham in lower left page, then add truck with dimensionals (or flat).
  4. Adhere sprig on top right corner of opposite page, then add Hot Cocoa label, cup of cocoa image and cookies. Optional: Use dimensionals for cup and one cookie. 
  5. Attach circle snowflake between two photo mats with a dimensional.

Qualify for JO JO POINTS

QUICK LINKS & PROMOS:

        1. May 2024-Apr 2025 Annual Catalogue –
          View PDF here: English  French  See products online  Card Recipes
        2. Online Exclusive Products:  click here
        3. Clearance Products – click here
        4. JO JO POINTS: Earn free stamps with my VIP reward program!
        5. Jo-Jo’s Stamping Essentials– click here
        6. WEEKLY NEWSLETTER & TUTORIALS: Sign up for my newsletter to get updates, specials & card ideas!
Read more

Happy Couple

Posted on October 30, 2024November 13, 2024 by Josee

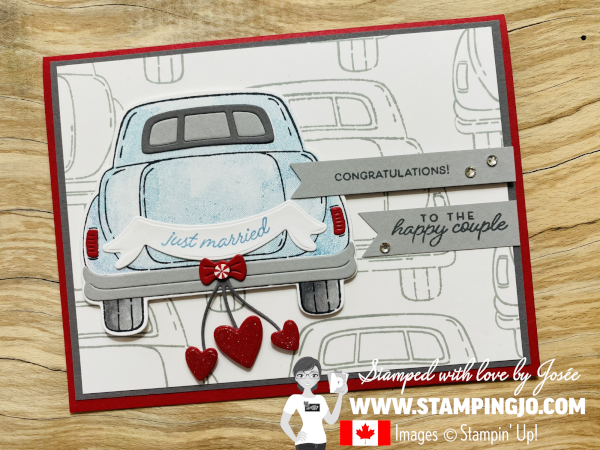
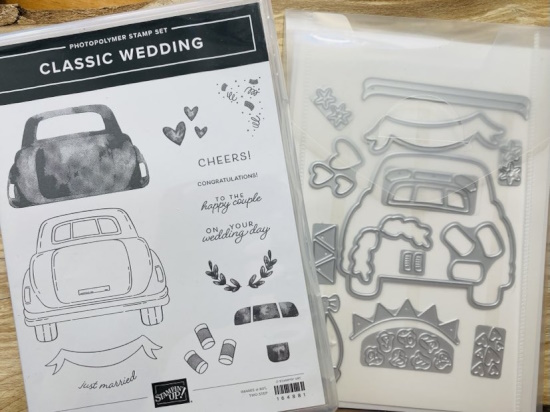
This car from the “Classic Wedding” stamp set that will be available to customers starting next month.

Dimensions

  • Real Red: 5 1/2″ x 8 1/2″, scored at 4 1/4″
  • Basic Gray: 4″ x 5 1/4″
  • Basic White: 3 3/4″ x 5″
  • Smoky Slate: approx. 3/8″ x 3″  and  1/2″ x 2″

Directions

  1. Stamp the outline car randomly on the Basic White cardstock using the Smoky Slate ink pad.
  2. Adhere the white layer to the Basic Gray cardstock, then to the card.
  3. Stamp the outline car on a piece of scrap Basic White cardstock using Memento Black Ink.
  4. Use the bold car stamp to ink it with Balmy Blue ink, stamp it first on a scrap paper then line it up with the outline and stamp it. (This make the colour softer).
  5.  Cut the car out using the car die.
  6. Use the window die to cut it out using Smoky Slate and Basic Gray. Adhere them to the card as shown above.
  7. Cut out the lights using Real Red Cardstock and adhere them to the car.
  8. Colour the wheels using Smoky Slate Stampin’ Blends.
  9. Cut out the bumper using Smoky Slate cardstock; adhere it to the car.
  10. Cut out the Basic White banner, then stamp the greeting on it with Balmy Blue ink. Adhere it to the car.
  11. Add car to the card using Dimensionals.
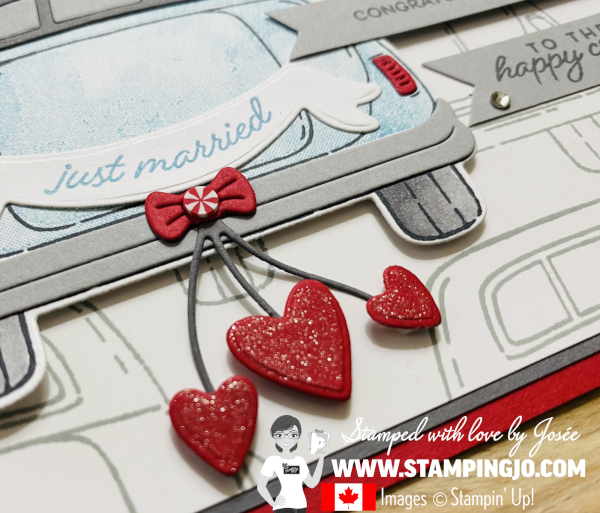
  12. Use the die to cut out the bow and streamers with Basic Gray cardstock. Cut it out one more time using Real Red cardstock. Cut off the bow from the Real Red cut-out and adhere it on top of the Basic Gray bow.
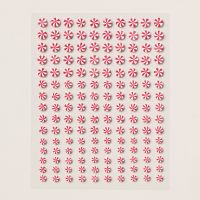
  13. Add a Peppermint Embellishment to the middle of the bow.
  14. Use the triple heart die to cut Real Red hearts.
  15. Cut the left and right ends of the streamers and add the hearts on top using Dimensionals. Adhere the middle large heart directly to the bottom of the streamer. Add a Dimensional to back to add it to the card.
  16. Stamp the 2 greetings on the Smoky Slate cardstocks using the Basic Gray ink. Cut the ends of the cardstock into a “V”.  Add “CONGRATULATIONS” to the card using Dimensionals and adhere the “TO THE happy couple” with glue.
  17. Add Rhinestones to the greeting layers.
  18. Use the Wink of Stella Glitter Brush to colour the 3 hearts.

Product List

The Classic Wedding stamp set and dies used in the above card will be available to customers starting in November. Click here to see it!

Real Red 8-1/2" X 11" Cardstock [ 102482 ]

Real Red 8-1/2″ X 11″ Cardstock
[102482]
$15.75

Basic Gray 8-1/2" X 11" Cardstock [ 121044 ]

Basic Gray 8-1/2″ X 11″ Cardstock
[121044]
$15.75

Basic White 8 1/2" X 11" Cardstock [ 159276 ]

Basic White 8 1/2″ X 11″ Cardstock
[159276]
$18.00

Smoky Slate 8-1/2" X 11" Cardstock [ 131202 ]

Smoky Slate 8-1/2″ X 11″ Cardstock
[131202]
$15.75

Tuxedo Black Memento Ink Pad [ 132708 ]

Tuxedo Black Memento Ink Pad
[132708]
$11.00

Balmy Blue Classic Stampin' Pad [ 147105 ]

Balmy Blue Classic Stampin’ Pad
[147105]
$12.25

Smoky Slate Classic Stampin' Pad [ 147113 ]

Smoky Slate Classic Stampin’ Pad
[147113]
$12.25

Basic Gray Classic Stampin' Pad [ 149165 ]

Basic Gray Classic Stampin’ Pad
[149165]
$12.25

Smoky Slate Stampin' Blends Combo Pack [ 154904 ]

Smoky Slate Stampin’ Blends Combo Pack
[154904]
$15.00

Rhinestone Basic Jewels [ 144220 ]

Rhinestone Basic Jewels
[144220]
$8.25

Clear Wink Of Stella Glitter Brush [ 141897 ]

Clear Wink Of Stella Glitter Brush
[141897]
$12.25

Real Red & White Adhesive Backed Peppermints

Real Red & White Adhesive Backed Peppermints
[164050]
$11.75

Stampin' Cut & Emboss Machine [ 149653 ]

Stampin’ Cut & Emboss Machine
[149653]
$177.00

Mini Stampin' Cut & Emboss Machine [ 150673 ]

Mini Stampin’ Cut & Emboss Machine
[150673]
$90.00

Boho Blue Limited Edition Mini Stampin' Cut & Emboss Machine [ 161104 ]

Boho Blue Limited Edition Mini Stampin’ Cut & Emboss Machine
[161104]
$86.00

Paper Snips [ 103579 ]

Paper Snips
[103579]
$16.50

Multipurpose Liquid Glue [ 110755 ]

Multipurpose Liquid Glue
[110755]
$8.25

Stampin' Dimensionals [ 104430 ]

Stampin’ Dimensionals
[104430]
$6.00


OCTOBER HOSTESS CODE FOR SHOPPING >> Y967ZXKS  <<

Qualify for JO JO POINTS

QUICK LINKS & PROMOS:

        1. NEW  Starter Kit Special: $206 (Reg. $165) worth of products for ONLY $135 – click here
        2. Kits Collection up to 30% off – click here
        3. NEW  Clearance Products updated – click here
        4. Sept 2024-Dec 2024 Mini Catalogue
          View PDF here:  English   French
        5. NEW  Scrapbooking Brochure
          View PDF here: English    French
        6. NEW  World Card-Making Day Oct 5th Free Event– click here for info
        7. May 2024-Apr 2025 Annual Catalogue –
          View PDF here: English  French  See products online  Card Recipes
        8. Online Exclusive Products:  click here
        9. Clearance Products – click here
        10. JO JO POINTS: Earn free stamps with my VIP reward program!
        11. Jo-Jo’s Stamping Essentials– click here
        12. WEEKLY NEWSLETTER & TUTORIALS: Sign up for my newsletter to get updates, specials & card ideas!
Read more

The Storm Will End

Posted on October 23, 2024November 13, 2024 by Josee

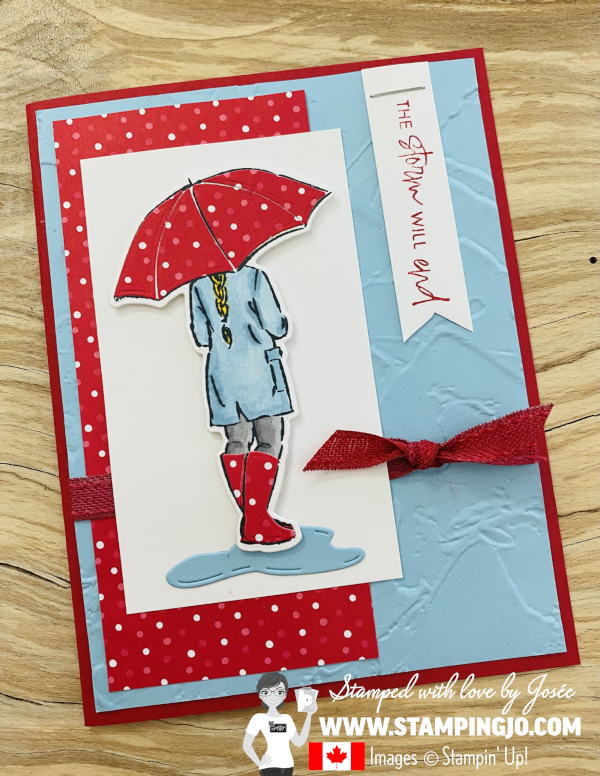
Today’s card features a Sneak Peek stamp set called Umbrella Days that will be available to customers starting next month.

Dimensions

  • Real Red: 5 1/2″ x 8 1/2″, scored at 4 1/4″
  • Balmy Blue: 4″ x 5 1/4″
  • Designer Paper: 2 1/4″ x 5″
  • Basic White: 2 3/8″ x 4″   and  5/8″ x 2 1/2″

Directions

  1. Run the Balmy Blue cardstock through the Cut & Emboss using the Painted Texture 3D Embossing Folder.
  2. Adhere the Designer Paper to the blue layer.
  3. Colour both sides of the Beige Ribbon (approx. 4 1/2″) using the Dark Real Red Stampin’ Blend. Let Dry. Place it on the Balmy Blue cardstock and adhere the ends on the back. Colour another piece of ribbon (approx. 3 1/2″), let dry, then tie it in a knot around the first ribbon. Trim ends.
  4. Stamp the greeting on the small Basic White cardstock using the Real Red ink pad or the Real Red Stampin’ Write Marker.
    Tip: If using the ink pad, use Washi Tape or painters tape to cover the remainder of the greeting before inking the stamp. Remove tape before stamping on cardstock.
    If using the marker, use the brush tip to colour the portion of the greeting that you want to stamp. Huff on the stamp to make sure it’s moist before stamping.
  5. Cut the end of the cardstock to create a “V” and staple the top of the greeting to the Balmy Blue cardstock.
  6. Adhere the Balmy Blue cardstock to the card.
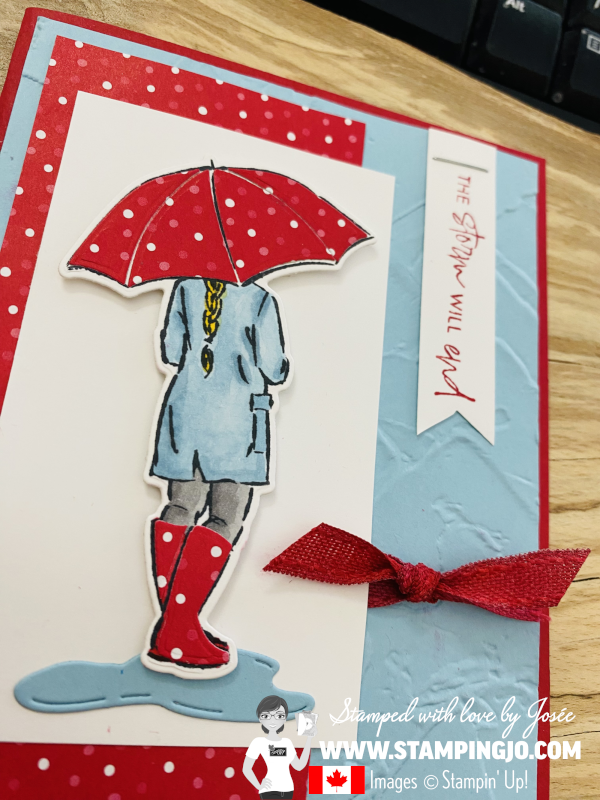
  7. Stamp the “girl and umbrella” image on a piece of scrap Basic White cardstock using Memento Black ink.
  8. Colour with Stampin’ Blends: Balmy Blue for the coat; Smoky Slate for the pants; Daffodil Delight for the hair.
  9. Use the dies to cut out the Umbrella and Boots with the Designer Paper. (Tip: I couldn’t find a spot on the Designer Paper that would have white polka-dots on both boots, so I cut out 2 different spots and glued the 2 half boots together.
  10. Adhere the 4 pieces of polka-dot pieces of the umbrella.
  11. Use the die to cut out the full girl and umbrella. Add the cut out to the Basic White cardstock using Dimensionals.
  12. Use the die to cut out a water puddle with Balmy Blue cardstock. Adhere it directly to the Basic White cardstock under the boots. Adhere the layer to the card.

Product List

Starting in November, customers can purchase the new Umbrella Days stamp set (#164891) featured on this card. Click here to see it.
As a demonstrator, I was able to pre-purchase it this month and start to play with it! 🙂

Real Red 8-1/2" X 11" Cardstock [ 102482 ]

Real Red 8-1/2″ X 11″ Cardstock
[102482]
$15.75

Balmy Blue 8-1/2" X 11" Cardstock [ 146982 ]

Balmy Blue 8-1/2″ X 11″ Cardstock
[146982]
$15.75

Iconic Celebrations 6" X 6" (15.2 X 15.2 Cm) Designer Series Paper [ 164193 ]

Iconic Celebrations 6″ X 6″ (15.2 X 15.2 Cm) Designer Series Paper
[164193]
$17.00

Basic White 8 1/2" X 11" Cardstock [ 159276 ]

Basic White 8 1/2″ X 11″ Cardstock
[159276]
$18.00

Tuxedo Black Memento Ink Pad [ 132708 ]

Tuxedo Black Memento Ink Pad
[132708]
$11.00

Real Red Classic Stampin' Pad [ 147084 ]

Real Red Classic Stampin’ Pad
[147084]
$12.25

Basic Beige 3/8" (1 Cm) Bordered Ribbon [ 163788 ]

Basic Beige 3/8″ (1 Cm) Bordered Ribbon
[163788]
$10.25

Balmy Blue Stampin' Blends Combo Pack [ 154830 ]

Balmy Blue Stampin’ Blends Combo Pack
[154830]
$15.00

Smoky Slate Stampin' Blends Combo Pack [ 154904 ]

Smoky Slate Stampin’ Blends Combo Pack
[154904]
$15.00

Real Red Stampin' Blends Combo Pack [ 154899 ]

Real Red Stampin’ Blends Combo Pack
[154899]
$15.00

Daffodil Delight Stampin' Blends Combo Pack [ 154883 ]

Daffodil Delight Stampin’ Blends Combo Pack
[154883]
$15.00

Stampin' Cut & Emboss Machine [ 149653 ]

Stampin’ Cut & Emboss Machine
[149653]
$177.00

Painted Texture 3 D Embossing Folder [ 154317 ]

Painted Texture 3 D Embossing Folder
[154317]
$13.75

Stampin' Dimensionals [ 104430 ]

Stampin’ Dimensionals
[104430]
$6.00

Multipurpose Liquid Glue [ 110755 ]

Multipurpose Liquid Glue
[110755]
$8.25

FUN NEWS: 
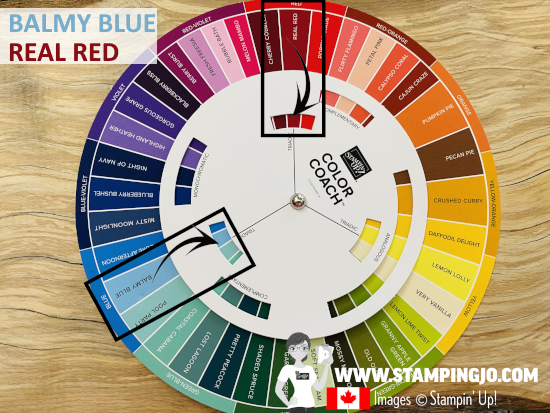
The Colour Wheel below will be available in November and is an incredible tool to pick colours for your projects! For the card I made, I looked for a Designer Paper that would look great on an umbrella. The background colour of it is Real Red, so I chose it as one of the colours.

I chose this colours based on part of a triadic colour scheme from the colour wheel, where three colours are evenly spaced, forming a triangle. This creates a balanced yet vibrant combination.


OCTOBER HOSTESS CODE FOR SHOPPING >> Y967ZXKS  <<

Qualify for JO JO POINTS

QUICK LINKS & PROMOS:

        1. NEW  Starter Kit Special: $206 (Reg. $165) worth of products for ONLY $135 – click here
        2. Kits Collection up to 30% off – click here
        3. NEW  Clearance Products updated – click here
        4. Sept 2024-Dec 2024 Mini Catalogue
          View PDF here:  English   French
        5. NEW  Scrapbooking Brochure
          View PDF here: English    French
        6. NEW  World Card-Making Day Oct 5th Free Event– click here for info
        7. May 2024-Apr 2025 Annual Catalogue –
          View PDF here: English  French  See products online  Card Recipes
        8. Online Exclusive Products:  click here
        9. Clearance Products – click here
        10. JO JO POINTS: Earn free stamps with my VIP reward program!
        11. Jo-Jo’s Stamping Essentials– click here
        12. WEEKLY NEWSLETTER & TUTORIALS: Sign up for my newsletter to get updates, specials & card ideas!
Read more

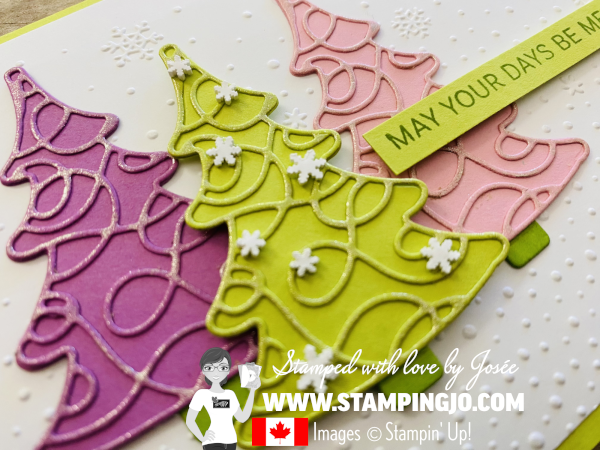
May Your Days Be Merry

Posted on October 21, 2024 by Josee

Dimensions

  • Lemon Lime Twist: 5 1/2″ x 8 1/2″, scored at 4 1/4″
  • Basic White: 4″ x 5 1/4″

Directions

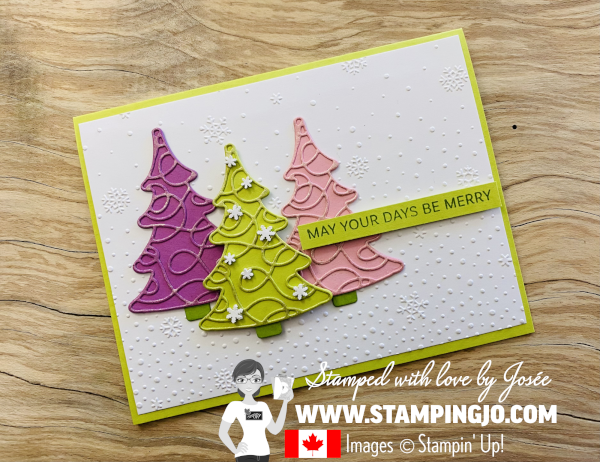
  1. Run the Basic White cardstock through the Cut & Emboss Machine with the Snowflake Sky Embossing Folder. Adhere the layer to the card.
  2. Cut out the background trees (Petunia Pop, Lemon Lime, Pretty in Pink) using the larger tree die.
  3. Cut out a piece of 2 1/8″ x 2 3/4″ of the each tree colour.  Cut out 3 pieces of  2 1/8″ x 2 3/4″ from the Adhesive Sheet. Remove the top piece of the Adhesive Sheet and place the cardstocks on each.
  4. Cut out each using the Swirly Tree Die. Add Wink of Stella to the trees.
  5. Pop out the middles of the tree, remove the backing from the Adhesive Sheet and place it on each of the background trees. Cut off the bottom of the background tree so that the size matches the swirly one.
  6. Use the die to cut out 3 “tree trunks” using Granny Apple Green cardstock. Adhere each one to the trees.
  7. Adhere the Petunia Pop and the Pretty ink Pink trees directly to the card.
  8. Place dimensionals on the back of the Lemon Lime Twist Tree and add it to the card.
  9. Stamp the greeting at the corner of a Lemon Lime Twist cardstock using Granny Apple Green ink. Use a trimmer to cut out the greeting. Add it to the card using Dimensionals.
  10. Adhere the Loose Snowflakes to the trees using a tiny bit of glue. Let dry before moving the card.

Product List

Decorative Trees Bundle (English) [ 164085 ]

Decorative Trees Bundle (English)
[164085]
$72.00

Lemon Lime Twist 8-1/2" X 11" Cardstock [ 144245 ]

Lemon Lime Twist 8-1/2″ X 11″ Cardstock
[144245]
$15.75

Basic White 8 1/2" X 11" Cardstock [ 159276 ]

Basic White 8 1/2″ X 11″ Cardstock
[159276]
$18.00

Petunia Pop 8 1/2" X 11" Cardstock [ 163801 ]

Petunia Pop 8 1/2″ X 11″ Cardstock
[163801]
$15.75

Granny Apple Green 8-1/2" X 11" Cardstock [ 146990 ]

Granny Apple Green 8-1/2″ X 11″ Cardstock
[146990]
$15.75

Pretty In Pink 8 1/2" X 11" Cardstock [ 163793 ]

Pretty In Pink 8 1/2″ X 11″ Cardstock
[163793]
$15.75

Granny Apple Green Stampin' Pad [ 147095 ]

Granny Apple Green Stampin’ Pad
[147095]
$12.25

Stampin' Cut & Emboss Machine [ 149653 ]

Stampin’ Cut & Emboss Machine
[149653]
$177.00

Snowflake Sky 3 D Embossing Folder [ 162026 ]

Snowflake Sky 3 D Embossing Folder
[162026]
$15.00

White Loose Snowflakes [ 164128 ]

White Loose Snowflakes
[164128]
$11.00

Clear Wink Of Stella Glitter Brush [ 141897 ]

Clear Wink Of Stella Glitter Brush
[141897]
$12.25

Adhesive Sheets [ 152334 ]

Adhesive Sheets
[152334]
$15.75

Multipurpose Liquid Glue [ 110755 ]

Multipurpose Liquid Glue
[110755]
$8.25


OCTOBER HOSTESS CODE FOR SHOPPING >> Y967ZXKS  <<

Qualify for JO JO POINTS

QUICK LINKS & PROMOS:

        1. NEW  Starter Kit Special: $206 (Reg. $165) worth of products for ONLY $135 – click here
        2. Kits Collection up to 30% off – click here
        3. NEW  Clearance Products updated – click here
        4. Sept 2024-Dec 2024 Mini Catalogue
          View PDF here:  English   French
        5. NEW  Scrapbooking Brochure
          View PDF here: English    French
        6. NEW  World Card-Making Day Oct 5th Free Event– click here for info
        7. May 2024-Apr 2025 Annual Catalogue –
          View PDF here: English  French  See products online  Card Recipes
        8. Online Exclusive Products:  click here
        9. Clearance Products – click here
        10. JO JO POINTS: Earn free stamps with my VIP reward program!
        11. Jo-Jo’s Stamping Essentials– click here
        12. WEEKLY NEWSLETTER & TUTORIALS: Sign up for my newsletter to get updates, specials & card ideas!
Read more

Posts pagination

  • Previous
  • 1
  • …
  • 4
  • 5
  • 6
  • 7
  • 8
  • 9
  • 10
  • …
  • 587
  • Next

go to store

Promos

Paper Bouquet Kit

josee smuck

Josée Smuck

Stampin’ Up! Canada Demonstrator since 2002
Ottawa, ON, Canada
Contact me with questions!
Josee@StampingJo.com
(613) 831-2917

Current Catalogues

Annual Catalogue (May2024-April2025)Stampin' Up! Annual CatalogueView Catalogue-ENG | Shop Online
View Catalogue- FR

——————

Looking for something?

Get the news


Click HERE to download Jo-Jo’s FREE Sketches & Tips Guide

Updates

Receive NEXT-DAY updates by email:

Receive SAME DAY updates by subscribing in a reader:
Click to Subscribe in a reader

Recent Posts

  • Embrace the Journey April 11, 2025
  • For the Books April 8, 2025
  • Beautiful Birthday April 5, 2025
  • Happy Retirement April 2, 2025
  • Frame & Flowers March 28, 2025

Categories

Proud Member…

Inky_Divas800

The content of this blog is the sole responsibility of Josee Smuck as a Stampin’ Up! Independent Demonstrator.  The use of and content of classes, services or products offered is not endorsed by Stampin’ Up! Unless otherwise indicated, images © Stampin’ Up! 1990 – present.

© 2025 Hand Stamped Cards with Josee Smuck-Stampin' Up! Canada Demonstrator | Powered by Superbs Personal Blog theme