Skip to content

Hand Stamped Cards with Josee Smuck-Stampin' Up! Canada Demonstrator

Stampin' Up! Canada Demonstrator; Rubber Stamps & Supplies for Cardmaking & Scrapbooking in Stittsville, Ontario (near Ottawa)

Menu
  • Home
  • JO JO POINTS
  • **Join**
  • Monthly Craft Kit
  • Weekly News
  • Shop Now
  • Contact Me
Menu

Sweet Cupcake Wish card

Posted on June 29, 2016June 27, 2016 by Josee

Good Morning!

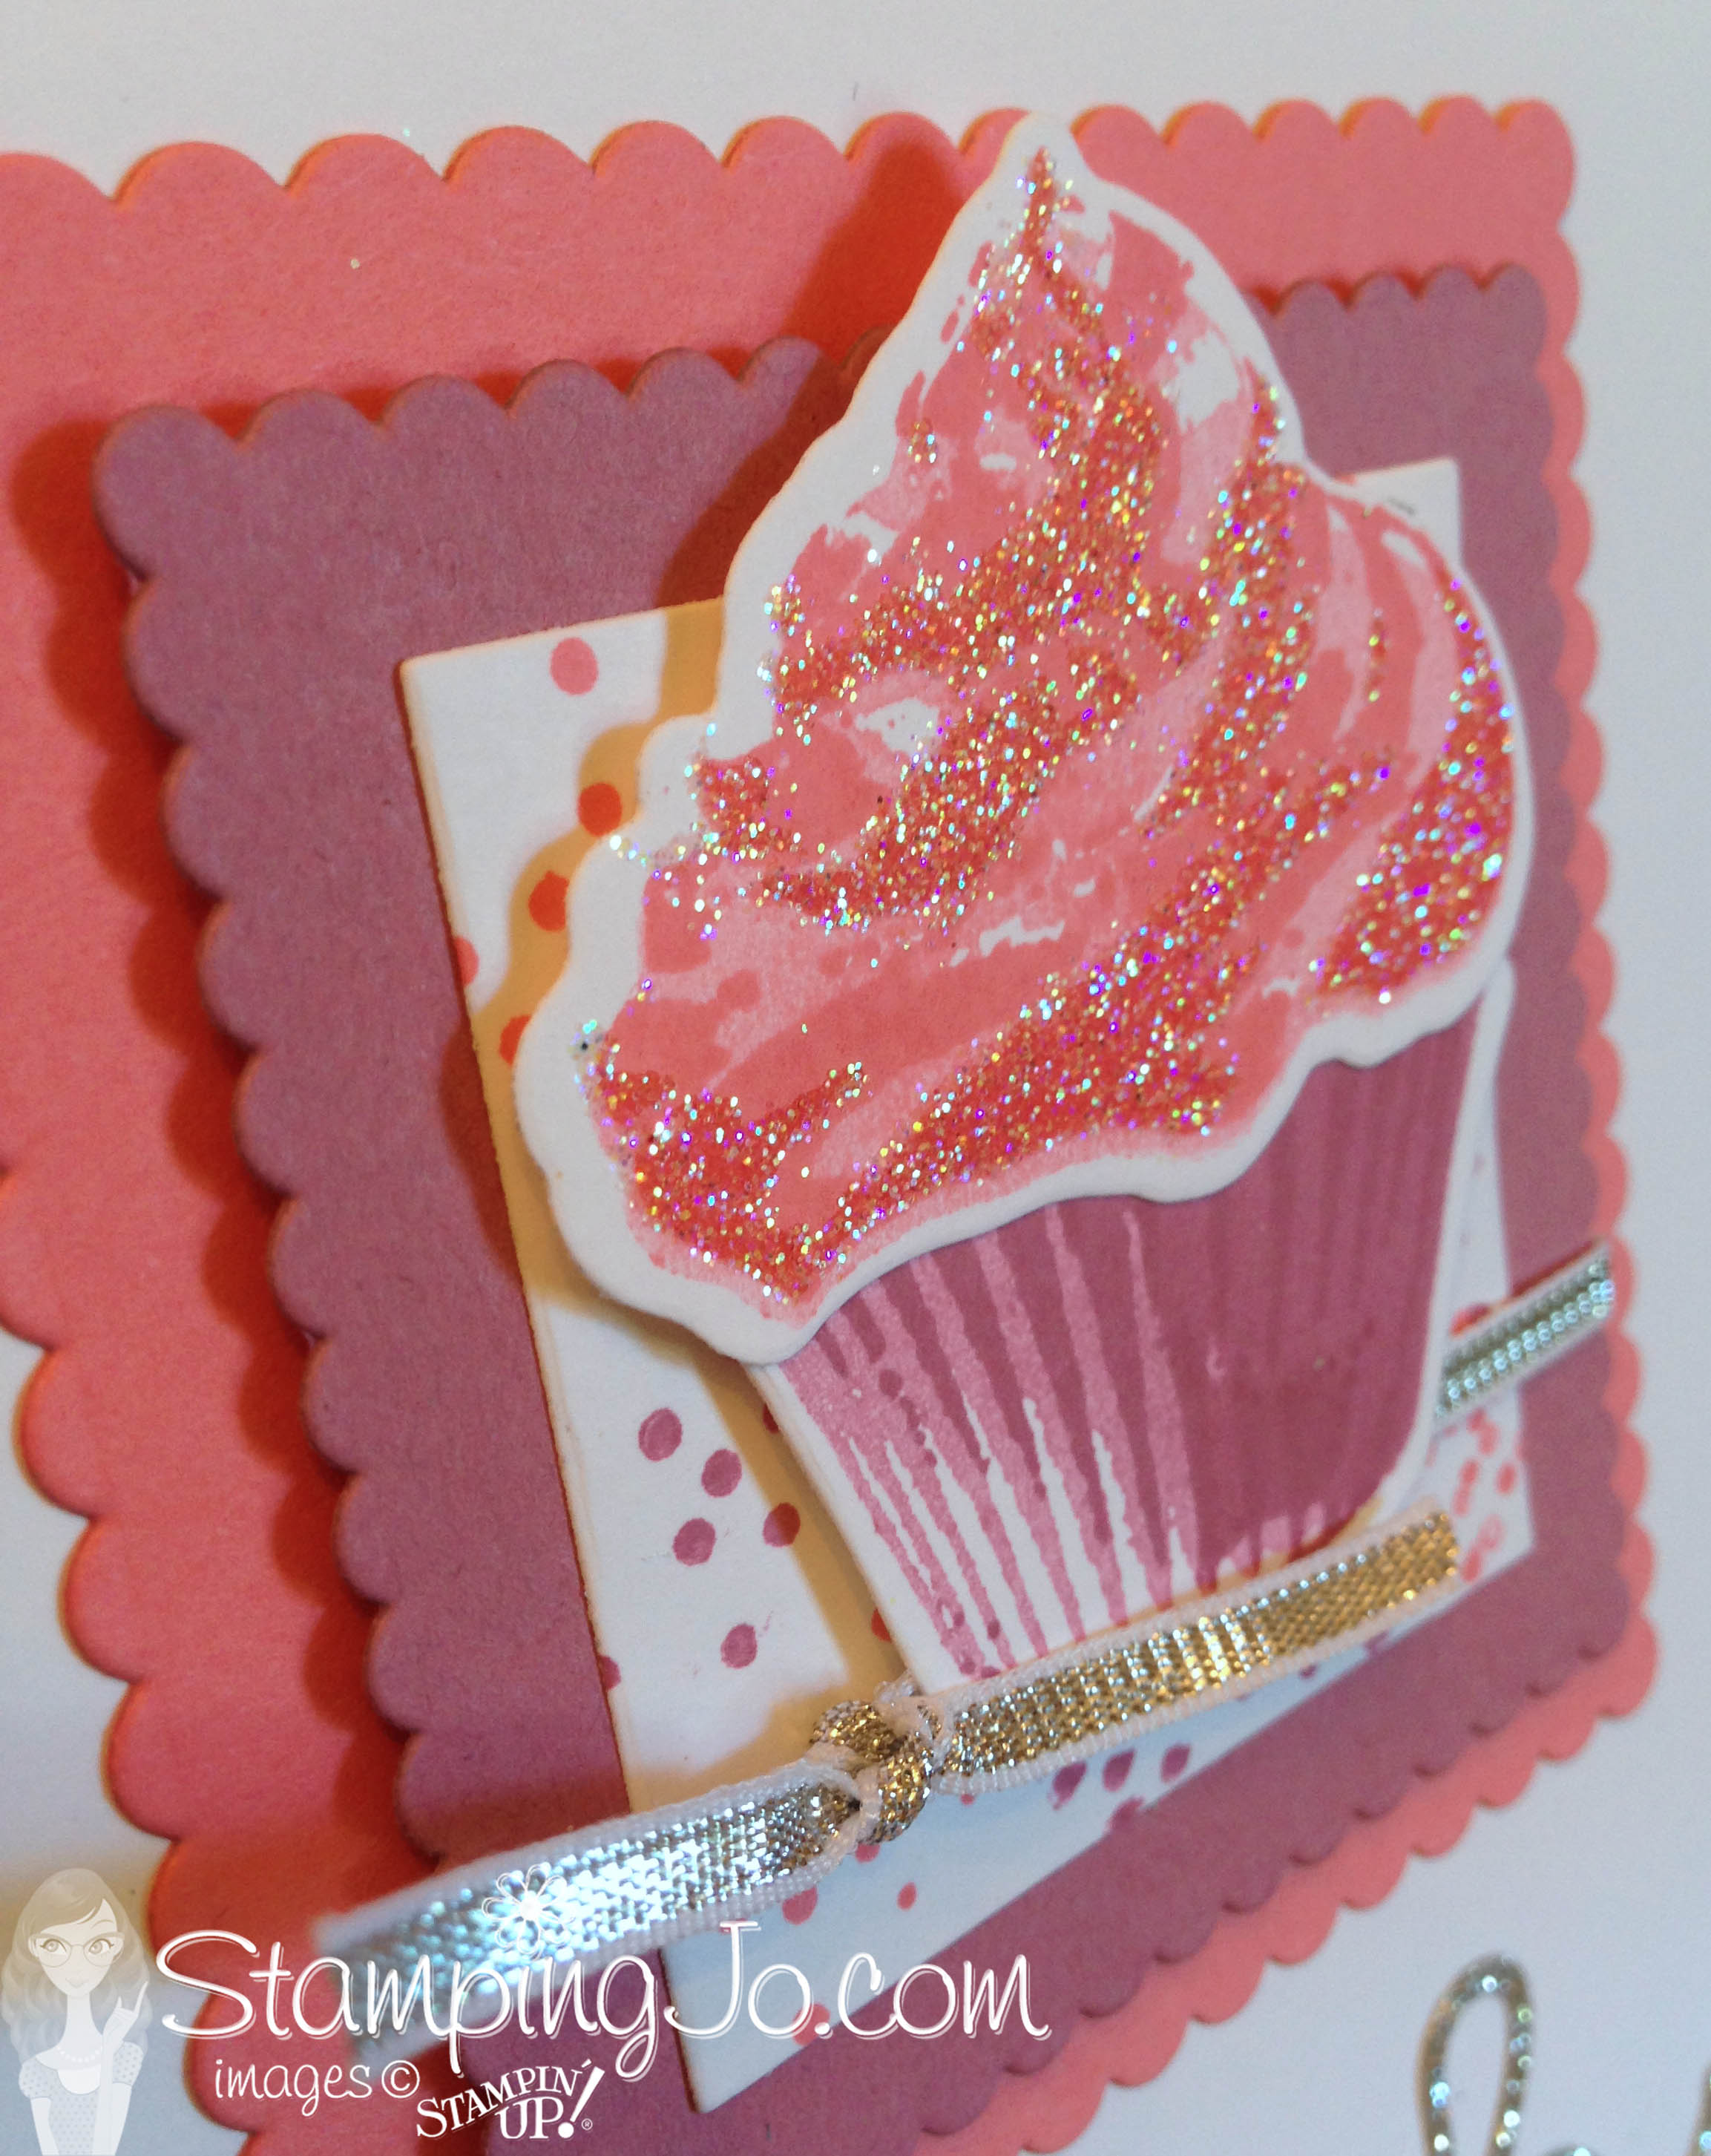
Today's card is a 'step up' from this Sweet Cupcake card I showed you last week. I wanted to create the card starting with the same basic techniques, but adding a few more steps to it creates a card with more WOW factor!  This card uses the Cupcake Cutouts Framelits to add that needed 'punch'!

Sweet Cupcake Cut Out by StampingJo


How To Make It: 

As I mentioned, this card starts with the basics of this card I posted last week.

To 'step it up' I  stamped the Whisper White square with the little 'sprinkles' stamp from Sweet Cupcake. I stamped and glittered the cupcake the same way and then die cut the cupcake pieces using the cupcake dies in the Cupcake Cutout Framelits and adhered them to the square layers using Stampin' Dimensionals. I added some Silver Ribbon before adhering all the layers together. 

Sweet Cupcake Cutout Glitter by StampingJo

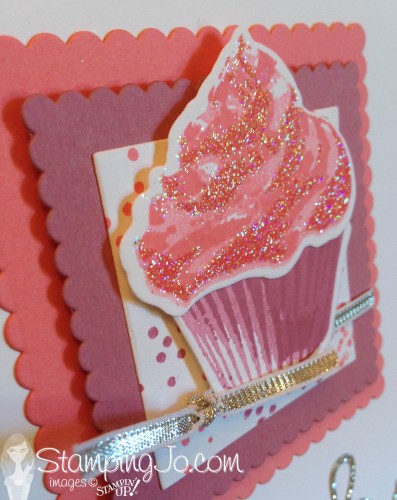
Then, the 'wish' was die cut from Silver Glimmer Paper, using the Precision Base Plate and Die Brush to help cut a perfect cut! That was adhered with the Fine Tip Glue Pen and a Rhinstone Basics Jewel was added to the 'i' to bling it up! 

Stamps: 

Sweet Cupcake-141498 (bundle: 142232)

Paper: 

Whisper White-100730 , Whisper White Thick-140272, Flirty Flamigo- 141416, Sweet Sugarplum-141418, Silver Glimmer Paper-135314

Ink:

Sweet Sugarplum- 141395, Basic Black-132708, Versamark- 102283, Refill- 102193

Other: 

Rhinestone Basic Jewels- 119246, Silver 1/8” Ribbon- 132137, Cupcake Cutouts Framelits- 141474, Stampin Dimensionals-104430, Heat & Stick Powder-100625, Dazzling Diamonds Stampin’ Glitter-133751, Layering Squares Framelits- 141708, Heat Tool- 129053, Fine Tip Glue Pen- 138309, Precision Base Plate- 139684, Die Brush- 140603


What do you think? Does this add more WOW than the previous version?
su blog signature


    hostess code graphic

jojopoints blog post footer

Read more

Swirly Scribbles ‘Marquetry’ card

Posted on June 28, 2016July 12, 2016 by Josee

Hello!

Have you heard of intarsia or marquetry? They are wood inlay techniques that I truly admire the look of. I'm sure it takes quite a bit of talent and patience to create some of the amazing designs out of different types of wood or wood veneers, or differently stained pieces to create those peices of art. When I started out to create this card, Intarsia and Marquetry was what came to mind. It does take a tiny bit of patience and some forethought to get the look, but probably not as much 'talent' required as the Big Shot dies do the really hard work. smiley 

This card was made using the new Swirly Scribbles Thinlits, the Lovely Lace Textured Impressions Embossing Folder and the Greatest Greetings stamp set for the sentiment.

Swirly Bird by StampingJo


How To Make It: 

I started this card with a base of Whisper White Thick cardstock.

On the Peekaboo Peach layer, I layed out the Swirly Scribbles Big Shot dies to get an idea of how I wanted the design to look. Then, I started to run the Peekaboo Peach layer through the Big Shot with the swirly dies, keeping track of the cut pieces as some of them will be used in the final design. 

Then, I cut the same die cuts out of the Playful Palette Designer Series Papers and set those aside. 

I cut the leaves from the Swirly Scribbles dies out of the Peekaboo Peach layer.

Now, behind the Peekaboo Peach layer, I added a full layer of the Emerald Envy cardstock. 

Swirly Bird embossed flower by StampingJo

Before adhering the layers together, I did a dry run and placed all the die cut pieces how I wanted them to go. I laid the Peekaboo Peach layer on the Emerald Envy layer and then started adding the die cut Playful Palette papers, also adding some of the Peekaboo Peach die cuts back in to fill in some of the spaces I did not want to be green. I left some of the 'spaces' empty so the Emerald Envy would show through. 

Once I was happy with the design, I adhered the Emerald Envy layer to the back of the Peekaboo Peach layer and then used the Fine Tip Glue Pen to adhere all the die cuts. 

While I allowed that to dry, I created the sentiment strip with the stamp from Greatest Greetings and then using the Banner Triple Punch I punched the tip and did the same to the mat layer beneath which also uses the Playful Palette Designer Series Paper.  

Once the 'marquetry' layer was dried, I ran it through the Big Shot in the Lovely Lace Textured Impressions Embossing Folder. Then adhered that to the card base and added the sentiment with Stampin' Dimensionals. 

Stamps: 

Greatest Greetings-140706

Paper: 

Playful Palette Designer Series Paper -141657, Whisper White Thick-140272, Peekaboo Peach cardstock- 141417, Emerald Envy cardstock- 141415

Ink:

Memento Tuxedo Black- 132708, Refill-133456

Other: 

Swirly Scribbles Thinlits-141497, Banner Triple Punch- 138292,Lovely Lace Textured Impressions Embossing Folder- 133737, Fine Tip Glue Pen- 138309, Stampin’ Dimensionals- 104430

Thanks for stopping by! 
su blog signature


    hostess code graphic

jojopoints blog post footer

Read more

My Crafty Friends Monday: Seaside Shore

Posted on June 27, 2016July 18, 2016 by Josee

Welcome to "My Crafty Friends Monday!" 

NEW! 2016-2017 Annual Catalogue Edition

My Crafty Friends Monday-NEW-SMI hope you enjoyed a great weekend! Each Monday, I like to feature different projects that have inspired me and I know they'll inspire you too!
 
Each project was created by different & amazingly talented stampers- make sure you check out their blogs for more details and to check out their other amazing projects!!
(**Note…don't worry- I've contacted each of these stampers and allowed them to decline if they choose.) 
 

This week's featured stamp set is Seaside Shore (141622 wood, 141625 clear-mount).

This stamp set is part of the By The Shore Suite (page 92 of the 2016-2017 Annual Catalogue) which includes the Seaside Textured Impressions Embossing Folder (141481), By the Shore Designer Series Paper (141640), By the Shore Cardstock Pack (141641) Dapper Denim Ruched Ribbon (141424) and Gold 1/4" Natural Trim (141484)


Stephanie Fischer: her blog

Fish gel card front by stephanie fischer

This is such a fun card! Check out the inside too! 


Kathy Richs: her blog

seaside shore by Kath Richs

Love the look of this one with the Seaside Textured Embossing Folder! 


Jan Clothier: her blog

seaside shore by jan clothier

Love how the fish are swimming in the strips of By the Shore Designer Series Paper! 


Delys Cram: her blog

seaside shore by delys cram

Love all the details on this one!


Sandy Mott: her blog

seaside shore by sandy mott

This home decor piece and card are amazing!  Love the colours and all the little details!


Sarah Lancaster: her blog

seaside shore shaker card by sarah lancaster

This one really caught my eye- what a great shaker card!


Love these ideas? You can purchase this stamp set through my ONLINE STORE! 

I hope you've enjoyed this week's "My Crafty Friends Monday" Make sure you visit the talented artist's featured on this post! Thanks for stopping by today!

Were you featured here? Here's a badge you can add to your blog!
My Crafty Friends Monday-featured-NEW-SM


su blog signature


     hostess code graphic  

jojopoints blog post footer

Read more

Swirly Bird and Layering Love Bird’s Nest

Posted on June 24, 2016June 21, 2016 by Josee

Happy Friday!! 

It's the first weekend of summer and it's going to be a great one! I hope you have something fun planned!

Today's card features a fun way to use the new Swirly Bird stamp set and Layering Love stamp set, as well as the popular and now available again Woodland Textured Impressions Embossing Folder. 

Swirly Bird Bird's Nest by StampingJo


How To Make It: 

First, emboss the Pool Party cardbase with the Woodland Textured Impressions Embossing Folder.

Stamp the sentiment from Layering Love with Archival Black ink (or Black Stazon ink) on the Glassine Sheet strip- this needs to be heat set to avoid smudging. Set aside to allow it to dry fully. 

Then, use the Layering Squares Framelits to cut layering sizes of Cherry Cobbler, Pool Party and Whisper White cardstock. Use the mini stapler to staple the glassine strip to the Cherry Cobbler scallop square, then adhere the Pool Party scallop square on top of that. 

Swirly Bird Bird's Nest2 by StampingJo

Stamp the bird, nest and eggs from Swirly Bird on the Whisper White square. I used Stampin' Write markers to color the stamps, but you can also use ink pads. I chose markers because I wanted to stamp the bird to look like a robin with its red chest. Adhere the stamped square to the mat squares and adhere the whole thing to the card front using Tear & Tape Adhesive only behind the square layers. 

As a final touch, I punched some 'branches' from Soft Suede cardstock using the Tree Builder punch. 

Stamps: 

Swirly Bird-141749, Layering Love-141962 wood, 141965 clear-mount

Paper: 

Pool Party-122924, Soft Suede-115318, Crumb Cake-120953, Cherry Cobbler-119685, Whisper White-100730

Ink:

Archival Black- 140931, Refill- 140928, Stampin' Write Markers: Crumb Cake, Soft Suede-131261 Neutrals Assortment, Pool Party- 131263 Subtles Assortment, Cherry Cobbler- 131262 Regals Assortment

Other: 

Woodland TIEF- 139673, Layering Squares Framelits-141708, Tree Builder Punch-138295, Glassine Sheet-138348, Handheld Stapler- 139083, Silver Mini Staples- 135847, Mini Glue Dots- 103683, Tear & Tape Adhesive-138995

Thanks for stopping by the blog today! Enjoy this first weekend of summer!!  su blog signature


    hostess code graphic

jojopoints blog post footer

Read more

Sweet Cupcake Sweet card

Posted on June 23, 2016June 21, 2016 by Josee

Good day!

I thought I would show you in detail the card we made for the Make & Take at my Open House last Friday.  This card uses the new Sweet Cupcake stamp set and coordinating Cupcake Cutout Framelits. 

Sweet Cupcake by StampingJo

How To Make It: 

This card starts with a base of Whisper White Thick cardstock. 

Then, a scallop square was diecut using the Layering Squares Framelits and Flirty Flamingo cardstock. 

Another square was diecut from Whisper White cardstock and then using Flirty Flamingo ink and Sweet Sugarplum ink the cupcake from Sweet Cupcake was stamped. Now, since this stamp is a Three Step stamp- the first layers were stamped 'off' first, then the second layer was stamped in full color. The third layer on the cupcake top was stamped with Versamark ink and then Heat & Stick powder was added.

The Heat & Stick powder was set using the Heat Tool and then Dazzling Diamonds Stampin' Glitter was sprinkled on and heat set again to ensure the glitter didn't rub off. 

Sweet Cupcake glitter by StampingJo

The sentiment from Sweet Cupcake was stamped in Sweet Sugarplum ink and then die cut using the banner die from the Cupcake Cutouts Framelits. It was folded at the banner edges and then added to the card front using Stampin' Dimensionals. 

The word SWEET was stamped in Basic Black and then die cut using the little label die from Cupcake Cutouts Framelits and added to the card front using Stampin' Dimensionals. 

Stamps: 

Sweet Cupcake-141498 (bundle: 142232)

Paper: 

Whisper White-100730 , Whisper White Thick-140272, Flirty Flamigo- 141416, Sweet Sugarplum-141418

Ink:

Sweet Sugarplum- 141395, Basic Black-132708, Versamark- 102283, Refill- 102193

Other: 

Cupcake Cutouts Framelits- 141474, Stampin Dimensionals-104430, Heat & Stick Powder-100625, Dazzling Diamonds Stampin’ Glitter-133751, Layering Squares Framelits- 141708, Heat Tool- 129053

Thanks for stopping by the blog today! Enjoy!    su blog signature


    hostess code graphic

jojopoints blog post footer

Read more

Posts pagination

  • Previous
  • 1
  • …
  • 245
  • 246
  • 247
  • 248
  • 249
  • 250
  • 251
  • …
  • 587
  • Next

go to store

Promos

Paper Bouquet Kit

josee smuck

Josée Smuck

Stampin’ Up! Canada Demonstrator since 2002
Ottawa, ON, Canada
Contact me with questions!
Josee@StampingJo.com
(613) 831-2917

Current Catalogues

Annual Catalogue (May2024-April2025)Stampin' Up! Annual CatalogueView Catalogue-ENG | Shop Online
View Catalogue- FR

——————

Looking for something?

Get the news


Click HERE to download Jo-Jo’s FREE Sketches & Tips Guide

Updates

Receive NEXT-DAY updates by email:

Receive SAME DAY updates by subscribing in a reader:
Click to Subscribe in a reader

Recent Posts

  • Embrace the Journey April 11, 2025
  • For the Books April 8, 2025
  • Beautiful Birthday April 5, 2025
  • Happy Retirement April 2, 2025
  • Frame & Flowers March 28, 2025

Categories

Proud Member…

Inky_Divas800

The content of this blog is the sole responsibility of Josee Smuck as a Stampin’ Up! Independent Demonstrator.  The use of and content of classes, services or products offered is not endorsed by Stampin’ Up! Unless otherwise indicated, images © Stampin’ Up! 1990 – present.

© 2025 Hand Stamped Cards with Josee Smuck-Stampin' Up! Canada Demonstrator | Powered by Superbs Personal Blog theme