Skip to content

Hand Stamped Cards with Josee Smuck-Stampin' Up! Canada Demonstrator

Stampin' Up! Canada Demonstrator; Rubber Stamps & Supplies for Cardmaking & Scrapbooking in Stittsville, Ontario (near Ottawa)

Menu
  • Home
  • JO JO POINTS
  • **Join**
  • Monthly Craft Kit
  • Weekly News
  • Shop Now
  • Contact Me
Menu

Jar of Haunts Halloween Card

Posted on September 14, 2016September 12, 2016 by Josee

Hello! 

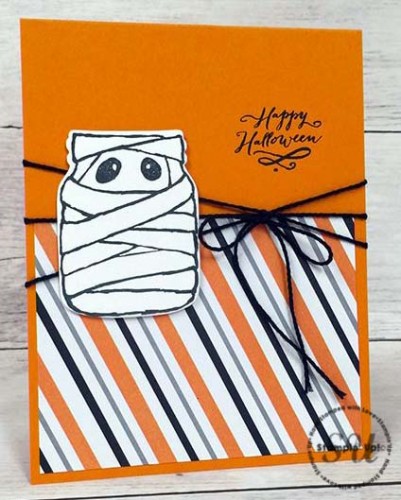
Today I thought I'd show you a super cute Halloween card using the new Jar of Haunts stamp set and the Everyday Jars Framelits! I just think this mummy jar is so adorable!

jar-of-haunts, Stamping Up

How To Make It: 

Cut a piece of Pumpkin Pie cardstock in half so it measures 4 1/4 x 11". Score at 5 1/2" and fold it in half.

Cut a piece of Halloween Night Specialty Designer Series Paper, striped pattern, down to 4 x 3". Attach to the bottom part of the card using Fast Fuse Adhesive.

Tie a piece of Solid Black Bakers Twine around the card and make a bow. Trim any excess bakers twine.

Stamp 'Happy Halloween' from the Jar of Haunts stamp set on the card as shown above.

On a piece of scrap Thick Whisper White card stock, stamp the mummy jar image from the Jar of Haunts stamp set.

Use the Big shot and coordinating Everyday Jars Framelits to cut the jar shape out.

Apply Clear Wink of Stella glitter to the eyes of the mummy.

The final step is to attach the jar to the front of your card with Stampin' Dimensionals. 

Stamps: 

Jar of Haunts Photopolymer Stamp Set (142247)

Paper: 

Pumpkin Pie (105117); Thick Whisper White Card Stock (140272)

Ink:

Tuxedo Black Momento Ink Pad (132708), Wink of Stella Glitter Brush (141897)

Other: 

Halloween Night Specialty Designer Series Paper (DSP) (142022); Basic Black Solid Baker’s Twine (141682); Fast Fuse Adhesive (129026); Stampin’ Dimensionals (104430); Everyday Jars Framelit dies (141490)

Have a wonderful day!


blog signature holidaySpecialOffers    hostess code graphic-monthly


Read more

Cookie Cutter Christmas Reindeer Card

Posted on September 13, 2016September 19, 2016 by Josee

Good Morning!

Before I show you today's card, check out what's on sale until the 14th! Shop for these deals while they last!

special-offers

Now, I wanted to show you one of the Christmas cards we made at my first Christmas stamp class of the season on Friday!  Such a cute and easy card to make using the Cookie Cutter Christmas stamp set and coordinating Cookie Cutter Punch, as well as the Greetings from Santa stamp set. 

cookie-cutter-christmas-by-stampingjo

How To Make It: 

Start with a card base of Thick Whisper White cardstock.

Then take the 4"x5.25" piece of Pool Party cardstock and run it through the Big Shot in the Pine Bough Textured Impressions Embossing Folder.

Stamp the sentiment from the Greetings from Santa stamp set in Basic Black; Adhere the Pool Party layer to the cardbase. 

cookie-cutter-christmas-reindeer-by-stampingjo

Use the Merry Tags Framelit Dies to cut the Red Glimmer Paper into the ornament shape

Cut a length of Burlap Ribbon to tie onto the Red Glimmer ornament leaving the knot loose for now.

Take a small bit of Linen Thread and add two Mini Jingle Bells.

StampingJo Quick Tip

TIP: Use a needle threader to help get the thread through the bells

Then thread the Linen Thread through the loose Burlap Ribbon knot and tie it a few times; then tighten the Burlap Ribbon and trim if necessary

Use a few Glue Dots to add the ornament to the card front

Use a Crumb Cake Stampin’ Write marker to ink up the reindeer from the Cookie Cutter Christmas stamp set, use the Real Red Stampin’ Write marker for the nose and stamp onto Crumb Cake cardstock; punch out using the Cookie Cutter Builder punch

Use Stampin’ Dimensionals to adhere the reindeer to the card front

Stamps: 

Cookie Cutter Christmas-142043, Greetings from Santa stamp set-143269 CM, 142069 wood Merry Tags Framelit Dies- 141835

Paper: 

Crumb Cake cardstock-120953, Whisper White Thick Cardstock-140272, Pool Party cardstock-131203, Red Glimmer Paper-121790

Ink:

Real Red Stampin’ Write & Crumb Caker marker set- 141973 • Basic Black Archival Ink- 140931, Refill- 140928

Other: 

Cookie Cutter Builder Punch-140396, Pine Bough Textured Impressions Embossing Folder- 141831, 5/8” Burlap Ribbon-141487, Linen Thread-104199, Mini Jingle Bells-142002

I hope you have a stampin' good day!  If you are in the Ottawa area, come join me for our next stamp class!


blog signature holidaySpecialOffers    hostess code graphic-monthly


Read more

My Crafty Friends Monday: Star of Light

Posted on September 12, 2016September 7, 2016 by Josee

Welcome to "My Crafty Friends Monday!" 

My Crafty Friends Monday-NEW-SMI hope you enjoyed a great weekend! Each Monday, I like to feature different projects that have inspired me and I know they'll inspire you too!
 
Each project was created by different & amazingly talented stampers- make sure you check out their blogs for more details and to check out their other amazing projects!!
(**Note…don't worry- I've contacted each of these stampers and allowed them to decline if they choose.) 
 

This week's featured stamp set is Star of Light (142110) which coordinates perfectly with the Starlight Thinlits Dies (141840).  Bundle & Save! (143508); Also available in French 

There were so many amazing projects to show you, it was hard to pick just a few! 🙂


Julia Quinn: her blog

starlight-by-julia-quinn


Patty Bennett: her blog

starlight-by-patty-bennett


Claire Daly: her blog

starlight-by-clare-daly


Catherine Carroll: her blog

star-of-light-shaker-card-by-catherine-carroll


Kim Peck: her blog

starlight-by-kim-peck


SternchenStempel Silvija: her YouTube video 

Starlight ornament by SternchenStempel Silvija


Love these ideas? You can purchase this stamp set through my ONLINE STORE! 

I hope you've enjoyed this week's "My Crafty Friends Monday" Make sure you visit the talented artist's featured on this post! Thanks for stopping by today!

Were you featured here? Here's a badge you can add to your blog!
My Crafty Friends Monday-featured-NEW-SM


blog signature holidaySpecialOffers    hostess code graphic-monthly


Read more

Bunch of Blossoms and Jar of Love Birthday Card

Posted on September 9, 2016September 7, 2016 by Josee

Happy Friday! 

It's the weekend already! Gotta love a short work week! I hope you got to enjoy one too!

Today's card uses stamps and supplies available from the Stampin' Up 2016-2017 Annual Catalogue. The Bunch of Blossoms stamp set , Jar of Love stamp set and the beautiful Petal Burst Textured Impressions Embossing Folder to create this gorgeous birthday card!

beautiful blooms and petal burst

How To Make It: 

Open up Petal Burst Embossing folder and work on the side that has the raised petals and apply ink from Bermuda Bay ink pad directly onto the folder, insert the Whisper White cardstock (5 x 3 ¾ ) and run through the Big Shot.

Adhere the Bermuda Bay cardstock layer (5 ¼ x 4) and the Petal Burst embossed piece to card front, adhere the Delicate White Doily on top of the embossed layer

Using the smaller bloom stamp from the Bunch of Blossoms stamp set and Whisper White cardstock scraps, stamp off with Bermuda Bay ink and stamp 3 blooms; then, using the Bermuda Bay ink full strength, stamp the detail bloom on the 3 blooms and punch out using the Blossom Builder Punch.

Stamp the five point flower stamp from Bunch of Blossoms with Old Olive ink on Whisper White cardstock, stamping it 3 times; Using Paper Snips, snip 2 of the 5 points off, leaving only 3 points to create the leafy base of the flower.

Use Old Olive ink again and stamp the 2 stems from Bunch of Blossoms on Whisper White, stamp off for the shadow stem and full strength for the main stem, cut with Paper Snips.

Use the ribbon from the Jar of Love stamp set and stamp in Bermuda Bay ink, use the Big Shot and matching ribbon die from the Everyday Jar Framelits to die cut out; put ½ a Stampin’ Dimensional on the back.

Stamp the sentiment from Bunch of Blossoms in Bermuda Bay ink on Whisper White cardstock and punch out with 1 ¼” Circle Punch; Use a 1 ½” Circle Punch to cut a circle from Bermuda Bay cardstock; adhere these 2 pieces together

Layer all the cut pieces with Stampin’ Dimensionals.

Stamps: 

Bunch Of Blossoms Photopolymer Bundle (142345), Jar Of Love Photopolymer Bundle (142342)

Paper: 

Whisper White (105549) ; Bermuda Bay (131286)

Ink:

Bermuda Bay Classic Stampin’ Pad (131171); Old Olive Classic Stampin’ Pad [126953]

Other: 

Delicate White Doilies [141701], Petal Burst Textured Impressions Embossing Folder [141493], 1-1/4″ Circle Punch [119861], 1/2″ Circle Punch [119869], Paper Snips (103579), Big Shot.

I hope you have wonderful weekend!


blog signature holidaySpecialOffers    hostess code graphic-monthly


Read more

Cookie Cutter Halloween and Spooky Fun Card

Posted on September 8, 2016September 6, 2016 by Josee

Hello! 

Today's card features the Cookie Cutter Halloween stamp set and coordinated Cookie Cutter Builder Punch, as well as the Spooky Fun stamp set to create a fun Halloween card!

cookie cutter halloween

How To Make It: 

Emboss the Seaside Textured Impressions Embossing Folder onto the Basic Gray card base only going up about 2-1/2”-3” from the bottom.

Trim ½” off the Halloween Night Designer Series Paper so you have two pieces: 4-1/4” x ½” and 4-1/4” x 3”. Using SNAIL Adhesive adhere the larger piece to the card base then using reverse side of the narrow strip, adhere to card base at bottom edge.

Choosing your four preferred nesting size dies from the Layering Ovals Framelits Dies, die cut largest oval from Whisper White cardstock then the scalloped oval from Basic Black, the next size oval from Pumpkin Pie then smallest one with Halloween Night Designer Series Paper. Adhere all the ovals to one another with SNAIL Adhesive.

Ink the skeleton from the Cookie Cutter Halloween stamp set, and the trick-or-treat bag and sentiment from the Spooky Fun stamp set in Basic Gray ink on Whisper White cardstock.

Color in the trick-or-treat bag using an Aqua Painter and pooled ink from squeezing lid of the Pumpkin Pie, Crushed Curry and Old Olive ink pads.

Punch out the skeleton using the Cookie Cutter Builder Punch and the sentiment using the Duet Banner Punch. Use the Paper Snips to cut out the trick-or-treat bag.

Using the Pumpkin Pie ink, stamp the hair bow onto Whisper White and punch out using the Cookie Cutter Builder Punch. Using Multipurpose Liquid Glue, dab on bow and glue to the skeleton. When dry, add a Pearl Basics Jewel. Glue the trick-or-treat bag to the skeleton hand.

Punch the sides of the sentiment banner with the 1/16” handheld punch. Tie Basic Black Solid Baker's Twine into holes and trim the excess. Adhere Pearl Basics Jewels to cover the holes.

Using Stampin’ Dimensionals, adhere the skeleton to the layered ovals then to the card front. Also with Stampin Dimensionals, adhere the sentiment to card front.

Stamps: 

Cookie Cutter Halloween (142252-w or 142255-c), Spooky Fun (142236)

Paper: 

Halloween Night Specialty Designer Series Paper (142022), Pumpkin Pie (105117), Basic Black (121045), Basic Gray (121044), Whisper White (100730)

Ink:

Basic Gray (140932), Pumpkin Pie (126945), Old Olive (126953),Crushed Curry (131173)

Other: 

Cookie Cutter Builder Punch (140396), Duet Banner Punch (141483), 1/16” Handheld Circle Punch (134363), Seaside Textured Impressions Embossing Folder (141481), Layering Ovals Framelits (141706), Big Shot Die Cutting Machine (143263), Magnetic Platform (130658), Pearl Basic Jewels (119247), Solid Baker’s Twine Basic Black (141682), Aqua Painter (103954), Stampin’ Dimensionals (104430), SNAIL Adhesive (104332), Multipurpose Liquid Glue (110755), Paper Snips (103579)

I hope you have a stampin' good day!


blog signature holidaySpecialOffers    hostess code graphic-monthly


Read more

Posts pagination

  • Previous
  • 1
  • …
  • 234
  • 235
  • 236
  • 237
  • 238
  • 239
  • 240
  • …
  • 587
  • Next

go to store

Promos

Paper Bouquet Kit

josee smuck

Josée Smuck

Stampin’ Up! Canada Demonstrator since 2002
Ottawa, ON, Canada
Contact me with questions!
Josee@StampingJo.com
(613) 831-2917

Current Catalogues

Annual Catalogue (May2024-April2025)Stampin' Up! Annual CatalogueView Catalogue-ENG | Shop Online
View Catalogue- FR

——————

Looking for something?

Get the news


Click HERE to download Jo-Jo’s FREE Sketches & Tips Guide

Updates

Receive NEXT-DAY updates by email:

Receive SAME DAY updates by subscribing in a reader:
Click to Subscribe in a reader

Recent Posts

  • Embrace the Journey April 11, 2025
  • For the Books April 8, 2025
  • Beautiful Birthday April 5, 2025
  • Happy Retirement April 2, 2025
  • Frame & Flowers March 28, 2025

Categories

Proud Member…

Inky_Divas800

The content of this blog is the sole responsibility of Josee Smuck as a Stampin’ Up! Independent Demonstrator.  The use of and content of classes, services or products offered is not endorsed by Stampin’ Up! Unless otherwise indicated, images © Stampin’ Up! 1990 – present.

© 2025 Hand Stamped Cards with Josee Smuck-Stampin' Up! Canada Demonstrator | Powered by Superbs Personal Blog theme