Skip to content

Hand Stamped Cards with Josee Smuck-Stampin' Up! Canada Demonstrator

Stampin' Up! Canada Demonstrator; Rubber Stamps & Supplies for Cardmaking & Scrapbooking in Stittsville, Ontario (near Ottawa)

Menu
  • Home
  • JO JO POINTS
  • **Join**
  • Monthly Craft Kit
  • Weekly News
  • Shop Now
  • Contact Me
Menu

Paisleys & Posies Thankful Card

Posted on September 21, 2016September 19, 2016 by Josee

Last Day for these Special Offers!!SpecialOffers

Hello! 

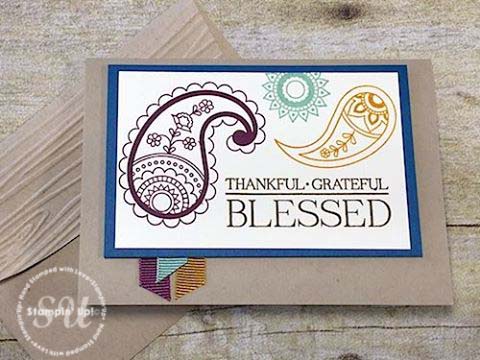
With Thanksgiving around the corner, I thought this Paisleys & Posies Thankful card was the perfect card to share today! I am really liking this Fall inspired color combo of Rich Razzleberry, Delightful Dijon, Mint Macaron and Dapper Denim! What do you think? I really like on the Crumb Cake background!
paisleys-and-posies-stampinup

How To Make It: 

This card starts with the Crumb Cake Note Card and Envelope set. 

Stamp the sentiment from the Paisleys & Posies stamp set in Soft Suede ink in the bottom right corner of the Very Vanilla cardstock layer.

From the Paisleys & Posies stamp set, stamp the large paisley in Rich Razzleberry to the left, the smaller paisley in Delightful Dijon to the right, and one of the circle design in Mint Macaron in the top center. Adhere this stamped layer to the Dapper Denim cardstock.

Adhere the three pieces of ribbon from the 3/8" Ribbon Trio Pack (which includes one spool each of Mint Macaron, Rich Razzleberry and Delightful Dijon ribbon!)  on the bottom left side of stamped layer and Dapper Denim mat. Add four to six Stampin Dimensionals to the back and adhere to the front of the card.

Tip: For an extra special touch, run the top of the envelope through the Big Shot in the Woodgrain Textured Impressions Embossing Folder!

Measurements:

Very Vanilla: 4” x 2 ½”

Dapper Denim: 4 ¼” x 2 ¾”

Ribbon: (1 each) 2” pieces, cut at an angle on one end

Stamps: 

Paisleys & Posies (142196)

Paper: 

Very Vanilla (101650); Dapper Denim (141414); Crumb Cake Note Cards & Envelopes (107297)

Ink:

Soft Suede (126978); Mint Macaron (138326); Delightful Dijon (138327); Rich Razzleberry (126950)

Other: 

3/8” Ribbon Trio Pack (142021); Woodgrain Embossing Folder (127821); SNAIL Adhesive(104332); Stampin'Dimensionals (104430)

Have a wonderful day!


blog signature holiday    hostess code graphic-monthly


Read more

Thanksgiving Decor: Acorny Thanks Silverware Pouch

Posted on September 20, 2016September 19, 2016 by Josee

Good morning!  

It's kind of hard to believe that it's already the 20th of September- the first day of Fall is in two more days! I just don't know how it happens but once school starts for the kids, the days really just fly by!  

<<Note: The Special Offers expire tomorrow!! Make sure you check them out before they are gone!>>

Having said that, our Thanksgiving weekend is coming soon! October 10th! You know it will be here before you know it! So, here's a great project you can work on to dress up your Thanksgiving table! 

This project is made easy using the Stampin' Up Medium Crumb Cake envelopes and the Acorny Thanks stamp set and coordinating Acorn Builder punch! You could even use any Designer Series Paper and color combo you like!

Acorny Thanks, silverware pouch to dress up your Thanksgiving table

How To Make It: 

Start with a Medium Crumb Cake envelope and seal the envelope and then trim one end off 1/8” to create a pouch.

On the open end of the envelope, use a 2" circle punch to punch 1/2 of the circle off the front of the envelope.

Wrap the 2-1/4” x 9-1/2”  strip of Moroccan Designer Series Paper around the envelope and secure in the back using SNAIL Adhesive or your favorite adhesive.

Tie the Dapper Denim Ruched Ribbon around the envelope pouch (over the Moroccan Designer Series Paper) and tie in a knot on the front.

From the Acorny Thanks stamp set, stamp 4 acorns and acorn tops (one in each color: Dapper Denim, Early Espresso, Cajun Craze and Delightful Dijon) and punch out using the coordinating Acorn Builder Punch. Mix and match the acorns and tops to create 4 acorns-use SNAIL Adhesive or Glue Dots to put them together. (You will have an extra acorn you can use on a name tag for a place setting or to create more of these pouches for your Thanksgiving table)

Stamp the “Thankful” banner from the Acorny Thanks stamp set and cut it out just using Paper Snips.

Adhere two of the acorns to the front of pouch with SNAIL Adhesive and adhere the third acorn and the Thankful banner with Stampin' Dimensionals.

Create one of these in any color assortment you prefer for each of your dinner guests, insert a napkin and your favorite silverware and place beside your dinner plates. 

Tip: Have the kids collect acorns and pine cones from your neighbourhood and place them on a pretty dish or bowl and use them as your Thanksgiving centerpiece! 

Measurements:

Moroccan DSP: 2-1/4” x 9-1/2”

Very Vanilla: 11” x 2-1/2”

Dapper Denim Ribbon: 13”

Stamps: 

Acorny Thanks (139718)

Paper: 

Moroccan Designer Series Paper DSP (141645); Medium Crumb Cake Envelope (107297); Very Vanilla Card Stock (101650)

Ink:

Delighful Dijon Ink Pad (138327); Dapper Denim Ink Pad (141394); Cajun Craze Ink Pad (126965); Early Espresso Ink Pad (126974)

Other: 

Dapper Denim Ruched Ribbon (141424); Acorn Builder Punch (139681); 2” Circle punch (133782); Dimensionals (104430); Stampin’ Trimmer (126889); SNAIL adhesive (104332)

I hope you have a stampin' good day!


blog signature holiday

Last few days to get these offers!!SpecialOffers    hostess code graphic-monthly


Read more

My Crafty Friends Monday: Christmas Pines

Posted on September 19, 2016September 16, 2016 by Josee

Welcome to "My Crafty Friends Monday!" 

My Crafty Friends Monday-NEW-SMI hope you enjoyed a great weekend! Each Monday, I like to feature different projects that have inspired me and I know they'll inspire you too!
 
Each project was created by different & amazingly talented stampers- make sure you check out their blogs for more details and to check out their other amazing projects!!
(**Note…don't worry- I've contacted each of these stampers and allowed them to decline if they choose.) 
 

This week's featured stamp set is Christmas Pines (142049) and Pretty Pines Thinlits Dies (141851). 

Bundle and Save! 143496


Juana Ambida: her blog

christmas_pretty_pines_juanita06

I just love the color combo on this one and the sentiment fits perfectly on that Delicate Ornament Thinlit diecut!


Ann Schach: her blog

christmas-pines-by-ann-schach

Just gorgeous with all the layering! The Metal Rimmed Pearls and the Gold Natural Trim ribbon from the 2016-2017 Annual Catalogue are perfect embellishments.


Lauren Alarid: her blog

christmas-pines-by-lauren-alarid

Love the addition of gold and red to all the lovely layers-especially the Mini Jingle Bells!


Kim Jolley: her blog

christmas-pines-gdp-winner-by-kim-jolley

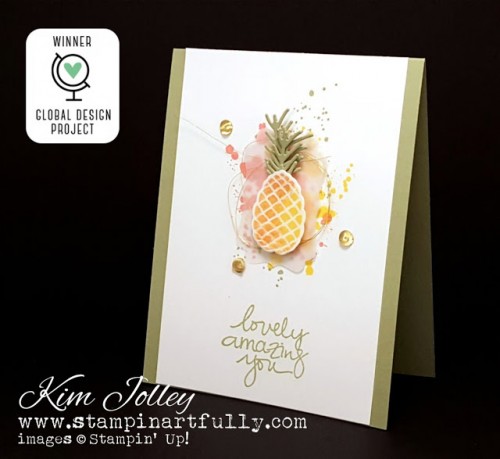
This is just genius using the pine cone stamp and dies to create a pineapple! The addition of the background using Gorgeous Grunge and the sentiment from the Lovely Amazing You stamp set are a gorgeous way to complete the card.


Jari Francis: her blog

stampin-up-christmas-pines-cardiology-by-jari-003

The Pretty Pines Thinlits die cuts make a perfect wreath, and paired with the Sparkle Textured Impressions Embossing Folder it looks amazing!


Lisa Brown: her blog

christmas-pines-by-lisa-brown

A wonderful gift box by Lisa also using the This Christmas Specialty Designer Series Paper from the 2016-2017 Annual Catalogue! 


Julie Davison: her blog

christmas-pines-by-julie-davison

The Pretty Pines Thinlits die cuts are perfect paired with the Pine Bough Textured
Impressions Embossing Folder.


Love these ideas? You can purchase this stamp set through my ONLINE STORE! 

I hope you've enjoyed this week's "My Crafty Friends Monday" Make sure you visit the talented artist's featured on this post! Thanks for stopping by today!

Were you featured here? Here's a badge you can add to your blog!
My Crafty Friends Monday-featured-NEW-SM


blog signature holidaySpecialOffers    hostess code graphic-monthly


Read more

Designer Series Paper Post It Note Holder

Posted on September 16, 2016September 12, 2016 by Josee

Happy Friday! 

I've got an amazing project to show you today! This would be a perfect gift for teachers or just to brighten someone's day! 

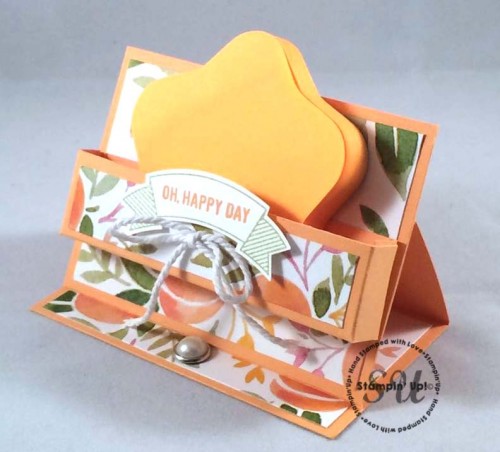
This Post It Note Holder uses the Fruit Stand Designer Series Paper with the Thoughtful Banners and coordinating Duet Banner Punch, of course, you could use any Designer Series Paper (there are many color choices within this same Fruit Stand Designer Series Paper pack!) and coordinating cardstock and any sentiment you choose!

fruit-stand-post-it-note-holder

How To Make It: 

1. Score 4 ¼” x 6 ½” Peekaboo Peach cardstock at 2” & 4” along the 6 ½” side. Fold on score lines (see figure 1). The 2 ½” side will be the bottom of the holder.

2. Adhere the 4” x 2 ¼” Fruit Stand Designer Series Paper to the bottom using SNAIL adhesive.

3. Adhere the 4” x 2 ¾” Fruit Stand Designer Series Paper to 4 ¼” x 3” Peekaboo Peach cardstock. Adhere to folded Peekaboo Peach cardstock using Fast Fuse lining up with bottom of top folded piece (see figure 2).

4. Score the 5 x 2 ½” Peekaboo Peach cardstock at ½” & 4 ½” along the 5” side and at 1” & 1 ½” along the 2 ½” side. Fold on score lines, snip along scored line up to ½” scored line in 4 places (see figure 3). Add the Fruit Stand Designer Series Paper to one long side (this will be the front of the “post-it note holder”).

5. Using Fast Fuse, fold in the ends of the post-it note holder (adhere the smaller piece in between the 2 larger pieces so you don’t have the flap to deal with).

6. Adhere the “post-it note holder” to the front as picture shows using the Tear & Tape Adhesive about ¾” from the bottom.

7. Center the Metal Rimmed Pearl to the bottom piece as the photo shows (this is what will hold up your holder).

8. Stamp the banner from the Thoughtful Banners stamp set on a scrap of Whisper White cardstock in Pear Pizzazz ink.

9. Stamp the desired sentiment the Thoughtful Banners stamp set in Peekaboo Peach ink in the center of banner.

10. Punch out the stamped banner using the Duet Banner Punch. Adhere to the front using Stampin Dimensionals.

11. Tie the Whisper White Thick Twine into a bow and add using a Glue Dot.

Measurements:

Peekaboo Peach Cardstock: 4 ¼” x 6 ½”, 4 ¼” x 3”, 5 x 2 ½”

Scrap Whisper White for banner sentiment

Fruit Stand Designer Series Paper: 4” x 2 ¾”, 4” x 2 ¼”, 3 ¾” x ¾”

Thick White Twine: 9”

Stamps: 

Thoughtful Banners (141614)

Paper: 

Peekaboo Peach cardstock (141417), Fruit Stand Designer Series Paper (141660), Whisper White (100730)

Ink:

Pear Pizzazz (131180), Peekaboo Peach (141398)

Other: 

Bone Folder (102300), Simply Scored Scoring Tool (122334), Stampin Trimmer (126889), Fast Fuse (129026), Tear & Tape Adhesive (138995), SNAIL adhesive (104332), Mini Glue Dots (103683), Whisper White Thick Twine (141688), Metal Rimmed Pearls (138394),Paper Snips (103579),Stampin Dimensionals(104430), Duet Banner Punch (141483), Post-It Notes in bright colors from any store

I hope you enjoyed today's project!


blog signature holidaySpecialOffers    hostess code graphic-monthly


Read more

Detailed Santa Thinlits Christmas Card

Posted on September 15, 2016September 12, 2016 by Josee

Ho ho ho Hello!  đꙂ  Sorry, couldn't resist that one! 

As you can tell, today's card is Santa inspired and believe it or not, super quick and easy!! It uses the Detailed Santa Thinilits Dies and the Greetings from Santa stamp set to make it simply!

greetings-from-santa

How To Make It: 

Start with a cardbase of Thick Whisper White cardstock at 11" x 4.25". greetings-from-santa-by-stampingjo

Score the cardbase at 5.5", then line up the die with the fold being careful not to move it when you roll it through the Big Shot for a straight cut; You could use the Magnetic Platform to hold the die in place, but I used the Precision Plate to get a better cut with this detailed die. Then, I used the Die Brush to release all the diecut pieces.

With Basic Black ink, stamp the greeting from the Greetings from Santa stamp set.  

Then, adhere the Cherry Cobbler Baker's Twine to the back of the cardbase with Tear & Tape adhesive– adding the strips of adhesive all around the back of the die cut before adhering the Cherry Cobbler layer. 

To finish off the card, tie the Cherry Cobble Baker's Twine in a bow. 

Stamps: 

Greetings from Santa stamp set-143269 CM, 142069 wood

Paper: 

Cherry Cobbler cardstock-119685 • Whisper White Thick Cardstock-140272

Ink:

Memento Tuxedo Black ink-132708, Refill: 133456

Other: 

Detailed Santa Thinlits Dies-141836; Cherry Cobbler Baker’s Twine-123125 (approx. 36”); Tear & Tape adhesive-138995; Die Brush-140603; Precision Plate-139684

Enjoy your day! 


blog signature holidaySpecialOffers    hostess code graphic-monthly


Read more

Posts pagination

  • Previous
  • 1
  • …
  • 233
  • 234
  • 235
  • 236
  • 237
  • 238
  • 239
  • …
  • 587
  • Next

go to store

Promos

Paper Bouquet Kit

josee smuck

Josée Smuck

Stampin’ Up! Canada Demonstrator since 2002
Ottawa, ON, Canada
Contact me with questions!
Josee@StampingJo.com
(613) 831-2917

Current Catalogues

Annual Catalogue (May2024-April2025)Stampin' Up! Annual CatalogueView Catalogue-ENG | Shop Online
View Catalogue- FR

——————

Looking for something?

Get the news


Click HERE to download Jo-Jo’s FREE Sketches & Tips Guide

Updates

Receive NEXT-DAY updates by email:

Receive SAME DAY updates by subscribing in a reader:
Click to Subscribe in a reader

Recent Posts

  • Embrace the Journey April 11, 2025
  • For the Books April 8, 2025
  • Beautiful Birthday April 5, 2025
  • Happy Retirement April 2, 2025
  • Frame & Flowers March 28, 2025

Categories

Proud Member…

Inky_Divas800

The content of this blog is the sole responsibility of Josee Smuck as a Stampin’ Up! Independent Demonstrator.  The use of and content of classes, services or products offered is not endorsed by Stampin’ Up! Unless otherwise indicated, images © Stampin’ Up! 1990 – present.

© 2025 Hand Stamped Cards with Josee Smuck-Stampin' Up! Canada Demonstrator | Powered by Superbs Personal Blog theme