Skip to content

Hand Stamped Cards with Josee Smuck-Stampin' Up! Canada Demonstrator

Stampin' Up! Canada Demonstrator; Rubber Stamps & Supplies for Cardmaking & Scrapbooking in Stittsville, Ontario (near Ottawa)

Menu
  • Home
  • JO JO POINTS
  • **Join**
  • Monthly Craft Kit
  • Weekly News
  • Shop Now
  • Contact Me
Menu
Stampin Up Cookie Cutter Halloween, A Happy Hello, Scarecrow card

Cookie Cutter Halloween Scarecrow Card

Posted on September 28, 2016September 26, 2016 by Josee

Hello! 

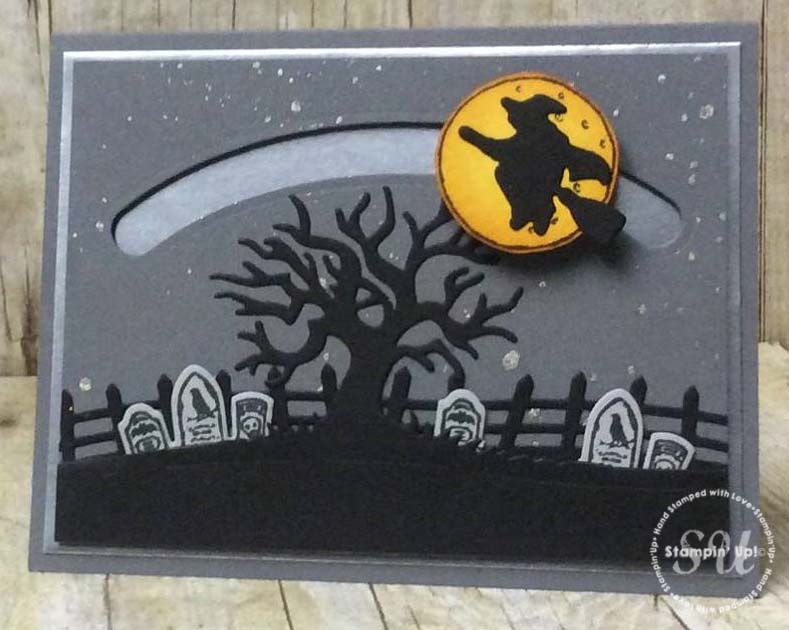
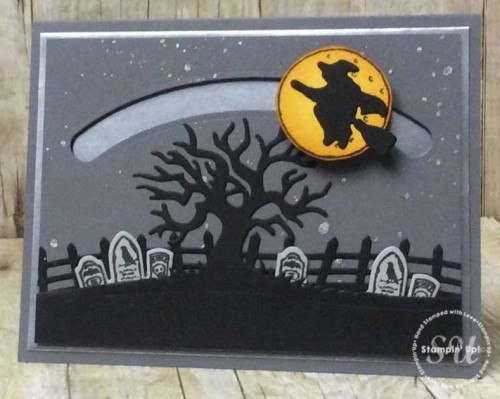
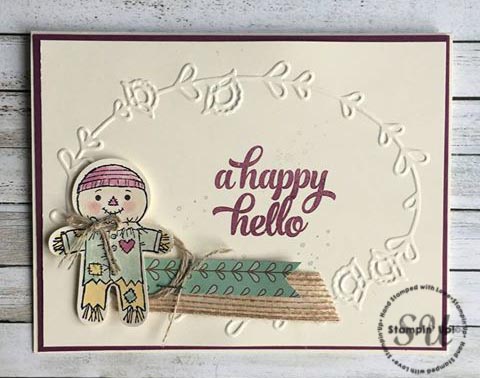
I just LOVE this little scarecrow stamp from the Cookie Cutter Halloween stamp set! He really is so cute and so fun to color with aqua painters and ink! I really like how this card came together and is just a perfect FALL card and by just changing the sentiment using any of the other sentiment stamps in the Tin of Cards stamp set this could be a Birthday card for someone having a birthday soon or a thank you card for your Thanksgiving hostess 🙂 

How To Make It: 

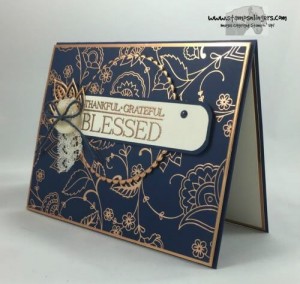
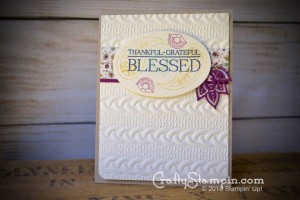
This card starts with a card base of Very Vanilla cardstock and then a layer of Rich Razzleberry cardstock. Then, using the Big Shot and the Pretty Paisleys Textured Impressions Embossing Folder, emboss the top layer of Very Vanilla cardstock.

Stamp “A Happy Hello” from the Tin of Cards stamp set with Rich Razzleberry ink on the Very Vanilla embossed layer.

Use Mint Macaron ink and the splatter stamp from Timeless Textures (stamped off on a scrap piece of paper first) to add some splatters to the cardfront.

Stamp the scarecrow from the Cookie Cutter Halloween stamp set onto a scrap of Very Vanilla cardstock, and use Aqua Painters and ink to add color to the scarecrow. Punch out the scarecrow with the Cookie Cutter Builder punch.

Use a small bit of Linen Thread and twirl to create a circle – allow the ends to be loose. Layer the Burlap ribbon, Petals and Paisley Designer Series Papers and the linen thread circle onto left side of embossed image and attach to the layer using the Handheld Stapler. Use Stampin' Dimensionals to attach the scarecrow punch out on top of the stapled embellishments.

Use two pieces of linen thread to create a bow for the scarecrow’s neck. Attach with a Glue Dot.

Adhere the Very Vanilla cardstock onto the cardbase.

Stamps: 

Cookie Cutter Halloween (142252 w, 142255 c), Tin of Cards (138946), Timeless Texture (140514 w,140517c)

Paper: 

Very Vanilla  (101650), Rich Razzleberry (115316) Petals & Paisley Specialty Designer Series Paper (142017)

Ink:

Basic Black Archival Ink (140931), Rich Razzleberry (126950), Delightful Dijon(138327), Mint Macaron (138326),Crumb Cake (126975)

Other: 

Pretty Paisleys Textured Impressions Embossing Folder (141833), Big Shot (143263), Cookie Cutter Builder Punch (140396), Aquapainters (103954), Linen Thread (104199), 5/8 “ Burlap Ribbon (141487), Handheld Stapler (139083), Stampin' Dimensionals (104430), Mini Glue Dots (103683)

Have a wonderful day!


blog signature holiday    hostess code graphic-monthly


Read more
Stampin Up Halloween Treat Bag

Halloween Treat Trick or Treat Bag

Posted on September 27, 2016September 26, 2016 by Josee

Good Morning!

Now that Fall is officially here, it's time to dig out the sweaters and light gloves for these cold mornings AND time to start thinking about what you're going to wear for Halloween and what you are going to dish out at the door! 

These little Glassine treat bags are super simple to make with a few supplies! Use the Halloween Treat stamp and Halloween Night Specialty Designer Series Paper for a cute Halloween themed bag, or change up the sentiment and Designer Series Papers for a Thanksgiving party favor!

How To Make It: 

Stamp “Happy Halloween” from the Halloween Treat stamp set in Basic Black on Whisper White Cardstock. Color with Smoky Slate and Pumpkin Pie Stampin' Write markers and cut out with Paper Snips.

Cut strips of Pop of Pink Designer Series Paper and Pumpkin Pie Glimmer Paper and use Paper Snips or Banner Triple Punch to trim the ends into banner tips as shown.

Put Basic Black paper into Glassine Bag (and add whatever treats you want to the bag) and fold the top of the bag over.

Wrap Halloween Night Designer Series Paper around the bag and tie the Silver Ribbon.

Assemble the banner strips using SNAIL Adhesive and use Stampin’ Dimensionals on the back of the “Happy Halloween” square.

Measurements:

• Whisper White: 3 x 3 • Basic Black: 4 ¼ x 4 ½ (for inside bag) • Pop of Pink Designer Series Paper: 4 ¼ x ¾ • Pumpkin Pie Glimmer Paper: 4 ¼ x ¾ • Halloween Night Designer Series Paper: 10 x 2 (scored at 2” and 6 ¾”)

Stamps: 

Halloween Treat #142249

Paper: 

Whisper White #100730, Basic Black #121045, Pop of Pink Designer Series Paper #141648, Pumpkin Pie Glimmer Paper #142029, Halloween Night Designer Series Paper #142022

Ink:

Basic Black Archival Stampin’ Pad #140931, Smoky Slate Marker #131261, Pumpkin Pie Marker #131259

Other: 

Glassine Gift Bags #141700, Silver 1/8” Ribbon #132137, Paper Snips #103579, Stampin’ Dimensionals #104430, SNAIL Adhesive #104332

I hope you have a stampin' good day!


blog signature holiday    hostess code graphic-monthly


Read more

My Crafty Friends Monday: Petals & Paisleys

Posted on September 26, 2016September 22, 2016 by Josee

Welcome to "My Crafty Friends Monday!" 

My Crafty Friends Monday-NEW-SMI hope you enjoyed a great weekend! Each Monday, I like to feature different projects that have inspired me and I know they'll inspire you too!
 
Each project was created by different & amazingly talented stampers- make sure you check out their blogs for more details and to check out their other amazing projects!!
(**Note…don't worry- I've contacted each of these stampers and allowed them to decline if they choose.) 
 

This week's featured stamp set is Petals & Paisleys (142196 Photopolymer). Bundle & Save! Stamp set and Framelits–143515

This stamp set coordinates with a whole suite of amazing products in a gorgeous color combo of Cajun Craze, Copper Foil, Delightful Dijon, Mint Macaron, Night of Navy, Rich Razzleberry, Soft Suede and Very Vanilla. 

Check out all the coordinating products: Paisleys Framelits Dies (141849), Petals & Paisleys Designer Series Paper (142017), Petals & Paisleys Cardstock Pack (142018), 3/8" Ribbon Trio Pack (142021), Pretty Paisleys Textured Impressions Embossing Folder (141833), Copper Foil Sheets (142020)


Amy Koender: ?her blog

paisleys-posies-stamp-with-amy-k

I love how Amy created the background with the Petals & Paisleys stamp set and use the die cuts as embellishments.


Christine Miller: her blog

paisleys-and-posies-by-christine-miller

Love how Christine used the paint stamp from Sunshine Sayings and the splatter from Gorgeous Grunge with the Petals & Paisleys. So pretty!


Mary Deatherage: her blog

petals-paisleys-and-posies-blessed-2-stamps-n-lingers-by-mary-deatherage

Love all the details on this and that Night of Navy and Copper- gorgeous!


Linda Cullen: her blog

petals-and-paisleys-linda-cullen

I love how Linda used the Cable Knit TIEF and of course all the details make this card beautiful!


Sarah Lancaster: her blog

paisleys-and-posies-heart-shaker-by-sara-lancaster

Not only is the background gorgeous on this card by Sarah, but the shaker card looks amazing!


Love these ideas? You can purchase this stamp set through my ONLINE STORE! 

I hope you've enjoyed this week's "My Crafty Friends Monday" Make sure you visit the talented artist's featured on this post! Thanks for stopping by today!

Were you featured here? Here's a badge you can add to your blog!
My Crafty Friends Monday-featured-NEW-SM


blog signature holiday    hostess code graphic-monthly


Read more

Cookie Cutter Halloween Thanksgiving card

Posted on September 23, 2016September 20, 2016 by Josee

Happy Friday! 

Today's card is a little something for Thanksgiving. It features the Cookie Cutter Halloween stamp set and matching Cookie Cutter Builder Punch, as well as the Labeler Alphabet stamp set to create your own sentiment!

cookie-cutter-halloween, scarecrow,gratitude, Stampin Up Canada

How To Make It: 

Start with a card base of Crumb Cake cardstock, score and fold.

Take the larger piece of Halloween Night Designer Series Paper and cut at an angle. Then adhere it to your card front leaving a gap in the middle where you cut the angle.

Using the small strip of Halloween Night Designer Series Paper in an alternating color than the bigger piece, hold it on the card and cut the edges to match the angles on the end and adhere to card with SNAIL Adhesive.

Die cut two leaves using Leaftlets Framelits, one in Old Olive and one in Basic Black. Adhere the two leaves together with SNAIL Adhesive making a slight shadow with the black die cut leaf. Add to the cardfront with SNAIL Adhesive.

Stamp the scarecrow from Cookie Cutter Halloween using Basic Black ink and punch out with the Cookie Cutter Builder Punch.

Color the scarecrow with a Blender pen and Old Olive, Delightful Dijon, Crumb Cake and Pumpkin Pie ink pads. Squeeze your ink pads when they are closed to get ink on the lid and use that ink as your palate to color. To color his face I used Crumb Cake ink and a Sponge Dauber to rub ink on.

Attach the punched scarecrow to the leaf on card front with Stampin' Dimensionals.

For the sentiment, stamp the letters using the Labeler Alphabet stamp set on a Whisper White strip and cut out by hand with Paper Snips. Attach to the card with SNAIL Adhesive.

Measurements:

Crumb Cake card stock: 5 ½” x 8 ½”, score at 4 ¼”

Old Olive card stock: 3” x 3 ½”

Basic Black card stock: 3” x 3 ½”

Halloween Night DSP: 4” x 4 ¼” + a strip approx. 4 ¾” x ¼”

Whisper White scraps: approx. 5” x ½” for sentiment + 2” x 2 ½” for scarecrow

Paper Pumpkin Glimmer Paper: Small scrap for scarecrow heart

Stamps: 

Cookie-Cutter Halloween (142255), Labeler Alphabet (141936)

Paper: 

Whisper White CS (100730), Old Olive (100702), Crumb Cake (120953), Basic Black (121045)

Ink:

Basic Black (140931), Old Olive (126953), Delightful Dijon (138327), Crumb Cake (126975), Pumpkin Pie (126945)

Other: 

Halloween Night DSP (142022), Pumpkin Pie Glimmer Paper (142029), Cookie Cutter Builder Punch (140396), Leaflets Framelits (138283), Blender Pen (102845), Sponge Dauber (133773), Stampin' Dimensionals (104430)

Have a wonderful weekend!


blog signature holiday    hostess code graphic-monthly


Read more

Spooky Fun Halloween Slider Card

Posted on September 22, 2016September 21, 2016 by Josee

autumn-paints

Good Morning!  Happy First Day of Fall! 

I've got a fun Halloween slider card to show you today using the Spooky Fun stamp set, Halloween Scenes Edgelits and Sliding Star Framelits from Stampin Up! 

spooky-fun-halloween-slider-card

How To Make It: 

Score the Basic Gray card base at 4 1/4" and fold.

Use Memento Tuxedo Black ink to stamp two sets of tombstones on Smoky Slate cardstock and one moon on Crushed Curry cardstock.

Use the Halloween Scenes Edgelits to diecut the Smoky Slate tombstones, the spooky tree from the largest Basic Black piece, the fence from the middle sized piece and the witch from the smallest.

Use Paper Snips to trim the moon and then pick up Pumpkin Pie ink with a Stamping Sponge and sponge around the edges of the moon.

Use the Clear Wink of Stella and splatter the Basic Gray mat to create a star effect. Allow to fully dry Then use a die from the Sliding Star Framelits to diecut the trail across the sky about 1/2” from the top.

Use SNAIL adhesive to attach the tombstones behind the ground. Cut the fence section and glue behind the tree and tombstones and then glue everything to the Basic Gray mat.

Use SNAIL Adhesive to attach the Silver Foil mat onto the card base and then use Stampin’ Dimensionals to attach the art piece to the Silver Foil.

Use a Stampin’ Dimensional and attach 2 pennies or 2 washers together. Carefully insert the penny/washer into the slot -1 penny/washer on top of slot and 1 penny/washer under the slot.

Glue the witch onto the moon and then use a Stampin’ Dimensional to attach the moon to the penny/washer. You will have a flying witch! 

Measurements:

Basic Gray: 5 1/2" x 8 1/2" 5” x 3 3/4"

Silver Foil: 5 1/4" x 4”

Crushed Curry: 2” x 2”

Basic Black: 3” x 3 3/4" 1 1/4" x 4” 2” x 2”

Smoky Slate: 1 1/4" x 3”

Stamps: 

Spooky Fun (142236) Spooky Fun Bundle (144437)

Paper: 

Basic Black (121045); Basic Gray (121044); Crushed Curry (131199); Silver Foil Sheets (132178); Smoky Slate (131202)

Ink:

Pumpkin Pie (126945); Memento Tuxedo Black (132708)

Other: 

Sliding Star Framelits (141820); Halloween Scenes Edgelits (141842); Clear Wink of Stella Glitter Brush (141897); Stamping Sponges (141337); Paper Snips (103579); Stampin’ Dimensionals (104430); SNAIL adhesive (104332); 2 Pennies or Washers

I hope you enjoyed today's project! 


blog signature holiday    hostess code graphic-monthly


Read more

Posts pagination

  • Previous
  • 1
  • …
  • 232
  • 233
  • 234
  • 235
  • 236
  • 237
  • 238
  • …
  • 587
  • Next

go to store

Promos

Paper Bouquet Kit

josee smuck

Josée Smuck

Stampin’ Up! Canada Demonstrator since 2002
Ottawa, ON, Canada
Contact me with questions!
Josee@StampingJo.com
(613) 831-2917

Current Catalogues

Annual Catalogue (May2024-April2025)Stampin' Up! Annual CatalogueView Catalogue-ENG | Shop Online
View Catalogue- FR

——————

Looking for something?

Get the news


Click HERE to download Jo-Jo’s FREE Sketches & Tips Guide

Updates

Receive NEXT-DAY updates by email:

Receive SAME DAY updates by subscribing in a reader:
Click to Subscribe in a reader

Recent Posts

  • Embrace the Journey April 11, 2025
  • For the Books April 8, 2025
  • Beautiful Birthday April 5, 2025
  • Happy Retirement April 2, 2025
  • Frame & Flowers March 28, 2025

Categories

Proud Member…

Inky_Divas800

The content of this blog is the sole responsibility of Josee Smuck as a Stampin’ Up! Independent Demonstrator.  The use of and content of classes, services or products offered is not endorsed by Stampin’ Up! Unless otherwise indicated, images © Stampin’ Up! 1990 – present.

© 2025 Hand Stamped Cards with Josee Smuck-Stampin' Up! Canada Demonstrator | Powered by Superbs Personal Blog theme