Skip to content

Hand Stamped Cards with Josee Smuck-Stampin' Up! Canada Demonstrator

Stampin' Up! Canada Demonstrator; Rubber Stamps & Supplies for Cardmaking & Scrapbooking in Stittsville, Ontario (near Ottawa)

Menu
  • Home
  • JO JO POINTS
  • **Join**
  • Monthly Craft Kit
  • Weekly News
  • Shop Now
  • Contact Me
Menu
Stampin Up, Basket of Wishes

Basket of Wishes Thinking of You Card

Posted on October 11, 2016October 11, 2016 by Josee

Good Morning! 

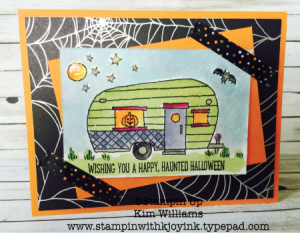
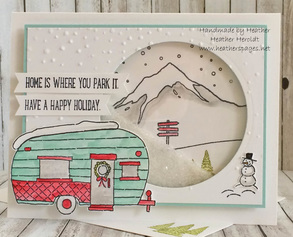
I have a cute and simple card to show you today. Not a Christmas card 🙂 but it could be a cute thank you card for your hostess if you were invited to Thanksgiving dinner at someone else's house 🙂 This card uses the Basket of Wishes stamp set which can be found in the Stampin Up 2016 Holiday Catalogue, as well as Ghoulish Grunge for that fabulous background!

Stampin Up, Basket of Wishes

How To Make It: 

Start with a cardbase of 4.25” x 11” Crumb Cake cardstock.

Adhere a layer of Delightful Dijon cardstock (4” x 5.25”) to the cardbase.

Stamp the mesh stamp from the Ghoulish Grunge stamp set with Smoky Slate ink on Whisper White cardstock, then adhere this layer to the cardbase.

On Crumb Cake cardstock, stamp the sentiment with Delightful Dijon ink and die cut with the Bunch of Banners Framelits.

On a scrap piece of Crumb Cake stamp the basket image from the Basket of Wishes stamp set and cut out with Paper Snips.

Stamp the sunflower image from Basket of Wishes twice on a some Whisper White scraps. Watercolor the flowers and leaves of stamped sunflower image with Aqua Painters using ink pads as your watercolor palette. 

Tip: To watercolor with ink pads, while the ink pad is closed, squeeze the lid firmly compressing the lid to the foam ink surface – this transfers ink to the inside lid – when you then open the ink pad you can use that ink as a palette for watercoloring with your Aqua Painter. (Simply fill the Aqua Painter with water).

Allow the flower images to dry then cut out with Paper Snips and then adhere with Glue Dots– one behind basket one in front so the basket appears full of flowers. Add to the cardfront.

Cut a length of linen thread tie into bow add with a Glue Dot to the basket. 

Adhere the banner die cut greeting to finish off the card!


Stamps: 

Basket of Wishes (142200); Ghoulish Grunge (142241)

Paper: 

Crumbcake (120953); Delightful Dijon (138338) Whisper White (100730)

Ink:

Basic Black Archival (666666); Delightful Dijon (138327) Garden Green (126973) Watermelon Wonder (138323) Smoky Slate (131379)

Other: 

Aquapainters (103954); Linen Thread (104199); Paper Snips (103579); Glue Dots (103683); Bunch of Banners Framelits (141488)

Thanks for stopping by the blog!


blog signature holiday


sharable2_b3g1dsp_naspuk    hostess code graphic-monthly


Read more

My Crafty Friends Monday: Glamper Greetings

Posted on October 10, 2016October 11, 2016 by Josee

Welcome to "My Crafty Friends Monday!" 

2016 Holiday Catalogue Spotlight

My Crafty Friends Monday-NEW-SMI hope you enjoyed a great weekend! If you are here in Canada, I hope you are enjoying a LONG and HAPPY Thanksgiving weekend! 
 
Each Monday, I like to feature different projects that have inspired me and I know they'll inspire you too!
 
Each project was created by different & amazingly talented stampers- make sure you check out their blogs for more details and to check out their other amazing projects!!
(**Note…don't worry- I've contacted each of these stampers and allowed them to decline if they choose.) 
 

This week's featured stamp set is Glamper Greetings (142202).

This stamp set is super versatile as you will see by all the amazing cards I found! There were so many great samples to show you, so get comfy! 🙂


Kim Williams: her blogglamper-greetings-by-kim-williams

Love this Halloween card with the Halloween Night Designer Series Paper in the background and the Halloween Night Designer Washi Tape holding those fun layers! 


Mary Deatherage: her blog

glamper-mountain-adventure-6-stamps-n-linger-by-mary-deatherage

I love how Mary created this amazing scene for the Glamper using the Mountain Adventure stamp set. Amazing!


Sandra Pfrang: her blog

glamper-greeting-by-sandra-pfrang

Sandra did a wonderful job with this Explosion Box! Love the little banners hanging on the sides of the box too!


Charlet Mallet: her blog

glamer-greetings-by-charlet-mallet

I just love all the details on this one by Charlet, including the Happy diecut from the Hello You Thinilts– a perfect birthday card!


Susan Best: her blog

wwys-glamper-greetings-by-susan-best

Not only do I love the amazing scene Susan creating here with the palm trees and sand, but I love the pop of pink too!


Erica Cerwin: her blog

glamper-greetings-by-erica-cerwin

Love the glittery snow on this Christmas card by Erica. So cute!


Heather Heroldt: her blog

glamper-holiday-by-heather-heroldt

This shaker card looks amazing! Heather used the Mountain Adventure stamp set here too and added some glitter for the snow inside the shaker. 


Dawn Thomas: her blog

glamper-greetings-by-dawn-thomas

Love the pastel colors on this one by Dawn- it's so darn pretty! Love that the sentiment fits on the Bunch of Banners Framelits! 


Marieke Bart- her blog

glamper-greetings-by-marieke-bart1 glamper-greetings-by-marieke-bart

I had to show you both of these cards because they are just an amazing sample of how you can use Glamper Greetings without the glamper! These are super cute and perfect with the Hardwood Background stamp!


Love these ideas? You can purchase this stamp set through my ONLINE STORE! 

I hope you've enjoyed this week's "My Crafty Friends Monday" Make sure you visit the talented artist's featured on this post! Thanks for stopping by today!

Were you featured here? Here's a badge you can add to your blog!
My Crafty Friends Monday-featured-NEW-SM


blog signature holiday


sharable3_b3g1dsp_naspuk    hostess code graphic-monthly


Read more
Foxy Friends stamp set, Jolly Hat Builder Punch, Stampin Up Canada

Foxy Friends Christmas Card

Posted on October 7, 2016October 3, 2016 by Josee

Hello! Happy Friday! 

Do you have plans this weekend? It's Thanksgiving here so there is definitely family time and a turkey dinner with all the fixings in my future 🙂 

Happy Thanksgiving from StampingJo.com
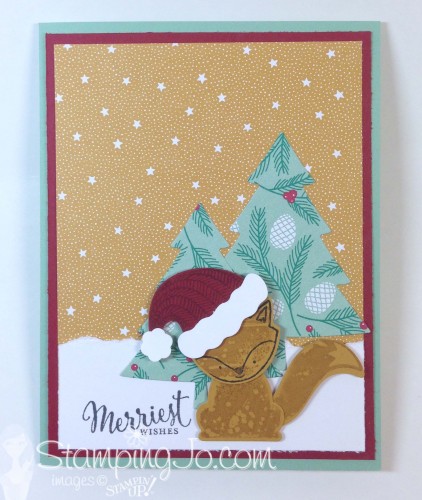
For today's card, I thought it would be fun to use the Foxy Friends stamp set with the new Jolly Hat Builder Punch and Jolly Friends stamp set.

I actually had a few other ideas for the hat builder punch that I have not had a chance to create yet, but I think there are many other stamp images that could use a Santa hat! If you have a good look at the catalogue I think you may just see that some of the other stamp sets you already own might look great with the Christmas hat ðŸ˜‰  What a simple way to get more use out of your stamp sets! 

Foxy Friends stamp set, Jolly Hat Builder Punch, Stampin Up Canada

How To Make It: 

This card starts with a cardbase made of Mint Macaron cardstock, and then a layer of Cherry Cobbler cardstock on top of that. 

Then, a layer of Presents & Pinecones Designer Series Paper was cut to layer on top of the Cherry Cobbler. I chose the star design as it worked perfectly for a background. Then, I took a strip of Whisper White cardstock and tore the top edge to look like snow at the bottom of the card. 

The sentiment from the Merriest Wishes stamp set was then stamped on the 'snow' using Memento Tuxedo Black ink.

I took a different patterned sheet from the Presents & Pinecones Designer Series Paper and cut two trees using the Perfect Pines Framelits. Those were adhered to the cardfront using SNAIL Adhesive.

The fox image was stamped in Delightful Dijon ink and Black ink using the body stamps from the Foxy Friends stamp set and the head & face from the Jolly Friends stamp set.

foxy-friends-punch-template

Tip: To make it easier to punch the whole fox in one punch, I made a template first. Using regular copy paper, I punched the Fox Builder Punch, then used that copy paper as a guide to stamp the body parts and face onto the cardstock. That way I was able to punch the whole fox at one time. 

The hat image from the Jolly Friends stamp set was stamped on Cherry Cobbler cardstock using Cherry Cobbler ink and punched out using the Jolly Hat Builder Punch. The trim for the hat was punched out using the same punch and Whisper White cardstock. 

Finally, all of the fox and hat punch outs were adhered together using Glue Dots and the whole fox was added to the card front using Stampin' Dimensionals. 

Stamps: 

Jolly Friends stamp set- 142112, Foxy Friends stamp set-141549 , Merriest Wishes stamp set-142063 wood, 142066 clear mount

Paper: 

Presents & Pinecones Designer Series Paper- 141986, Whisper White cardstock-100730, Mint Macaron- 138337, Cherry Cobbler cardstock-119685 , Delightful Dijon-138338

Ink:

Memento Tuxedo Black ink-132708, Refill: 133456, Delightful Dijon-138327, Cherry Cobbler- 126966

Other: 

Perfect Pines Framelits- 139665, Fox Builder Punch- 141470, Jolly Hat Builder Punch- 141847, Glue Dots-103683

Have an awesome weekend! Happy Thanksgiving!


blog signature holiday


sharable10_b3g1dsp_na    hostess code graphic-monthly


Read more
Merriest Wishes, Christmas Card, Stampin Up Canada

Merriest Wishes Christmas Card

Posted on October 6, 2016October 3, 2016 by Josee

Hello! 

Today's card is another one of the cards we made last month in my first Christmas card class of the season. I've got another class coming up, so if you are in the Ottawa area, make sure you check out the details and join us!

Merriest Wishes, Christmas Card, Stampin Up Canada


How To Make It: 

This card starts with a cardbase made of Smoky Slate cardstock. 

The background was then stamped using the circular design stamps from the Merriest Wishes stamp set in Always Artichoke and Smoky Slate ink. 

The Fancy Frost Specialty Designer Series Paper was then cut to 2"x4" and before adhering to the card base, the Sweet Sugarplum Glitter Ribbon was adhered and tied on. 

The circular sentiment from Merriest Wishes was stamped in Basic Black ink on Always Artichoke, and then die cut using the Merry Tags Framelits dies. 

The small strip of Sweet Sugarplum cardstock was trimmed on the ends using the Triple Banner Punch and then the 'Glad Tidings' sentiment from Merriest Wishes was stamped in Basic Black ink and the edges were bordered with some Clear Wink of Stella to add a little sparkle. This strip was fed through the hole of the Always Artichoke die cut and then both pieces were adhered to the card front. 

Stamps: 

Merriest Wishes stamp set-142063 wood, 142066 clear mount

Paper: 

Smoky Slate cardstock-131202 • Always Artichoke cardstock-105119 • Sweet Sugarplum cardstock-141418 (cut 1”x3”), Fancy Frost Specialty Designer Series Paper-142014 (cut to 2”x4”)

Ink:

Memento Tuxedo Black ink-132708, Refill: 133456, Always Artichoke ink-126972 • Smoky Slate ink-131179, Wink of Stella-clear-141897

Other: 

Merry Tags Framelit Dies- 141835; Banner Triple Punch-138292; Glitter Ribbon Combo Pack-Sweet Sugarplum– 142015

Thanks for stopping by! I hope you have a great day!


blog signature holiday


sharable10_b3g1dsp_na    hostess code graphic-monthly


Read more
Greetings from Santa, Everyday Jar Framelits, Christmas Card Idea, Stampin Up Canada

Greetings From Santa Christmas Card

Posted on October 5, 2016October 5, 2016 by Josee

Good day! 

Did you take advantage of this sale yet? Make sure to stock up on your stamping supplies while they are on SALE! Today is the LAST DAY!! 

wcmd_shareable-2_oct0116_na

Today's card is one of the cards we made at last month's Christmas card class. We used the Jar of Love stamp and Everday Jar Framelits to create a scene with the stamps from the Greetings from Santa stamp set.  The diagonal notched trim on the label was made using the Detailed Santa Thinlits and add such a nice touch to the label.  

Greetings from Santa, Everyday Jar Framelits, Christmas Card Idea, Stampin Up Canada

How To Make It: 

This card starts with a Smoky Slate cardbase.  The sentiment from Greetings From Santa was stamped on a strip of Whisper White cardstock and added to the cardbase with SNAIL Adhesive. Then, a couple of Rhinestones Basics Jewels were added. 

The Red Glimmer Paper was die cut using the Big Shot and the Lots of Labels Framelits, then die cut again using the diagonal notch trim die from the Detailed Santa Thinlits. The die cut was added to the cardfront using SNAIL Adhesive. 

On Whisper White cardstock, the jar image from the Jar of Love stamp set was stamped in Basic Black ink. The lid image from the same stamp set was stamped in Smoky Slate ink and then both images were die cut using the coordinating Everyday Jar Framelits. 

The little evergreen tree from the Greetings From Santa stamp set was stamped in Always Artichoke ink and the deer from the same stamp set was stamped in Chocolate Chip ink. Then the jar die cut was run through the Big Shot in the Softly Falling Textured Impressions Embossing Folder the make the jar look like a snow globe. 

I used Glue Dots to adhere the lid to the jar die cut, then tied the Smoky Slate Stitched Ribbon around it leaving the knot loose for now. The Mini Jingle Bells were threaded onto a piece of White Baker's Twine (I used a needle threader to help with that task- so much easier! See my tip here) Then the White Baker's Twine was threaded through the Smoky Slate Ribbon knot and tied and then that knot was tightened as well. 

Finally, the decked out jar die cut was added to the card front with Stampin' Dimensionals. 

Stamps: 

Greetings from Santa stamp set-143269 CM, 142069 wood, Jar of Love stamp set- 141587

Paper: 

Smoky Slate cardstock- 131202, Whisper White cardstock-100730 (cut 1”x4.25”, plus die cutting jar & lid), Red Glimmer Paper-121790

Ink:

Memento Tuxedo Black ink-132708, Refill: 133456, Chocolate Chip ink-126979, Always Artichoke ink-126972

Other: 

Lots of Labels Framelits- 138281, Stitched Ribbon- Smoky Slate- 141687, Mini Jingle Bells-142002, Softly Falling Textured Impressions Embossing Folder- 139672, Everyday Jars Framelits- 141490, Detailed Santa Thinlits Dies-141836, White Baker’s Twine- 124262, Rhinestone’s Basic Jewels- 119246, Mini Glue Dots- 103683, Stampin Dimensionals- 104430

I hope you have a stampin' good day!


blog signature holiday


sharable10_b3g1dsp_na    Earn Free Stamps with JoJo Points


Read more

Posts pagination

  • Previous
  • 1
  • …
  • 230
  • 231
  • 232
  • 233
  • 234
  • 235
  • 236
  • …
  • 587
  • Next

go to store

Promos

Paper Bouquet Kit

josee smuck

Josée Smuck

Stampin’ Up! Canada Demonstrator since 2002
Ottawa, ON, Canada
Contact me with questions!
Josee@StampingJo.com
(613) 831-2917

Current Catalogues

Annual Catalogue (May2024-April2025)Stampin' Up! Annual CatalogueView Catalogue-ENG | Shop Online
View Catalogue- FR

——————

Looking for something?

Get the news


Click HERE to download Jo-Jo’s FREE Sketches & Tips Guide

Updates

Receive NEXT-DAY updates by email:

Receive SAME DAY updates by subscribing in a reader:
Click to Subscribe in a reader

Recent Posts

  • Embrace the Journey April 11, 2025
  • For the Books April 8, 2025
  • Beautiful Birthday April 5, 2025
  • Happy Retirement April 2, 2025
  • Frame & Flowers March 28, 2025

Categories

Proud Member…

Inky_Divas800

The content of this blog is the sole responsibility of Josee Smuck as a Stampin’ Up! Independent Demonstrator.  The use of and content of classes, services or products offered is not endorsed by Stampin’ Up! Unless otherwise indicated, images © Stampin’ Up! 1990 – present.

© 2025 Hand Stamped Cards with Josee Smuck-Stampin' Up! Canada Demonstrator | Powered by Superbs Personal Blog theme