Skip to content

Hand Stamped Cards with Josee Smuck-Stampin' Up! Canada Demonstrator

Stampin' Up! Canada Demonstrator; Rubber Stamps & Supplies for Cardmaking & Scrapbooking in Stittsville, Ontario (near Ottawa)

Menu
  • Home
  • JO JO POINTS
  • **Join**
  • Monthly Craft Kit
  • Weekly News
  • Shop Now
  • Contact Me
Menu

Enjoy Today Medallion Card

Posted on May 10, 2017May 9, 2017 by Josee

Today's card is an easy and fairly quick stamped card using the Eastern Palace Suite from Stampin' Up's 2017-2018 Annual Catalogue. This card also uses the NEW Very Vanilla Thick cardstock for the cardbase. If you love our Whisper White Thick cardstock, you will love having the option of Very Vanilla too!

Eastern Palace Suite, Stampin Up, Eastern Medallion Thinlits


How To Make This Hand Stamped Card:

Start with the cardbase of Very Vanilla Thick cardstock.

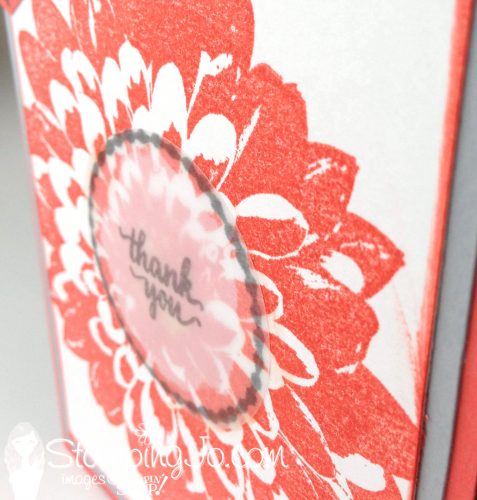
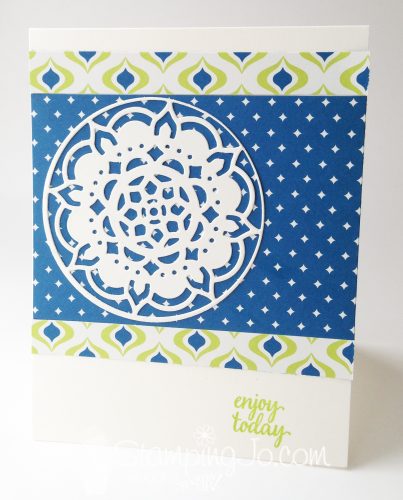
Adhere the Eastern Palace Specialty Designer Series Paper– you will need two 1/2" x 4 1/4" strips and one 3"x 4 1/4" strip. Then, stamp the sentiment from the Eastern Beauty stamp set using Lemon Lime Twist ink.

Take a piece of Very Vanilla cardstock and die cut the cardstock using both the Eastern Medallion Thinlits and the next size up circle die from the Layering Circles Framelits. Using the Magnetic Platform will keep the dies in place while you run them through the Big Shot. Use the Die Brush to get all the little pieces out of the die cut.

Adhere the medallion to the cardfront using the Fine Tip Glue Pen.

Stampin' Up Stamps:

Eastern Beauty stamp set- from the Eastern Palace Suite

Stampin' Up Paper:

Thick Vanilla Cardstock, Eastern Palace Specialty Designer Series Paper

Stampin' Up Ink:

Lemon Lime Twist ink

Other Stamp Supplies and Tools:

Eastern Medallions Thinlits, Layering Circle Framelits, Fine Tip Glue Pen, SNAIL Adhesive, Magnetic Platform, Die Brush, Big Shot

Thanks for stopping by today! Don't forget when you purchase the Eastern Palace Suite Premier Bundle, you will not only be able to use the card ideas I share here on the blog, but I will also send you 24 Card Ideas with instructions to get more out of your bundle!


QUICK LINKS: 
EASTERN PALACE SUITE– Get the details on the early released product bundles!

RETIRING LIST– These items are only available while supplies last!

CLEARANCE RACK– Save up to 60% —NEW products added!!

JO JO POINTS– Earn free stamps with my Jo Jo Points Program    

NEW to STAMPIN' UP? Check out my tips here.

Read more

Thoughtful Banners stamp set: Masculine Birthday Card

Posted on May 9, 2017May 9, 2017 by Josee

I have used the Thoughtful Banners stamp set on many stamped cards, but one thing I realized is that I had never used the little rectangular stamp before. When I sat down to stamp this card, I was determined to use it and ended up with this masculine birthday card.

How To Make This Masculine Stamped Birthday Card:

I started this card with some Pool Party cardstock for the card base, then I added a layer of Smoky Slate cardstock.

Then, on a layer of Whisper White cardstock I started stamping the rectangular stamp from the Thoughtful Banners stamp set with Pool Party, Pear Pizzazz and Bermuda Bay ink. I tried to keep it straight, not worrying too much about it and cleaned off the stamp each time before changing colors.

Once all the rectangles were stamped, I went back and filled the spaces with Pear Pizzazz ink and the arrow stamp from the Thoughtful Banners stamp set.

I then die cut the Pumpkin Pie cardstock with the oval die from the Stitched Shape Framelits dies and adhered it to the cardfront with Stampin Dimensionals.

On a small piece of Whisper White cardstock, I stamped the label outline stamp from the Thoughtful Bannners stamp set with Bermuda Bay ink, then stamped the birthday greeting with Basic Gray ink. I stamped the same arrow stamp on each end using Pear Pizzazz ink. I punched the stamped greeting out with the Classic Label punch.

Thoughtful Banners, Stampin Up, handmade birthday card

I then punched the Smoky Slate cardstock with the Classic Label Punch and cut it in half. Then I adhered it behind the punched greeting allowing it to peek out at each end. I added some small strips of Stampin Dimensionals (from the outer edge of the sheet) and added it to the oval on the card front. (Hint: the NEW Mini Stampin Dimensionals coming June 1st in the new Annual Catalogue will be perfect for these small jobs!)

Stampin' Up Stamps:

Thoughtful Banners

Stampin' Up Paper:

Pool Party, Smoky Slate, Whisper White, Pumpkin Pie

Stampin' Up Ink:

Pool Party, Bermuda Bay, Pear Pizzazz, Archival Basic Gray

Other Stamp Supplies and Tools:

Classic Label Punch, Stitched Shape Framelits, Stampin' Dimensionals

Thanks for stopping by today! I hope you enjoyed this masculine stamped card using the Thoughtful Banners stamp set.


QUICK LINKS: 
EASTERN PALACE SUITE– Get the details on the early released product bundles!

RETIRING LIST– These items are only available while supplies last!

CLEARANCE RACK– Save up to 60% —NEW products added!!

JO JO POINTS– Earn free stamps with my Jo Jo Points Program    

NEW to STAMPIN' UP? Check out my tips here.

Read more
In Color, Fresh Florals DSP, Stampin Up

2017-2019 In Color Collection: New 2017-2018 Annual Catalogue Sneak Peek

Posted on May 8, 2017May 9, 2017 by Josee

With the new 2017-2018 Annual catalogue coming soon, I thought I would give you a preview of the some of the NEW products and colors that will be coming June 1st! There is so much goodness in the new catalogue, I wish I could show you the whole thing. If you become a demonstrator, one of the perks is getting to see and play with the new products before they come out! 😉 If you want to read more about becoming a Canadian Stampin' Up demostrator, click here. The first thing I wanted to show you are the new 2017-2019 In Colors. In fact, my updated blog signature at the end of this post features some of these colors! 😉

Stampin' Up 2017-2019 In Color Collection

I am in LOVE with the new Berry Burst color- that one is my favorite, but I think the other In Colors: Powder Pink, Fresh Fig, Lemon Lime Twist and Tranquil Tide will be really fun colors to play with! Love how bright and cheerful these colors are!

Looking at both In Color Collections together I think it's really going to be fun to use a mix of all the colors together. In fact, you can download this amazing color chart that gives you some great color combinations to try with the new In Colors! 

To download the PDF version of the In Color Color Combo Chart <<<<click here.

Color Coordinating Papercrafting Products

Now, if you've been a Stampin Up fan for some time, you may already know this well, and if you are new to Stampin Up, you have to know that the best thing about Stampin Up isn't just the stamps, it's the COLOR COORDINATION!  You can get everything you need to create cards that MATCH. If you started your stamping journey by buying products here and there from different brands and stores, you know what I am talking about. Stamping is so much less frustrating when you don't have to worry about colors matching! You know, you bought pink ribbon, pink cardstock and pink ink, only to realize that none of them are the same color of pink! That is never an issue with Stampin Up- if you have some favorite colors, you can get coordinating products in that color!

Stampin' Up 2017-2019 In Color Inks

In Color Stampin Ink Pads, Stampin UpYou can get Stampin' Ink Pads and refills to match so you never have to worry about ink pads drying out! Plus you get get matching Stampin' Write Markers too, so anything you color will match. In Color ink refills, Stampin Up

Of course markers can be used to ink up stamps as well, especially great if you want to ink the stamp in different colors.

In Color Stampin Write Markers, Stampin Up

Stampin' Up 2017-2019 In Color Papers

Of course, you need matching cardstock too! Stampin' Up has your 8 1/2" x11" cardstock, perfect for cardmaking and other papercrafting projects. In Color Cardstock, Stampin UpComing back to the 2017-2018 Annual Catalogue is 12"x12" cardstock– perfect for scrapbooking and making gift boxes or other 3D projects. In Color 12x12 Cardstock, Stampin UP

Also, part of the In Color Collection is this new Fresh Florals Designer Series Paper stack that includes 40 sheets of 12" x 12" paper: 4 each of 2 double-sided designs in 5 In Colors: Berry Burst, Fresh Fig, Lemon Lime Twist, Powder Pink, Tranquil Tide and Whisper White. In Color, Fresh Florals DSP, Stampin Up

Stampin' Up 2017-2019 In Color Accessories

Also part of the Stampin' Up 2017-2019 In Color Collection of products are the new 2017-2019 In Color Itty Bitty Bows. These are so cute and I love the idea of not having to tie my own bows! They can be added to your cards or scrapbook pages with a Mini Glue Dot. So easy!In Color Bitty Bows, Stampin Up

But, if you love your ribbon, we've got you covered there too! This In Color Finely Woven 1/2" Ribbon will coordinate with ALL the products I've shown you so far.

In Color Woven Ribbon, Stampin Up, papercrafting accessories

That's it for today's sneak peek! What do you think about the new In Color products? Do you have a favorite yet?

If you would like to see more of the new goodies, I received my preorder shipment and you can check out my unboxing video on my Facebook page!


QUICK LINKS: 
EASTERN PALACE SUITE– Get the details on the early released product bundles!

RETIRING LIST– These items are only available while supplies last!

CLEARANCE RACK– Save up to 60% —NEW products added!!

JO JO POINTS– Earn free stamps with my Jo Jo Points Program    

NEW to STAMPIN' UP? Check out my tips here.

Read more

Definitely Dahlia: Simple Stamped Thank You

Posted on May 5, 2017May 9, 2017 by Josee

The card I made for today is a simple stamped thank you card using the Definitely Dahlia stamp set from Stampin' Up's 2016-2017 Annual Catalogue. I am glad to say that this simple, but beautiful stamp will be in the next catalogue too.

Definitely Dahlia stamp, Stampin Up, simple stamped thank you card

I had a mishap when I was stamping the flower- you know, when you get ink where there shouldn't be any! Ya, that kind of mishap. Before I decided to just stamp it again on the other side of the cardstock- the beauty of stamping before adhering- I had decided to use the Classic Label punch to cover up the mishap 🙂 Even though I did restamp it and got a better stamped image, I decided to keep my corner cover ups for a different way to use this punch!

How To Make This Simple Stamped Thank You Card:

To start, I cut and scored the Calypso Coral cardstock for the card base, then added a layer of Smoky Slate cardstock on top.

On the Shimmery White cardstock layer, I stamped the Definitely Dahlia background stamp with Calypso Coral ink. Although normally with background stamps I like to place the stamp side up on the table and then place the cardstock on top of the inked stamp- that was how I got my mishap with this particular stamp. Because this stamp doesn't cover the whole background, I got more ink that I wanted. So, I stamped this dahlia like I would any other stamp- put the stamp to the paper on the table and I got I much better image.

Before I adhered the stamped image to the cardfront, I ran the edges along the Calypso Coral inkpad to ink up the edges. I had also used a So Saffron Stampin' Write marker to color in the middle of flower- but you can't see it much through the Vellum cardstock. 🙂

On the Vellum cardstock, I used the Archival Basic Gray ink to stamp the circle design and thank you greeting from the Eastern Beauty stamp set, which is part of the Eastern Palace Suite. I then heat set the ink with the Heat Tool, so it would not smudge.

I used one of the circles dies from the Layering Circles Framelits to cut the stamped vellum greeting. I then used the Fine Tip Glue Pen along the edge of the circle die cut to adhere the vellum to the flower middle. As you can see, the vellum ended up with a bit of a popped up look- which i liked. But, if you don't want that look, you will want to add the glue to the whole die cut.

Definitely Dahlia, Stampin Up, thank you card

As a final touch, with the Classic Label punch, I punched two labels from Calypso Coral cardstock and then stamped the diamond design from the Eastern Beauty stamp set on each end and adhered them to the cardfront with SNAIL Adhesive to look like photo corners. This could be a great way to frame some photos on a scrapbook page too!

Stampin' Up Stamps:

Definitely Dahlia background stamp, Eastern Beauty stamp set: currently only available in the Eastern Palace Suite

Stampin' Up Paper:

Calypso Coral Cardstock, Smoky Slate Cardstock, Vellum Cardstock, Shimmery White Cardstock

Stampin' Up Ink:

Archival Basic Gray, Calypso Coral Stampin' Pad, So Saffron Stampin' Write Marker

Other Stampin' Up Supplies and Tools:

Classic Label Punch, Layering Circles Framelits, Fine Tip Glue Pen, SNAIL Adhesive, Heat Tool


QUICK LINKS: 
EASTERN PALACE SUITE– Get the details on the early released product bundles!

RETIRING LIST– These items are only available while supplies last!

CLEARANCE RACK– Save up to 60% —NEW products added!!

JO JO POINTS– Earn free stamps with my Jo Jo Points Program    

NEW to STAMPIN' UP? Check out my tips here.

Read more
Oh So Succulent stamp set, Stampin Up, Mother's Day card,peekaboo gatefold

Mother’s Day card: Gatefold card

Posted on May 4, 2017May 9, 2017 by Josee

With Mother's Day coming soon I thought I would share this Mother's Day card using the Oh So Succulent stamp set that will be retiring soon! This card uses a peekaboo gatefold technique for a fun look!

Oh So Succulent stamp set, Stampin Up, Mother's Day card,peekaboo gatefold


How To Make This Gatefold Mother's Day Card:

Cut the Sahara Sand cardstock to 5 ½” x 7 ¾” , score at 1 ¾” and 6”, and fold and crease well on the score lines with the Bone Folder.

Adhere a 4” x 5 ¼” piece of Whisper White cardstock to the inside of the card.

Ink up the sentiment from the Oh So Succulent stamp set in Sahara Sand ink. Carefully hold the card closed with one hand and stamp the sentiment in the gap that “peeks” into the inside.

Note: Be sure to stamp the sentiment to the far right so that you have room for your focal front piece.

In the lower right corner of the inside piece, stamp the medium succulent outline from the Oh So Succulent stamp set in Old Olive ink and then stamp the leaves in Old Olive ink as well.

Oh So Succulent, Stampin Up, Mother's Day card,inside of card

Ink up the solid inside succulent stamp with Sweet Sugarplum ink and stamp in the outline area.

On the card front panels attach two Whisper White cardstock layers that are 1 3/8” x 5 1/8”. Then adhere the Succulent Garden Designer Series Paper pieces that are 1” x 4 ¾” on to the Whisper White layers.

Stamp the outline of the bigger succulent flower from the Oh So Succulent stamp set in Old Olive ink on a 2 ¼” x 2 ¼” Whisper White square. Then, stamp the solid inside succulent flower in Sweet Sugarplum ink inside the outline stamp.

Cut out this flower using the Big Shot and the coordinating Succulent Framelit Die.

On a 2 ¼” x 2 ¼” Whisper White cardstock square, stamp the leaf twice in Old Olive ink on opposite corners.

Adhere the leaf square to a 2 ½” x 2 ½” square of Sahara Sand cardstock.

Add a Stampin' Dimensional to the back of the die cut flower and place on top of the stamped leaves.

Place two Stampin' Dimensionals at the very top edge of the Sahara Sand/White square with the flower. Adhere it to the card front so that it straddles the peek-a-boo opening.

Note: Dimensionals should be stuck to the top panel of the card front for easy opening.

Stampin' Up Stamps:

Oh So Succulent (142992)

Stampin' Up Paper:

Sahara Sand (121043), Whisper White (100730), Succulent Garden Designer Series Paper (142778)

Stampin' Up Ink:

Old Olive (126953), Sweet Sugarplum (141395), Sahara Sand (126976)

Other Stampin' Up Supplies and Tools:

Succulent Framelit Dies (142757), Big Shot (143263), SNAIL Adhesive (104332), Stampin' Dimensionals (104430), Bone Folder (102300)

I hope you are inspired by today's gatefold Mother's Day card and will try something a little different the next time you sit down to stamp! Have a great day!


QUICK LINKS: 
EASTERN PALACE SUITE– Get the details on the early released product bundles!

RETIRING LIST– These items are only available while supplies last!

CLEARANCE RACK– Save up to 60% —NEW products added!!

JO JO POINTS– Earn free stamps with my Jo Jo Points Program    

NEW to STAMPIN' UP? Check out my tips here.

Read more

Posts pagination

  • Previous
  • 1
  • …
  • 200
  • 201
  • 202
  • 203
  • 204
  • 205
  • 206
  • …
  • 587
  • Next

go to store

Promos

Paper Bouquet Kit

josee smuck

Josée Smuck

Stampin’ Up! Canada Demonstrator since 2002
Ottawa, ON, Canada
Contact me with questions!
Josee@StampingJo.com
(613) 831-2917

Current Catalogues

Annual Catalogue (May2024-April2025)Stampin' Up! Annual CatalogueView Catalogue-ENG | Shop Online
View Catalogue- FR

——————

Looking for something?

Get the news


Click HERE to download Jo-Jo’s FREE Sketches & Tips Guide

Updates

Receive NEXT-DAY updates by email:

Receive SAME DAY updates by subscribing in a reader:
Click to Subscribe in a reader

Recent Posts

  • Embrace the Journey April 11, 2025
  • For the Books April 8, 2025
  • Beautiful Birthday April 5, 2025
  • Happy Retirement April 2, 2025
  • Frame & Flowers March 28, 2025

Categories

Proud Member…

Inky_Divas800

The content of this blog is the sole responsibility of Josee Smuck as a Stampin’ Up! Independent Demonstrator.  The use of and content of classes, services or products offered is not endorsed by Stampin’ Up! Unless otherwise indicated, images © Stampin’ Up! 1990 – present.

© 2025 Hand Stamped Cards with Josee Smuck-Stampin' Up! Canada Demonstrator | Powered by Superbs Personal Blog theme