Skip to content

Hand Stamped Cards with Josee Smuck-Stampin' Up! Canada Demonstrator

Stampin' Up! Canada Demonstrator; Rubber Stamps & Supplies for Cardmaking & Scrapbooking in Stittsville, Ontario (near Ottawa)

Menu
  • Home
  • JO JO POINTS
  • **Join**
  • Monthly Craft Kit
  • Weekly News
  • Shop Now
  • Contact Me
Menu

Add Texture with Embossing Paste

Posted on June 14, 2017June 13, 2017 by Josee

If you have had a chance to browse the new 2017-2018 Annual Catalogue, you have or may not have seen the NEW Embossing Paste on page 201. Along with the Pattern Party Decorative Masks and Palette Knives you will love playing with the embossing paste when you are cardmaking or scrapbooking! It creates such a pretty, soft texture for your cards and scrapbook pages.

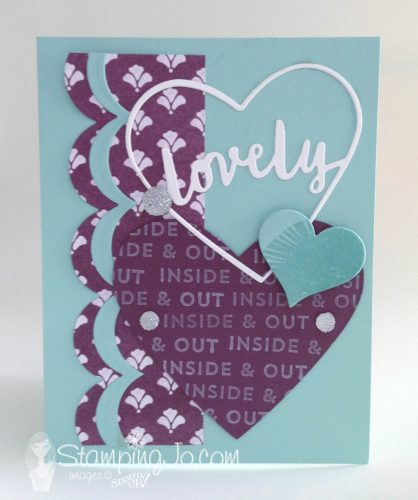
This card uses the Pattern Party Decorative Mask for the background, the Lovely Words Thinlits dies for the 'friend' die cut and the Leaflets Framelits, as well as some Metallic Sequins to add some bling to the background layer.

Check out this video from Stampin' Up with some tips and samples of what you can make with the Embossing Paste.

Embossing Paste on card using Feather Together stamp set, Stampin Up, stamped card ideas

These cards use the Pattern Party Decorative Masks for the background as well as the Feather Together stamp set on page 176 of the new catalogue.

Tips for using Embossing Paste:

  • ⇒Color with Stampin' ink refills to create colored embossing paste
  • ⇒Use embossing paste as is for the white on white, or white on colored cardstock look
  • ⇒It dries quickly– but drying time varies depending on how thick you put it on
  • ⇒Clean tools and masks with soapy water right away so the paste doesn't get stuck on your tools
  • ⇒Don't worry about being perfect when applying the texture paste
  • ⇒Get creative and experiment in creating your own masks with dies and window sheets (for example, use the smaller heart dies from the Sweet & Sassy Framelits, the new Eclectic Layers Thinlits Dies or the Butterflies Thinlits to cut some window sheets and use the die cut window sheets as masks!)
  • ⇒Secure the mask and cardstock to your surface with washi tape

Embossing Paste on card using the At Home With You stamp set, Stampin Up, stamped Christmas card

This card uses the At Home With You stamp set and At Home Framelits Dies, with the brick Pattern Party Decorative Mask with embossing paste in the background. The embossing paste was left white on white cardstock to create a gorgeous backdrop for this stamp bundle.


The tools you need to add texture with Embossing Paste:

  • Stampin' Up Embossing Paste
  • Palette Knives
  • Pattern Party Decorative Masks (or Window Sheets and your favorite dies to create your own masks)
  • Ink Refills
  • Silicone Craft Sheet (pg. 203 of 2017-2018 Annual Catalogue)
  • Washi Tape (optional)

If you love the look of added texture on your cardmaking projects and scrapbook pages, you will want to give the new Embossing Paste a try! Have fun and get stamping!


QUICK LINKS: 

NEW! 2017-2018 ANNUAL CATALOGUE– Download the PDF version or check out the new products in store

NEW! MEMORIES AND MORE and PLANNER KIT product line- check them out here!

CLEARANCE RACK– Save up to 60% —NEW products added!!

JO JO POINTS– Earn free stamps with my Jo Jo Points Program    

NEW to STAMPIN' UP? Check out my tips here.

Read more
Just Add Text, Stampin Up

You Are So Beautiful Card

Posted on June 13, 2017June 9, 2017 by Josee

Today's card is a quick and easy, no layer, stamped 'any occasion' card using the new Just Add Text stamp set from Stampin' Up's NEW 2017-2018 Annual Catalogue. I love the way this card turned out with the partial embossing on the bottom!

Just Add Text, Stampin Up

How To Make This Hand Stamped Card:

This card really is so simple to make! Start with a half sheet (11" x 4 1/4") of the new Thick Very Vanilla cardstock– scored and folded at the 5 1/2" mark.

Unfold the cardbase and place it in the Fluttering Textured Impressions Embossing folder– only putting about 1/4 of the cardfront bottom in the embossing folder. Run that through the Big Shot taking care not to shift the cardbase so you get a straight section of embossed butterflies. (Not to worry if it ends up slightly off- you will be covering the top edge of it with ribbon!)

Once that is done, ink up the 'You Are So Beautiful To Me' stamp from the Just Add Text stamp set with Basic Black Archival ink and stamp the greeting just above the embossed edge, allowing some space to add the ribbon. 

Then, color in the stamped image using the Watercolor Pencils in Old Olive, Daffodil Delight and Pumpkin Pie.

To finish off the card, place a strip of Tear & Tape Adhesive horizontally between the embossed area and the stamped greeting. Peel off the adhesive backing and place a small piece of Old Olive 3/8" Mini Chevron Ribbon centered vertically on the horizontal strip about 3/4 of an inch from the left edge of the card (where you see the knot in the image). Then place a longer strip of Old Olive 3/8" Mini Chevron Ribbon right on the horizontal line of Tear & Tape Adhesive and press down to adhere the ribbon to the cardfront. Tie the vertically placed piece of ribbon in a knot.

Trim the ribbon off the edge of the card and the knotted ends if needed.

Stampin' Up Stamps:

Just Add Text stamp set

Stampin' Up Paper:

Thick Very Vanilla Cardstock

Stampin' Up Ink:

Archival Basic Black

Other Stampin' Up Supplies and Tools:

Old Olive 3/8" Mini Chevron Ribbon, Fluttering Textured Impressions Embossing Folder, Watercolor Pencils: Old Olive, Daffodil Delight, Pumpkin Pie, Tear & Tape Adhesive

I hope you enjoyed today's quick and easy, no layer card using the new Just Add Text stamp set!


QUICK LINKS: 

NEW! 2017-2018 ANNUAL CATALOGUE– Download the PDF version or check out the new products in store

NEW! MEMORIES AND MORE and PLANNER KIT product line- check them out here!

CLEARANCE RACK– Save up to 60% —NEW products added!!

JO JO POINTS– Earn free stamps with my Jo Jo Points Program    

NEW to STAMPIN' UP? Check out my tips here.

Read more

Petal Garden Suite

Posted on June 12, 2017June 9, 2017 by Josee

Today I wanted to show you the gorgeous new Petal Garden Suite from Stampin' Up's NEW 2017-2018 Annual Catalogue. You can find this whole suite of products on page 56 and 57 of the new catalogue.

Stampin Up 2017-2018 Annual Catalogue-Petal Garden Suite

This gorgeous suite of products features the colors: Calypso Coral, Old Olive, Pool Party, Rich Razzleberry, Sweet Sugarplum and Whisper White. These color combinations are so feminine and pretty! Add in the rose images for a gorgeous suite of products to create gorgeous cards! The Petal Garden Designer Series Paper Stack brings the whole suite together!

Petal Garden Designer Series Paper Stack, Petal Garden Suite

Petal Garden Suite, Stampin Up


The Petal Garden cardstock pack, available in 8 1/2" x11" size contains 24 sheets total of Calypso Coral, Rich Razzleberry and Thick Whisper White to coordinate with the whole suite. The 1/8" Sheer Ribbon is available in Calypso Coral, Fresh Fig, Old Olive and Whisper White.

1/8" Sheer Ribbon, Stampin Up, Petal Garden Suite

The Garden Trellis Textured Impressions Embossing Folder is a pretty addition to the Petal Garden Suite.

Garden Trellis Textured Impressions Embossing Folder, Stampin Up, Petal Garden Suite

Thanks for stopping by today to check out the new Petal Garden Suite from Stampin Up!


QUICK LINKS: 

NEW! 2017-2018 ANNUAL CATALOGUE– Download the PDF version or check out the new products in store

NEW! MEMORIES AND MORE and PLANNER product line- check them out here!

CLEARANCE RACK– Save up to 60% —NEW products added!!

JO JO POINTS– Earn free stamps with my Jo Jo Points Program    

NEW to STAMPIN' UP? Check out my tips here.

Read more

Lovely Words Meets Seasonal Layers Thinlits

Posted on June 9, 2017June 7, 2017 by Josee

Today's stamped card was a fun one to make using the Lovely Inside and Out stamp set and coordinating Lovely Words Thinlits from Stampin' Up's NEW 2017-2018 Annual Catalogue. I love the color combination on this one too!

Lovely Words, Stampin Up

How To Make This Hand Stamped Card:

First, start by cutting and scoring a cardbase from Pool Party cardstock.

Take a strip of the Fresh Fig colored Fresh Florals Designer Series Paper and cut the scallop edge by running the strip of paper through the Big Shot with the Seasonal Layers Thinlits. Die cut the edge twice to get the two separate pieces as shown. Adhere them to the cardbase.

Die cut a large heart shape from a piece of Fresh Fig cardstock using the Sweet & Sassy Framelits.  Stamp the words 'Lovely Inside and Out' all over the heart using the Whisper White Craft ink. Adhere the stamped heart die cut to the cardfront as shown using SNAIL Adhesive.

With the Whisper White cardstock, die cut the 'Lovely' heart using the Lovely Words Thinlits and the heart die from the Sweet & Sassy Framelits to completely cut the heart shape out.

Lovely Words Thinlits, Stampin Up

Note: The Lovely Words Thinlits don't cut the shape out completely. To cut the shapes out, use the matching layered shape dies to complete the cut.

Adhere this die cut to the cardfront using the Fine Tip Glue Pen.

Using the same Sweet & Sassy Framelits dies, cut a small heart out of Pool Party cardstock. Stamp the sunburst design from the Lovely Inside and Out stamp set with Versamark ink onto the small heart and then sprinkle with Clear Embossing Powder and melt the powder with the Heat Tool. Adhere this to the cardfront using Stampin' Dimensionals.

Tip: Use some tweezers to hold the small die cut while you heat it so you don't burn your fingers! It gets hot!

As a final touch, add a few Clear Faceted Gems for some bling!

Stampin' Up Stamps:

Lovely Inside and Out stamp set

Stampin' Up Paper:

Pool Party cardstock, Fresh Fig cardstock, Fresh Florals Designer Series Paper

Stampin' Up Ink:

Craft Whisper White ink, Versamark

Other Stampin' Up Supplies and Tools:

Seasonal Layers Thinlits, Lovely Words Thinlits, Sweet & Sassy Framelits, Clear Faceted Gems, Clear Embossing Powder, Heat Tool

I made several more cards using the Lovely Inside and Out stamp set and Lovely Words Thinlits- stay tuned over the next few weeks to see those cards!


QUICK LINKS: 

NEW! 2017-2018 ANNUAL CATALOGUE– Download the PDF version or check out the new products in store

NEW! MEMORIES AND MORE and PLANNER KIT product line- check them out here!

CLEARANCE RACK– Save up to 60% —NEW products added!!

JO JO POINTS– Earn free stamps with my Jo Jo Points Program    

NEW to STAMPIN' UP? Check out my tips here.

Read more
In the City, baby card, Stampin Up

Special Delivery Baby Card

Posted on June 8, 2017June 7, 2017 by Josee

The stamp set I am showing you today is one the first stamp sets I ordered from Stampin Up when the new catty came out. I just love the doodle images in this In The City stamp set from Stampin' Up's NEW 2017-2018 Annual Catalogue. It is one of the HOST only stamp sets and not only does it have several different 2-step images to create some fun city scapes, but it has several different greeting stamps that make it a super versatile stamp set! Today's card is a just a sample of how you can use the images and greetings to create this hand stamped baby card. 

In the City, baby card, Stampin Up

This HOST only stamp is available to you when you host a workshop or place an order over $200! If you have a Stampin' Up wish list, that is not a hard $ amount to get to! Not only do you get to choose one of the exclusive HOST only stamp sets, you also qualify for Stampin' Rewards! Check out the full details here. 

How To Make This Hand Stamped Baby Card:

I started this card with a base of the NEW Powder Pink cardstock.

On a piece of Whisper White cardstock I stamped the scene using the various stamps from the In The City stamp set keeping the scene tight to fit into the oval that will be cut later. The main images were stamped in Basic Black ink and then I filled in the colors with the matching 2-step stamp in Old Olive ink, Powder Pink ink and Berry Burst ink. The fireworks were stamped with Powder Pink ink.

The scene was then die cut with the larger oval from the Stitched Shape Framelits and the mat oval was die cut using the next size oval die from the Layering Ovals Framelits. Both pieces were adhered together with SNAIL Adhesive.

The greeting from the In The City stamp set was curved onto the acrylic block (I used the punch to guide the curve) and then stamped with Basic Black ink on a scrap piece of Whisper White cardstock and then punched out using the Duet Banner Punch. The mat piece was punched with the same punch out of Powder Pink cardstock. Again both pieces were adhered together using SNAIL Adhesive.

Now to put the card together:

Lay a Delicate White Doily on the card front and once you are happy with it's position, adhere it using SNAIL. Add a layer of the NEW Berry Burst 1/2" Finely Woven Ribbon with one end snipped in a ribbon cut.

Add the oval layers on top using SNAIL Adhesive and then add the greeting using Stampin' Dimensionals.

Add some Clear Clear Faceted Gems to finish off the card.

Stampin' Up Stamps:

In the City stamp set (Host Only)

Stampin' Up Paper:

Powder Pink cardstock, Berry Burst cardstock, Whisper White cardstock

Stampin' Up Ink:

Basic Black Archival ink, Powder Pink ink, Berry Burst ink, Old Olive ink

Other Stampin' Up Supplies and Tools:

Stitched Shape Framelits, Layering Ovals Framelits, Duet Banner Bunch, Stampin' Dimensionals, Clear Faceted Gems (NEW!), Berry Burst 1/2" Finely Woven Ribbon (NEW!), Delicate White Doilies, Paper Snips, SNAIL Adhesive, 

Thanks for stopping by today to check out the baby card using the new In the City host stamp set!


QUICK LINKS: 

NEW! 2017-2018 ANNUAL CATALOGUE– Download the PDF version or check out the new products in store

NEW! MEMORIES AND MORE and PLANNER product line- check them out here!

CLEARANCE RACK– Save up to 60% —NEW products added!!

JO JO POINTS– Earn free stamps with my Jo Jo Points Program    

NEW to STAMPIN' UP? Check out my tips here.

Read more

Posts pagination

  • Previous
  • 1
  • …
  • 195
  • 196
  • 197
  • 198
  • 199
  • 200
  • 201
  • …
  • 587
  • Next

go to store

Promos

Paper Bouquet Kit

josee smuck

Josée Smuck

Stampin’ Up! Canada Demonstrator since 2002
Ottawa, ON, Canada
Contact me with questions!
Josee@StampingJo.com
(613) 831-2917

Current Catalogues

Annual Catalogue (May2024-April2025)Stampin' Up! Annual CatalogueView Catalogue-ENG | Shop Online
View Catalogue- FR

——————

Looking for something?

Get the news


Click HERE to download Jo-Jo’s FREE Sketches & Tips Guide

Updates

Receive NEXT-DAY updates by email:

Receive SAME DAY updates by subscribing in a reader:
Click to Subscribe in a reader

Recent Posts

  • Embrace the Journey April 11, 2025
  • For the Books April 8, 2025
  • Beautiful Birthday April 5, 2025
  • Happy Retirement April 2, 2025
  • Frame & Flowers March 28, 2025

Categories

Proud Member…

Inky_Divas800

The content of this blog is the sole responsibility of Josee Smuck as a Stampin’ Up! Independent Demonstrator.  The use of and content of classes, services or products offered is not endorsed by Stampin’ Up! Unless otherwise indicated, images © Stampin’ Up! 1990 – present.

© 2025 Hand Stamped Cards with Josee Smuck-Stampin' Up! Canada Demonstrator | Powered by Superbs Personal Blog theme