Skip to content

Hand Stamped Cards with Josee Smuck-Stampin' Up! Canada Demonstrator

Stampin' Up! Canada Demonstrator; Rubber Stamps & Supplies for Cardmaking & Scrapbooking in Stittsville, Ontario (near Ottawa)

Menu
  • Home
  • JO JO POINTS
  • **Join**
  • Monthly Craft Kit
  • Weekly News
  • Shop Now
  • Contact Me
Menu
Colorful Seasons, Stampin Up

Cottage inspired card

Posted on June 29, 2017June 26, 2017 by Josee

This weekend marks Canada's 150th birthday! Are you celebrating? There are so many activities going on around the city, I am sure we will find something to do. Some of you may be heading out of the city to a cottage or camping, for a quieter celebration and today's card reminded me of that. This stamped card using the Colorful Seasons stamp set from Stampin' Up's NEW 2017-2018 Annual Catalogue is perfect for cards to cover all the seasons.

Colorful Seasons, Stampin Up

How To Make This Hand Stamped Card:

You can start this card with Thick Whisper White cardstock. Then add a layer of the Berry Burst colored Color Theory Designer Series Paper Stack.

Use the scallop die from the Seasonal Layers Thinlits to cut Dapper Denim and Tranquil Tide cardstock. Alternate the die cuts on the cardfront and adhere them using SNAIL Adhesive.

On a piece of Whisper White cardstock stamp the lounge chair from the Colorful Seasons stamp set in Basic Black ink and Berry Burst ink. Then die cut the chair using the oval Stitched Shape Framelits and adhere the oval to the cardfront using Stampin' Dimensionals.

Stamp the greeting from the Colorful Seasons stamp set in Basic Black ink on the cardfront and add some Glitter Enamel Dots.

Add a folded piece of Daffodil Delight 1/4" Double Stitched Ribbon with a couple of Mini Glue Dots and then add a Glitter Enamel Dot to finish it off.

Stampin' Up Stamps:

Colorful Seasons stamp set

Stampin' Up Paper:

Thick Whisper White cardstock, Color Theory Designer Series Paper Stack, Tranquil Tide cardstock, Dapper Denim cardstock, Whisper White cardstock

Stampin' Up Ink:

Berry Burst Stampin' Pad, Basic Black ink

Other Stampin' Up Supplies and Tools:

Stitched Shape Framelits, Seasonal Layers Thinlits, Glitter Enamel Dots, Daffodil Delight 1/4" Double Stitched Ribbon

I hope you have a wonderful long weekend!


QUICK LINKS: 

NEW! 2017-2018 ANNUAL CATALOGUE– Download the PDF version or check out the new products in store

NEW! MEMORIES AND MORE and PLANNER KIT product line- check them out here!

CLEARANCE RACK– Save up to 60% —NEW products added!!

JO JO POINTS– Earn free stamps with my Jo Jo Points Program    

NEW to STAMPIN' UP? Check out my tips here.

Read more

Weaved Thank You Card

Posted on June 28, 2017June 26, 2017 by Josee

The card I have to show you today is a stamped thank you card using the Daisy Delight stamp set and coordinating Daisy Punch from Stampin' Up's NEW 2017-2018 Annual Catalogue.

How To Make This Hand Stamped Thank You Card:

This card started with Daffodil Delight cardstock on which I stamped the daisy from the Daisy Delight stamp set with Daffodil Delight ink (say that 5 times fast! laugh) to create a background on the cardbase.

Then, I cut a sheet from the Wood Textures Designer Series Paper Stack into strips. The papers are double sided, so I used both sides of the sheet to create a block of woven paper strips. Once I had the look I wanted, I started to adhere them together. I trimmed of any ragged edges. A piece of Daffodil Delight 1/4" Double Stitched Ribbon was wrapped around it and then the whole thing was adhered to the card base. A few pieces of the Daffodil Delight 1/4" Double Stitched Ribbon were tied to the wrapped ribbon.

The daisy from the Daisy Delight stamp set was stamped on Whisper White cardstock with Daffodil Delight ink, the flower center was stamped with Early Espresso ink and then the daisy was punched out using the Daisy punch. Two more daisies were punched from the lighter Crushed Curry sheets of Color Theory Designer Series Paper Stack. The daisies were stacked with Mini Glue Dots and Stampin' Dimensionals and then added to the card front.

The larger Thank You was stamped on the cardfront below the weave layer with Early Espresso ink.

The smaller greeting was stamped on Whisper White cardstock with Early Espresso ink and then punched out using the Classic Label punch. This was adhered to the cardfront using Mini Glue Dots.

Stampin' Up Stamps:

Daisy Delight stamp set

Stampin' Up Paper:

Daffodil Delight cardstock, Color Theory Designer Series Paper Stack, Wood Textures Designer Series Paper Stack, Whisper White cardstock

Stampin' Up Ink:

Daffodil Delight Stampin' Pad, Early Espresso Stampin' Pad

Other Stampin' Up Supplies and Tools:

Daffodil Delight 1/4" Double Stitched Ribbon, Daisy Punch, Classic Label punch

I hope you enjoyed today's hand stamped thank you card using the new Daisy Delight stamp set!


QUICK LINKS: 

NEW! 2017-2018 ANNUAL CATALOGUE– Download the PDF version or check out the new products in store

NEW! MEMORIES AND MORE and PLANNER KIT product line- check them out here!

CLEARANCE RACK– Save up to 60% —NEW products added!!

JO JO POINTS– Earn free stamps with my Jo Jo Points Program    

NEW to STAMPIN' UP? Check out my tips here.

Read more
In the City, friendship card, Stampin Up

Friendship card

Posted on June 27, 2017June 26, 2017 by Josee

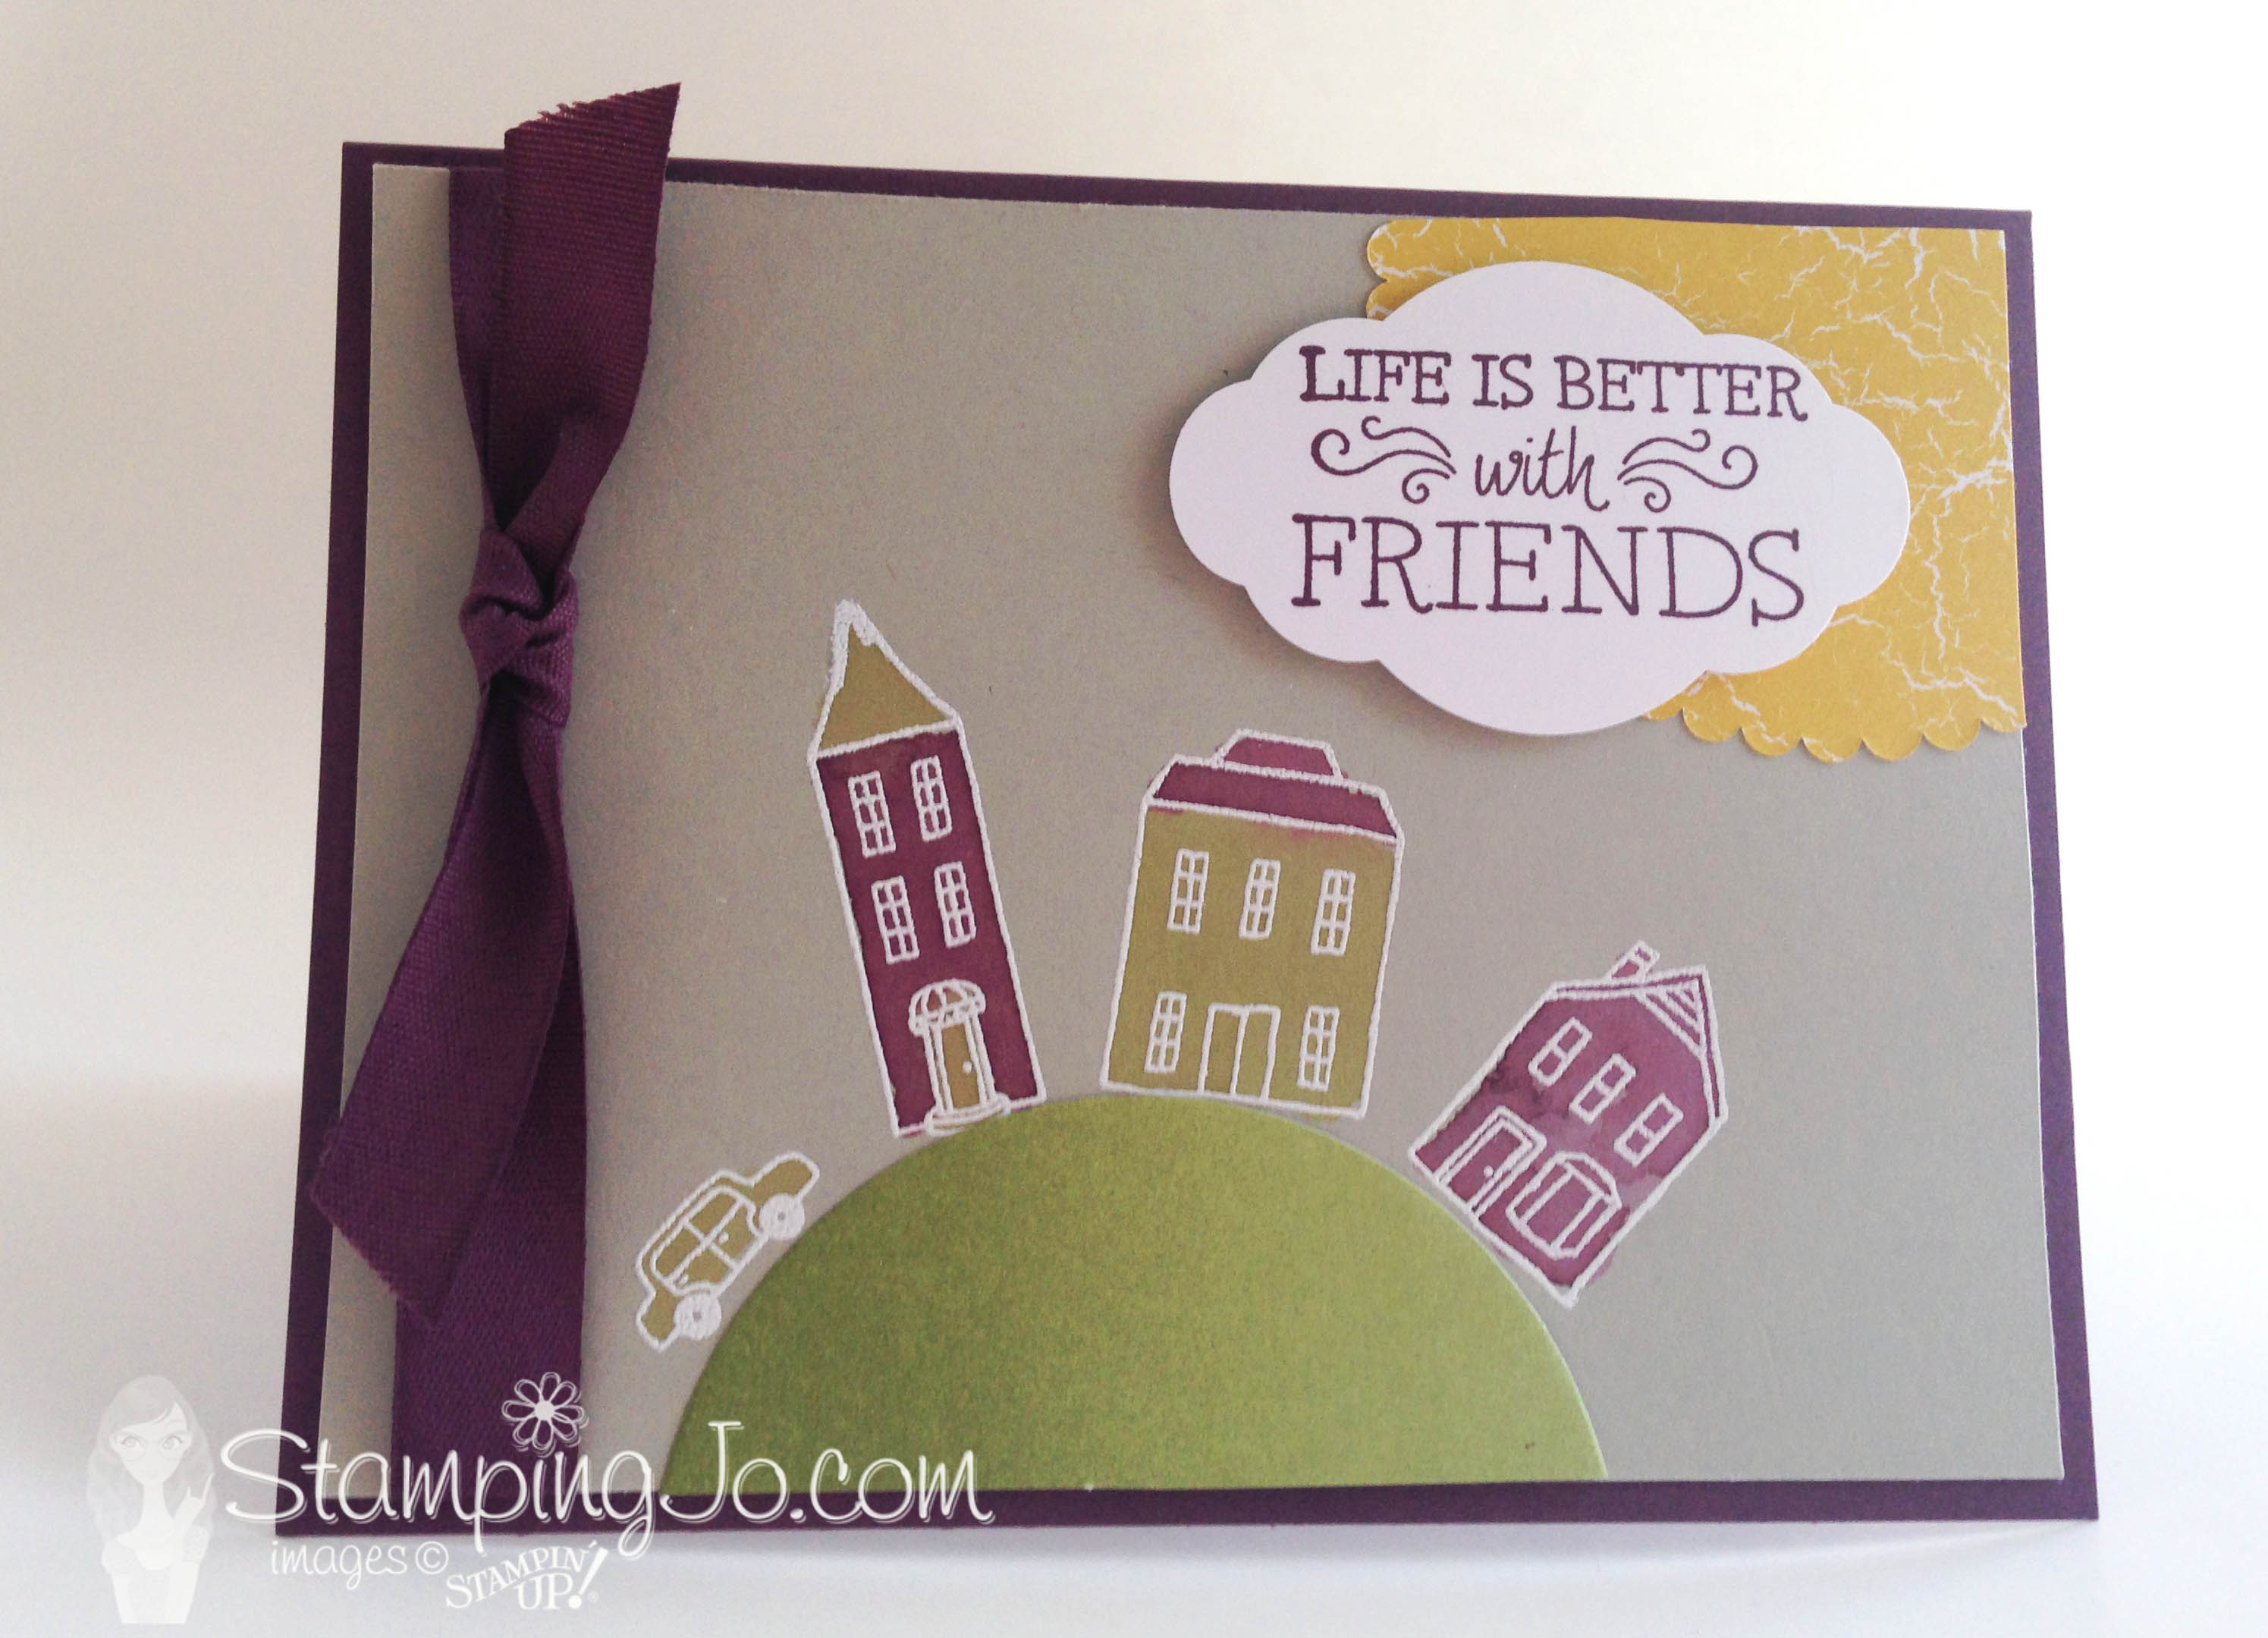
I am back today with another fun card using the In the City host stamp set from Stampin' Up's NEW 2017-2018 Annual Catalogue. You can get the full details about this stamp set in this post here.

In the City, friendship card, Stampin Up

How To Make This Hand Stamped Card:

Start this card with a base of Fresh Fig cardstock. 

Then, use the largest die from the Layering Circles Framelits to cut a piece of Old Olive Color Theory Designer Series Paper Stack– this will be the 'grass' for the hill. Use the scallop circle die from the same die set to cut the 'sun' out of Crushed Curry Color Theory Designer Series Paper.

Place the Old Olive circle on the bottom of the Crumb Cake layer and use it as a guide to stamp the houses and car from the In the City stamp set with White Craft ink. After the houses are all stamped, sprinkle White Stampin' Emboss Powder over the ink and melt the embossing powder with the Heat Tool.

Use an Aqua Painter and Fresh Fig and Old Olive Stampin' Pads to color in the houses and car.

Then, use SNAIL adhesive to add the Old Olive die cut circle below the houses, using Paper Snips to cut off the excess. Do the same with the 'sun' piece, adding it to the corner of the Crumb Cake layer.

Wrap some Fresh Fig 1/2" Finely Woven Ribbon around the front of the Crumb Cake piece and adhere to the back of the layer. Adhere the Crumb Cake layer to the card base and then tie another piece of Fresh Fig 1/2" Finely Woven Ribbon to the cardfront.

For the final step, stamp the greeting from the In the City stamp set with Fresh Fig ink, then punch it out using the Pretty Label Punch. Adhere this to the cardfront using Stampin' Dimensionals.

Stampin' Up Stamps:

In the City Host Stamp Set

Stampin' Up Paper:

Fresh Fig cardstock, Crumb Cake cardstock, Color Theory Designer Series Paper Stack

Stampin' Up Ink:

Fresh Fig Stampin' Pad, Old Olive Stampin' Pad, Whisper White Craft Ink

Other Stampin' Up Supplies and Tools:

Stampin' Emboss Powder-White, Heat Tool, Aqua Painter, Pretty Label Punch, Layering Circles Framelits, Fresh Fig 1/2" Finely Woven Ribbon, SNAIL Adhesive, Stampin' Dimensionals

Thanks for stopping by today!


QUICK LINKS: 

NEW! 2017-2018 ANNUAL CATALOGUE– Download the PDF version or check out the new products in store

NEW! MEMORIES AND MORE and PLANNER KIT product line- check them out here!

CLEARANCE RACK– Save up to 60% —NEW products added!!

JO JO POINTS– Earn free stamps with my Jo Jo Points Program    

NEW to STAMPIN' UP? Check out my tips here.

Read more

Lovely Friends Bundle

Posted on June 26, 2017June 19, 2017 by Josee

My Crafty Friends Monday-NEW-SMEach Monday, I like to feature different projects that have inspired me to stamp some cards and I know they'll inspire you to get stamping too! This week we've got some great samples of hand made birthday cards using the Lovely Friends stamp set and coordinating Lovely Laurel Thinlits dies. 

Each project I have to show you today was created by different & amazingly talented stampers and they have been contacted for permission to share their cards.

This week's featured product is the Lovely Friends stamp set (143763 Photopolymer) and coordinates with the Lovely Laurel Thinlits (143731).  Both available in a money saving bundle: 145319.


Shadow Box Card and Gift Box

Kim Oliver used this bundle to create this amazing Shadow Box card and gift box- a beautiful way to use these products!


Good Friends Are Hard To Find

Amy Koender used the Laurel Thinlits Dies inside the card to create the pop up effect these dies were designed for- such a pretty card!


This card by Brian King is a great example of simplicity at it's best- love the color blocks!


Golden Anniversary Card

This card by Sara Levin is gorgeous as an anniversary card combined with the Large Numbers Framelits. A great way to use this bundle!


You Make Me Happy

Sarah Fleming used the Lovely Laurel Thinlits on the front of the card to create a gorgeous look and she used the Lots of Labels Framelits in a creative way for the stamped greeting.


Do you love these stamped card ideas? You can get the Lovely Friends bundle in my ONLINE STORE. 


QUICK LINKS: 

NEW! 2017-2018 ANNUAL CATALOGUE– Download the PDF version or check out the new products in store

NEW! MEMORIES AND MORE and PLANNER KIT product line- check them out here!

CLEARANCE RACK– Save up to 60% —NEW products added!!

JO JO POINTS– Earn free stamps with my Jo Jo Points Program    

NEW to STAMPIN' UP? Check out my tips here.

Read more

Welcome To Our Block Card

Posted on June 22, 2017June 19, 2017 by Josee

I have to say I am loving the stamp set I used in today's card. The images are simple but so cute and the fact that the stamp set is so versatile makes it all the better! This stamped welcome card features the In the City host stamp set from Stampin' Up's NEW 2017-2018 Annual Catalogue.

Welcome card using In the City Host stamp set from Stampin Up, Watercolor Wash background stamp and Pretty Label Punch

How To Make This Hand Stamped Welcome Card:

First, start with a card base of Berry Burst cardstock. On a layer of Whisper White cardstock, use the Soft Sky ink to stamp the background with the Watercolor Wash background stamp.

Then, use the Basic Black ink to stamp the houses from the In The City stamp set along the bottom of the stamped background. Use the matching 'fill' stamps (the roof and house fronts) to add color to each house using Tranquil Tide ink, Berry Burst ink and Lemon Lime Twist ink.

Punch three Whisper White cardstock 'clouds' using the Pretty Label Punch, adhering two of them to the Whisper White layer with SNAIL Adhesive. Wrap the Berry Burst 1/2" Finely Woven Ribbon along the front of the stamped layer, adhering it to the back. Then adhere it to the cardbase, tying another piece of ribbon to the ribbon on the cardfront.

Welcome card using In the City Host stamp set from Stampin Up, Watercolor Wash background stamp and Pretty Label Punch

Next, stamp the 'Welcome To Our Block' greeting in Basic Black ink on the lower 'cloud' and then add the last 'cloud' with Stampin' Dimensionals above the ribbon.

To finish off the card, on a scrap of Whisper White cardstock, stamp the sun from the In the City stamp set in Basic Black ink and stamp the inside of the sun with Daffodil Delight ink. Punch the sun out using the 3/4" Circle Punch and adhere that to the card front using a Stampin' Dimensional.

Stampin' Up Stamps:

In The City stamp set (hostess stamp set- click here to read how you can get this stamp set), Watercolor Wash background stamp

Stampin' Up Paper:

Berry Burst cardstock, Whisper White cardstock

Stampin' Up Ink:

Basic Black, Berry Burst Stampin' Pad, Tranquil Tide Stampin' Pad, Lemon Lime Twist Stampin' Pad, Daffodil Delight Stampin' Pad, Soft Sky Stampin' Pad

Other Stampin' Up Supplies and Tools:

3/4" Circle Punch, Pretty Label Punch (for the clouds), Berry Burst 1/2" Finely Woven Ribbon, SNAIL Adhesive, Stampin' Dimensionals

I hope you enjoyed today's stamped welcome card using the new In the City stamp set!


QUICK LINKS: 

NEW! 2017-2018 ANNUAL CATALOGUE– Download the PDF version or check out the new products in store

NEW! MEMORIES AND MORE and PLANNER KIT product line- check them out here!

CLEARANCE RACK– Save up to 60% —NEW products added!!

JO JO POINTS– Earn free stamps with my Jo Jo Points Program    

NEW to STAMPIN' UP? Check out my tips here.

Read more

Posts pagination

  • Previous
  • 1
  • …
  • 193
  • 194
  • 195
  • 196
  • 197
  • 198
  • 199
  • …
  • 587
  • Next

go to store

Promos

Paper Bouquet Kit

josee smuck

Josée Smuck

Stampin’ Up! Canada Demonstrator since 2002
Ottawa, ON, Canada
Contact me with questions!
Josee@StampingJo.com
(613) 831-2917

Current Catalogues

Annual Catalogue (May2024-April2025)Stampin' Up! Annual CatalogueView Catalogue-ENG | Shop Online
View Catalogue- FR

——————

Looking for something?

Get the news


Click HERE to download Jo-Jo’s FREE Sketches & Tips Guide

Updates

Receive NEXT-DAY updates by email:

Receive SAME DAY updates by subscribing in a reader:
Click to Subscribe in a reader

Recent Posts

  • Embrace the Journey April 11, 2025
  • For the Books April 8, 2025
  • Beautiful Birthday April 5, 2025
  • Happy Retirement April 2, 2025
  • Frame & Flowers March 28, 2025

Categories

Proud Member…

Inky_Divas800

The content of this blog is the sole responsibility of Josee Smuck as a Stampin’ Up! Independent Demonstrator.  The use of and content of classes, services or products offered is not endorsed by Stampin’ Up! Unless otherwise indicated, images © Stampin’ Up! 1990 – present.

© 2025 Hand Stamped Cards with Josee Smuck-Stampin' Up! Canada Demonstrator | Powered by Superbs Personal Blog theme