Skip to content

Hand Stamped Cards with Josee Smuck-Stampin' Up! Canada Demonstrator

Stampin' Up! Canada Demonstrator; Rubber Stamps & Supplies for Cardmaking & Scrapbooking in Stittsville, Ontario (near Ottawa)

Menu
  • Home
  • JO JO POINTS
  • **Join**
  • Monthly Craft Kit
  • Weekly News
  • Shop Now
  • Contact Me
Menu

Detailed with Love

Posted on May 22, 2018 by Josee

Happy Tuesday! I hope you had a great holiday weekend! This past weekend, my oldest turned 18…I cannot believe how quickly time flies. I just don’t feel old enough to have an 18 yr. old.

Supplies:

  • Stamp Sets – Detailed with Love (146603w, 146606c);
  • Card Stock –Very Vanilla (101650); Rich Razzleberry (147091)
  • Stamp Pads – Mint Macaron (147106)
  • Misc – Share What You Love Specialty Designer Series Paper Stack (146926); Big Shot Die-Cutting Machine (143263); Layering Ovals Framelits (141706); Pearlized Doilies (146936); Share What You Love Artisan Pearls (146927); Nature’s Twine (146342); Stampin’ Sponges (14137); Stampin’ Dimensionals (104430); Mini Glue Dots (103683)

SHARE WHAT LOVE BUNDLES Get a 16-card tutorial FREE when you purchase ones of these bundles this month!

Measurements:

  • Very Vanilla CS: 4 1/4” x 11”; 2 1/2” x 3 1/2”; 2” x 2 ¾”
  • Rich Razzleberry CS: 3 3/4” x 5”; 2” x 2 1/2”
  • Share What You Love DSP: 3 1/2” x 4 3/4″

Instructions:

  1. Score Very Vanilla cardstock at 5 1/2” then fold to form card base.
  2. Adhere Rich Razzleberry CS to card front slanting to the left.
  3. Sponge Pearlized Doily using Stampin’ Sponge and Mint Macaron Ink.  Cut into quarters then adhere 2 pieces behind Share What You Love DSP.
  4. Add DSP unit to card front slanting to the right.
  5. Stamp image using Mint Macaron Ink onto Very Vanilla CS.  Die cut using Layering Ovals Framelits run through Big Shot.
  6. Die cut Rich Razzleberry CS using scallop oval from Layering Ovals Framelits.
  7. Die cut Very Vanilla CS using Layering Ovals Framelits.
  8. Adhere all ovals together.  Add to card front using Stampin’ Dimensionals.
  9. Add Share What You Love Artisan Pearls to bottom of stamped oval unit.
  10. Tie Rich Razzleberry and Mint Macaron twine into bow.  Add to card front using Mini Glue Dots.

MAY HOSTESS CODE FOR SHOPPING >>  F4GV9ZVM <<

Qualify for JO JO POINTS


QUICK LINKS:

  1. SHARE WHAT LOVE BUNDLES Get a 16-card tutorial FREE when you purchase ones of these bundles this month!
  2. SHOP FOR PRODUCTS ONLINE
  3. WEEKLY NEWSLETTER & TUTORIALS: Sign up for my newsletter to get updates, specials & card ideas!
  4. JO JO POINTS: Earn free stamps with my VIP reward program!
  5. New to Stampin’ Up? Check out my STAMPING 101 TIPS here!
  6. CLEARANCE RACK: Save up to 60% on great products!

Save

Save

Save

Save

Save</spa</sp

Read more

Friends like you

Posted on May 18, 2018May 15, 2018 by Josee

Supplies:

  • Stamp Sets – Love What You Do (148042)
  • Card Stock – So Saffron (333333); Share What You Love Specialty Designer Series Paper (146926); Grapefruit Grove (146972); Rich Razzleberry (115316); Whisper White (100730)
  • Stamp Pads – Mint Macaron (147106)
  • Misc. – Whisper White Solid Baker’s Twine (124262); Mini Glue Dots (103683); Paper Snips (103579); Share What You Love Artisan Pearls (146927); Banner Triple Punch (138292); Multipurpose Liquid Glue (110755)

SHARE WHAT LOVE BUNDLES Get a 16-card tutorial FREE when you purchase ones of these bundles this month!

Measurements:

  • So Saffron: 8-1/2” x 5-1/2” scored at 4-1/4” & 1/2” x 3”
  • Share What You Love Specialty Designer Series Paper: 4” x 5-1/4”
  • Grapefruit Grove: 2-1/2” x 3-1/2”
  • Whisper White: 2-1/4” x 3-1/4”
  • Rich Razzleberry: 4-1/4” x 1”

Instructions:

  1. Stamp greeting in Mint Macaron ink on Whisper White layer where shown and adhere to Grapefruit Grove layer.
  2. Add green pearl to the “i” in friend.
  3. Adhere Designer Series Paper layer to card front.
  4. Punch both ends of Rich Razzleberry strip with Banner Triple Punch and adhere to card front where shown and then add greeting layer.
  5. Snip both ends of the So Saffron strip with Paper Snips and adhere to FRIEND layer.
  6. Tie a triple bow with Whisper White Solid Baker’s Twine and adhere to So Saffron banner strip with Mini Glue Dot.

MAY HOSTESS CODE FOR SHOPPING >>  F4GV9ZVM <<

Qualify for JO JO POINTS


QUICK LINKS:

  1. SHARE WHAT LOVE BUNDLES Get a 16-card tutorial FREE when you purchase ones of these bundles this month!
  2. SHOP FOR PRODUCTS ONLINE
  3. WEEKLY NEWSLETTER & TUTORIALS: Sign up for my newsletter to get updates, specials & card ideas!
  4. JO JO POINTS: Earn free stamps with my VIP reward program!
  5. New to Stampin’ Up? Check out my STAMPING 101 TIPS here!
  6. CLEARANCE RACK: Save up to 60% on great products!

Save

Save

Save

Save

Save</spa</sp

Read more

Graceful Garden

Posted on May 17, 2018May 15, 2018 by Josee

Supplies:

  • Stamp:  Graceful Garden Clear-Mount Stamp Set [143849]
  • Ink: Old Olive Pad [126953] , Tuxedo Black Memento Ink Pad [132708]
  • Paper:  Rich Razzleberry Card Stock [115316] , Old Olive Card Stock [100702] , Whisper White Card Stock [100730] , Share What You Love Specialty Designer Series Paper* [146926]
  • Misc. Share What You Love Artisan Pearls* [146927] , Rich Razzleberry Stampin’ Blends Markers Combo Pack [144602] , Old Olive Stampin’ Blends Markers Combo Pack [144597],  Stitched Shapes Framelits Dies [145372], Layering Circle Framelits Dies [141705], Silver Baker’S Twine [145569], Stampin’ Dimensionals [104430]

* These items can be found in the bundles below!

SHARE WHAT LOVE BUNDLES Get a 16-card tutorial FREE when you purchase ones of these bundles this month!

Measurements:

  • Rich Razzelbeary:   5 ½” x 8 ½” , 1 x 2 ½, scrap for die cutting 3 ½ x 3 ½
  • Whisper White:        4 x 5 ¼”, ¾ x 2 ¼ , scrap 3 ½ x 3 ½  ”
  • Old Olive:                 1 ¾ x 1 ¾ – 2 pieces,   1 ¾ x 3
  • Designer Paper:      1 ½ x 1 ½  – 2 pieces, 1 ½ x 2 ¾ ”

Instructions:

  1. Fold card base in half. Stamp a background image in Old olive on the bottom right corner of whisper white piece. Adhere designer paper to corresponding old olive pieces. Adhere old olive  pieces to stamped whisper white (see picture), than adhere whisper white to card front.
  2. Dies cut biggest stitched circle from whisper white scrap and corresponding scalloped circle from Rich Razzleberry. Stamp rose on whisper white stitched circle using memento ink. Color image with Rich Razzleberry and Old Olive blends. Adhere stamped circle to Rich Razzleberry.  Stamp ‘for you’ in memento ink on ¾ x 2 ½ white piece, adhere to Rich Razzleberry piece. Add to card front with dimensionals.
  3. Add 2 pearls to the greeting. Adhere a bow from silver twine to the rose with glue dot.

MAY HOSTESS CODE FOR SHOPPING >>  F4GV9ZVM <<

Qualify for JO JO POINTS


QUICK LINKS:

  1. SHARE WHAT LOVE BUNDLES Get a 16-card tutorial FREE when you purchase ones of these bundles this month!
  2. SHOP FOR PRODUCTS ONLINE
  3. WEEKLY NEWSLETTER & TUTORIALS: Sign up for my newsletter to get updates, specials & card ideas!
  4. JO JO POINTS: Earn free stamps with my VIP reward program!
  5. New to Stampin’ Up? Check out my STAMPING 101 TIPS here!
  6. CLEARANCE RACK: Save up to 60% on great products!

Save

Save

Save

Save

Save</spa</sp

Read more

Flowers are hugs!

Posted on May 16, 2018May 15, 2018 by Josee

Can you find all the fun & exciting preview items on this card!?

Supplies:

Stamp Sets:  Abstract Impressions* (p 147513), Handwritten* (w 146521, c 146524)
Inks:  Soft Sea Foam* (147102), Granny Apple Green* (147095), Poppy Parade (147050), Lovely Lipstick* (147140)
Paper:  Soft Sea Foam* (146988), Poppy Parade (119793), Whisper White (100730)
Other: Big Shot Cutting Machine (143263), Petal Burst Textured Impression Embossing Folder (141493), White 5/8” Polka Dot Tulle Ribbon* (146912), Snail (104332), Glue Dots (103683)

* Found in the 2018-19 Catalogue coming out in June 2018!

SHARE WHAT LOVE BUNDLES Get a 16-card tutorial FREE when you purchase ones of these bundles this month!

Measurements:

  • Soft Sea Foam: 4 ¼” x 11”
  • Poppy Parade: 3 ½” x 3 ½”
  • Whisper White: 3 ½” x 3 ½”; 4 ¼” x 3/4”
  • Ribbon: 10”

Instructions:

  1. Cut out a circle with the Stitched Shaped Circle on the Big Shot from the Whisper White cardstock.
  2. Cut out a Scallop Circle on the Big Shot from the Poppy Parade cardstock.
  3. Run the Soft Sea Foam card base through the Big Shot with the Embossing Folder to emboss the front of the card.
  4. On the white cardstock circle, stamp the Handwritten stamp with Soft Sea Foam ink.
  5. On the white circle, stamp the most filled in part of the rose with Poppy Parade ink—but first stamp the ink on the scrap paper so that you have a lighter version of the Poppy Parade.
  6. Stamp the next part of the rose with Poppy Parade ink.
  7. Stamp the final part of the rose (the most detailed) with Lovely Lipstick ink.
  8. Stamp two leaves with Soft Sea Foam ink.
  9. Stamp the detailed part of the leaves, with Granny Apple Green ink-but first stamp it on scrap paper, so that the green is a bit lighter.
  10. Stamp the saying with Lovely Lipstick ink on the small piece of Whisper White cardstock. Trim the ends off on an angle.
  11. Wrap a small piece of the ribbon around the end of the saying. Tie the rest of the ribbon into a bow and attach it with glue dots.

MAY HOSTESS CODE FOR SHOPPING >>  F4GV9ZVM <<

Qualify for JO JO POINTS


QUICK LINKS:

  1. SHARE WHAT LOVE BUNDLES Get a 16-card tutorial FREE when you purchase ones of these bundles this month!
  2. SHOP FOR PRODUCTS ONLINE
  3. WEEKLY NEWSLETTER & TUTORIALS: Sign up for my newsletter to get updates, specials & card ideas!
  4. JO JO POINTS: Earn free stamps with my VIP reward program!
  5. New to Stampin’ Up? Check out my STAMPING 101 TIPS here!
  6. CLEARANCE RACK: Save up to 60% on great products!

Save

Save

Save

Save

Save</spa</sp

Read more

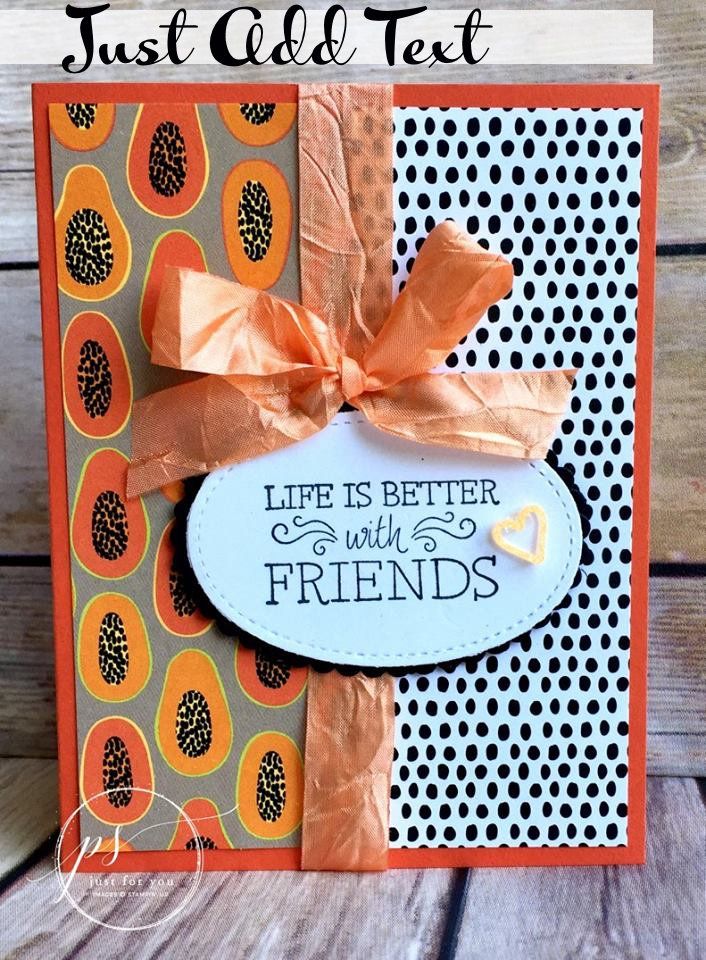
Life is Better with Friends

Posted on May 15, 2018May 14, 2018 by Josee

Just Add Text…yes, that is the name of the stamp set…not a typo…lol. 🙂 Isn’t the Tutti-Frutti designer paper super cute? 

Measurements:

  • Tangerine Tango Card Stock : 8 1/2” x 5 1/2”, scored at 4-1/4”
  • Basic Black Card Stock 3-1/2” x 2-1/2”
  • Whisper White Card Stock: 3-1/2” x 2-1/2”
  • DSP:  4” x 5-1/4”, cut in half lengthwise

Instructions:

  1. Take 1/2 sheet of Tangerine Tango card stock, fold in half, and crease with bone folder. Adhere DSP to card front.  Run 12” length of ribbon around the center, covering up the seam between the 2 pieces of DSP and adhere at center front.
  2. Stamp greeting with black ink on white card stock and cut out with 2-7/8” long oval shape from Stitched Shapes dies. Run black card stock through Big Shot on scalloped oval die that is 3” in length.  Adhere these pieces together and attach to card front with Stampin’ Dimensionals.
  3. Take 8” length of ribbon and tie a bow. Attach to card front with Mini Glue Dot.  Take another Mini Glue Dot and fold in half—attach to back of acrylic shape.  Stick to oval.

SHARE WHAT LOVE BUNDLES Get a 16-card tutorial FREE when you purchase ones of these bundles this month!

Product List

Just Add Text Clear-Mount Stamp Set

Just Add Text Clear-Mount Stamp Set
[143934]
$24.00

Just Add Text Wood-Mount Stamp Set

Just Add Text Wood-Mount Stamp Set
[143931]
$33.00

Tangerine Tango 8-1/2" X 11" Card Stock

Tangerine Tango 8-1/2″ X 11″ Card Stock
[111349]
$10.00

Basic Black 8-1/2" X 11" Card Stock

Basic Black 8-1/2″ X 11″ Card Stock
[121045]
$10.00

Whisper White 8-1/2" X 11" Card Stock

Whisper White 8-1/2″ X 11″ Card Stock
[100730]
$11.25

Tuxedo Black Memento Ink Pad

Tuxedo Black Memento Ink Pad
[132708]
$8.00

Tutti-Frutti 6" X 6" (15.2 X 15.2 Cm) Designer Series Paper

Tutti-Frutti 6″ X 6″ (15.2 X 15.2 Cm) Designer Series Paper
[145606]
$12.50

Peekaboo Peach 5/8" Crinkled Seam Binding Ribbon

Peekaboo Peach 5/8″ Crinkled Seam Binding Ribbon
[144192]
$10.75

2016-2018 In Color Glitter Acrylic Shapes

2016-2018 In Color Glitter Acrylic Shapes
[144218]
$11.25

Big Shot

Big Shot
[143263]
$136.00

Stitched Shapes Framelits Dies

Stitched Shapes Framelits Dies
[145372]
$40.00

Stitched Shapes Framelits Dies

Stitched Shapes Framelits Dies
[145372]
$40.00

Stitched Shapes Framelits Dies

Stitched Shapes Framelits Dies
[145372]
$40.00

Stampin' Dimensionals

Stampin’ Dimensionals
[104430]
$5.25

SNAIL Permanent Adhesive

SNAIL Permanent Adhesive
[104332]
$9.00

Glue Dots

Glue Dots
[103683]
$7.00

MAY HOSTESS CODE FOR SHOPPING >>  F4GV9ZVM <<

Qualify for JO JO POINTS


QUICK LINKS:

  1. SHARE WHAT LOVE BUNDLES Get a 16-card tutorial FREE when you purchase ones of these bundles this month!
  2. SHOP FOR PRODUCTS ONLINE
  3. WEEKLY NEWSLETTER & TUTORIALS: Sign up for my newsletter to get updates, specials & card ideas!
  4. JO JO POINTS: Earn free stamps with my VIP reward program!
  5. New to Stampin’ Up? Check out my STAMPING 101 TIPS here!
  6. CLEARANCE RACK: Save up to 60% on great products!

Save

Save

Save

Save

Save</spa</sp

Read more

Posts pagination

  • Previous
  • 1
  • …
  • 158
  • 159
  • 160
  • 161
  • 162
  • 163
  • 164
  • …
  • 587
  • Next

go to store

Promos

Paper Bouquet Kit

josee smuck

Josée Smuck

Stampin’ Up! Canada Demonstrator since 2002
Ottawa, ON, Canada
Contact me with questions!
Josee@StampingJo.com
(613) 831-2917

Current Catalogues

Annual Catalogue (May2024-April2025)Stampin' Up! Annual CatalogueView Catalogue-ENG | Shop Online
View Catalogue- FR

——————

Looking for something?

Get the news


Click HERE to download Jo-Jo’s FREE Sketches & Tips Guide

Updates

Receive NEXT-DAY updates by email:

Receive SAME DAY updates by subscribing in a reader:
Click to Subscribe in a reader

Recent Posts

  • Embrace the Journey April 11, 2025
  • For the Books April 8, 2025
  • Beautiful Birthday April 5, 2025
  • Happy Retirement April 2, 2025
  • Frame & Flowers March 28, 2025

Categories

Proud Member…

Inky_Divas800

The content of this blog is the sole responsibility of Josee Smuck as a Stampin’ Up! Independent Demonstrator.  The use of and content of classes, services or products offered is not endorsed by Stampin’ Up! Unless otherwise indicated, images © Stampin’ Up! 1990 – present.

© 2025 Hand Stamped Cards with Josee Smuck-Stampin' Up! Canada Demonstrator | Powered by Superbs Personal Blog theme