Skip to content
Hand Stamped Cards with Josee Smuck-Stampin' Up! Canada Demonstrator
Menu
  • Home
  • JO JO POINTS
  • **Join**
  • Monthly Craft Kit
  • Weekly News
  • Shop Now
  • Contact Me
Menu

Blog

Festive Flower Builder Punch Card

Posted on September 16, 2015November 5, 2015 by Josee

Good Morning! 

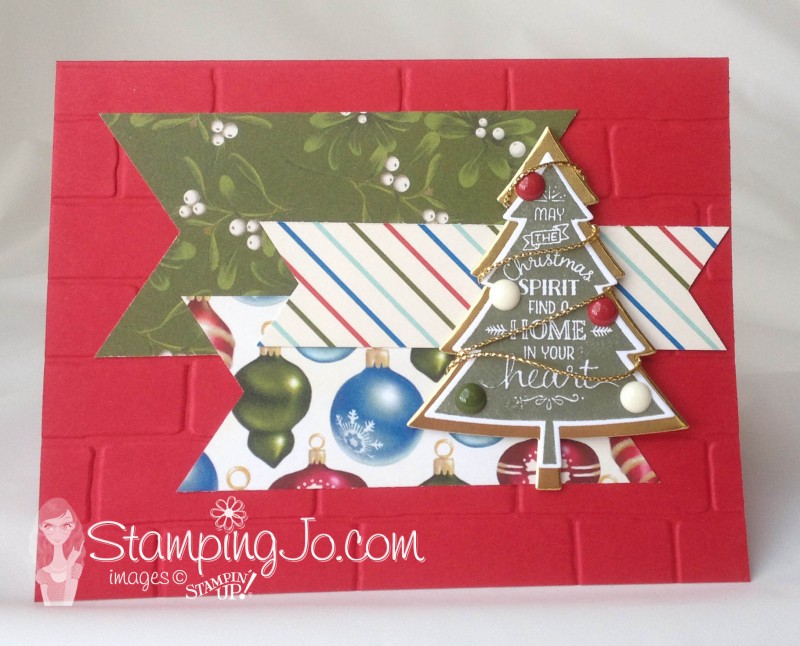
Thanks for stopping by today! I thought I would show you one of the cards we made in last night's Christmas Card Class. Thank you to everyone who came out to the first Christmas Card Class of the season!

Festive Flower Builder Punch

Before embossing the Whisper White Thick card base, use the circle punch to cut a small slit in the top right corner of the card to feed the ribbon through, then run the card through the Big Shot in the Softly Falling Textured Impressions Embossing Folder. Love that new embossing folder!

Stamp the sentiment from Reason for the Season on Crushed Curry and punch each end with the Banner Triple punch- use the punch upside down to ensure you do not cut the stamped words.

To build the poinsettia: punch Real Red with the whole Festive Flower punch 4 times, then twice again on each side of the punch to cut the larger flower petals only;  Punch 2 times from Always Artichoke with the larger petal side of the punch

Once all the punching is done, stamp the petals and leaves with the Reason For the Season stamps, with the same coloured ink and assemble the flower starting with the smaller petals, alternating them to fill in the flower.

Feed the ribbon through the slit and tie around the card front before adhering the poinsettia.

Supplies used on this card:

  • Whisper White Thick Cardstock-140272
  • Reason for the Season stamp set- 139730
  • Festive Flower Builder Punch- 139682 (Bundle with stamp set- 140847)
  • Real Red cardstock- 102482
  • Always Artichoke cardstock- 105119
  • Gold Foil sheet-132622
  • Crushed Curry cardstock- 131199
  • Basic Black Archival Ink- 140931, Refill- 140928
  • Home for Christmas Designer Buttons- 139639
  • Softly Falling Textured Impressions Embossing Folder- 139672
  • Gold Glitter Ribbon- 139614
  • ¾” Circle Punch-119873
  • Banner Triple Punch-138292

You can shop directly by adding items to your shopping basket below-make sure you scroll through the list:


While you are here today, check out the NEW Weekly Deals for this week:


Have a great day!

View the NEW 2015 Holiday Catalogue here!

Shop the Holiday Catalogue

signature


stampingjojojopoints

September Hostess Code to use: PWGKJBHU

Earn FREE stamps! Use this monthly Hostess Code to earn JO JO POINTS for every $40 you spend (before taxes & shipping)!

Click here to learn more about this Loyalty Program!
hostessrewards

>>How to use the hostess code:

a. Enter your items into cart
b. At Check out- Look under the "Special Offers" box (bottom left)
c. Enter HOSTESS CODE in box and hit apply, then complete your order

d. After you receive your order confirmation, keep track of your JO JO POINTS earned on your JO JO POINTS Tracking Sheet! Earn 1 JO JO POINT for every $40 you spend before taxes and shipping!

e. Once you have 10 JO JO POINTS, email me your Tracking Sheet and choice of photopolymer or clear-mount stamp set FREE!!

NOTE: If your order is over $200, do not use the Hostess Code so that you to claim the Stampin' Rewards (more FREE items!) on your order! You will still earn JO JO POINTS on that order!

Read more

Stampers Dozen Blog Hop: Halloween

Posted on September 14, 2015September 14, 2015 by Josee

logo
 

Good Morning!

Welcome to this month's 'Halloween' Blog Hop! For this month's project, I wanted to create a cute and special treat bag for some special Trick or Treaters 🙂 

Halloween Treat Bag: Sparkling Seasons, Happy Scenes, Stamp a Bag, Black Glimmer Paper

This project started out with a simple kraft paper bag from the Kraft Tag a Bag Gift Bags. I stamped it with the zig zag stamp from the Stamp A Bag stamp set in NEW Archival Black Ink. I stamped a strip of Old Olive cardstock with the same stamp to wrap around the bag.

Sparkling Seasons, Happy Scenes, Stamp a Bag, Black Glimmer PaperThen, to make the tag, I started with the NEW Black Glimmer Paper and cut out the tag with the Lots of Labels Framelits. Then, I cut three ovals from Pumpkin Pie cardstock using the smallest oval from the Ovals Collection Framelits. I stamped the pumpkin face from the NEW Sparkling Seasons stamp set onto the middle oval (and a bit of the mouth onto the oval beside it), inked the edges with Pumpkin Pie ink and then adhered the ovals together to make a pumpkin shape. Then ran them through the Big Shot in the Chevron Textured Impressions Embossing Folder. 

To create the pumpkin stem and leaves, I used the Leaflets Framelits but actually cut the leaf twice to create a smaller leaf (see photo below). Then ran it through the Big Shot in the Woodgrain Textured Impression Embossing Folder. The stem was just a strip of Old Olive wrapped around a Stampin' Write marker to create a swirly stem. 

The sentiment from the NEW Happy Scenes Stamp set was stamped on Whisper White and then cut out using the rounded leaf framelit from the Leaflets Framelits (shown in the photo below). 

halloween bag tag cut from Leaflets Framelits

The pumpkin pieces were adhered together using Glue Dots and Tear and Tape adhesive. I then used the Handheld Stapler to staple the Black Glimmer Tag to the Old Olive strip and then wrapped the strip around the bag. 

Here is a list of the supplies I used to create this project:

Thanks for stopping by! Now click Next Blog to hop on over to Laura Milligan's blog to check out what crafty goodness she has in store for us! 

Next Blogprevious blog


View the NEW 2015 Holiday Catalogue here!

Shop the Holiday Catalogue

signature


stampingjojojopoints

September Hostess Code to use: PWGKJBHU

Earn FREE stamps! Use this monthly Hostess Code to earn JO JO POINTS for every $40 you spend (before taxes & shipping)!

Click here to learn more about this Loyalty Program!
hostessrewards

>>How to use the hostess code:

a. Enter your items into cart
b. At Check out- Look under the "Special Offers" box (bottom left)
c. Enter HOSTESS CODE in box and hit apply, then complete your order

d. After you receive your order confirmation, keep track of your JO JO POINTS earned on your JO JO POINTS Tracking Sheet! Earn 1 JO JO POINT for every $40 you spend before taxes and shipping!

e. Once you have 10 JO JO POINTS, email me your Tracking Sheet and choice of photopolymer or clear-mount stamp set FREE!!

NOTE: If your order is over $200, do not use the Hostess Code so that you to claim the Stampin' Rewards (more FREE items!) on your order! You will still earn JO JO POINTS on that order!

… READ MORE “Stampers Dozen Blog Hop: Halloween”
Read more

My Crafty Friends Monday Holiday Edition: Witches’ Night

Posted on September 14, 2015September 14, 2015 by Josee

Welcome to "My Crafty Friends Monday!" 

2015 Holiday Catalogue Edition


My Crafty Friends Monday-NEW-SMI hope you enjoyed a great weekend! Each Monday, I like to feature different projects that have inspired me and I know they'll inspire you too!
 
Each project was created by different & amazingly talented stampers- make sure you check out their blogs for more details and to check out their other amazing projects!!
(**Note…don't worry- I've contacted each of these stampers and allowed them to decline if they choose.) 
 

This week's featured stamp set is "Witches Night" page 7 of the 2015 Holiday Catalogue (139708 Photopolymer) and coordinates with the Witching Decor Project Kit and Lots of Labels Framelits Dies


Erica B. Cerwin: her blog

erica cerwin

Love these treat boxes! What a great idea!


Connie Babbert: her blog

connie babbert

I love the way Connie cut out the bird and the 31 to make them pop out!


Paula Wright: her blog

paula wright

Wouldn't you love to receive this treat package? Love it!


Stampin' Up: on Pinterest

stampin up

Love the simplicity of this one! 


Love these ideas? You can purchase this stamp set through my ONLINE STORE! 

I hope you've enjoyed this week's "My Crafty Friends Monday" Make sure you visit the talented artist's featured on this post! Thanks for stopping by today!

Were you featured here? Here's a badge you can add to your blog is you choose!
My Crafty Friends Monday-featured-NEW-SM


View the NEW 2015 Holiday Catalogue here!

Shop the Holiday Catalogue

signature


stampingjojojopoints

September Hostess Code to use: PWGKJBHU

Earn FREE stamps! Use this monthly Hostess Code to earn JO JO POINTS for every $40 you spend (before taxes & shipping)!

Click here to learn more about this Loyalty Program!
hostessrewards

>>How to use the hostess code:

a. Enter your items into cart
b. At Check out- Look under the "Special Offers" box (bottom left)
c. Enter HOSTESS CODE in box and hit apply, then complete your order

d. After you receive your order confirmation, keep track of your JO JO POINTS earned on your JO JO POINTS Tracking Sheet! Earn 1 JO JO POINT for every $40 you spend before taxes and shipping!

e. Once you have 10 JO JO POINTS, email me your Tracking Sheet and choice of photopolymer or clear-mount stamp set FREE!!

NOTE: If your order is over $200, do not use the Hostess Code so that you to claim the Stampin' Rewards (more FREE items!) on your order! You will still earn JO JO POINTS on that order!

… READ MORE “My Crafty Friends Monday Holiday Edition: Witches’ Night”
Read more

Peaceful Pines

Posted on September 11, 2015November 5, 2015 by Josee

Hello! Happy Friday! 

Today's card uses the NEW Peaceful Pines stamp set and the NEW matching Perfect Pines Framelits Dies. 

Peaceful Pines

The Real Red card base was embossed with the Brick Wall Textured Embossing Folder. Then on top of that I cut some strips of the NEW Home for Christmas Designer Series Paper and punched the ends with the Banner Triple Punch and layered them on top. Then, using the Perfect Pines Framelits, I cut two different sized trees- one from a Gold Foil sheet and one from Whisper White that was stamped with one of the trees from Peaceful Pines. I layered the two trees together and then wrapped some Gold Cording Trim to decorate the tree and finished it off with some Home For Christmas Enamel Dots and adhered it to the card front using Stampin' Dimensionals. 

Here are the supplies used on this card:

Capture

Click on the supplies below to shop: 


That's it for today. Have a wonderful weekend!!

View the NEW 2015 Holiday Catalogue here!

Shop the Holiday Catalogue

signature


stampingjojojopoints

September Hostess Code to use: PWGKJBHU

Earn FREE stamps! Use this monthly Hostess Code to earn JO JO POINTS for every $40 you spend (before taxes & shipping)!

Click here to learn more about this Loyalty Program!
hostessrewards

>>How to use the hostess code:

a. Enter your items into cart
b. At Check out- Look under the "Special Offers" box (bottom left)
c. Enter HOSTESS CODE in box and hit apply, then complete your order

d. After you receive your order confirmation, keep track of your JO JO POINTS earned on your JO JO POINTS Tracking Sheet! Earn 1 JO JO POINT for every $40 you spend before taxes and shipping!

e. Once you have 10 JO JO POINTS, email me your Tracking Sheet and choice of photopolymer or clear-mount stamp set FREE!!

NOTE: If your order is over $200, do not use the Hostess Code so that you to claim the Stampin' Rewards (more FREE items!) on your order! You will still earn JO JO POINTS on that order!

… READ MORE “Peaceful Pines”
Read more

Stained Glass Reason for the Season & Embellished Ornaments

Posted on September 10, 2015November 5, 2015 by Josee

Hello! 

I've got another great card to show you today! This card uses the holly from Embellished Ornaments and the poinsettia from Reason for the Season. Both NEW from the 2015 Holiday Catalogue!

Reason for the Season

The base of this card uses Pear Pizzazz. Then I cut a square of the NEW Red Foil paper (so gorgeous!) and on top of that layered a square of Whisper White. I stamped the holly in Pear Pizzazz and then tied some Gold Cording Trim around that and adhered it to the card front.

Then, I took a sheet from the Winter Wonderland Designer Vellum Stack– the one I though looks like gold lines from a stained glass window and decided to make it look like stained glass! I stamped the poinsettia on the back of the vellum sheet in Black archival ink and then coloured in the lines with Stampin' Write markers in Real Red, Pear Pizzazz and a little Crushed Curry and I allowed it to dry with the Heat Tool so it would not smear. Then I layered it on a piece of Gold Foil paper adhering it with the Fine Tip Glue Pen. Once the glue was dry, I cut around the stamped lines of the poinsettia and adhered it to the card front using Stampin' Dimensionals.  The sentiment was stamped using Whisper White ink. 

Here are the supplies used to create this card:


Have a wonderful day!! 

View the NEW 2015 Holiday Catalogue here!

Shop the Holiday Catalogue

signature


stampingjojojopoints

September Hostess Code to use: PWGKJBHU

Earn FREE stamps! Use this monthly Hostess Code to earn JO JO POINTS for every $40 you spend (before taxes & shipping)!

Click here to learn more about this Loyalty Program!
hostessrewards

>>How to use the hostess code:

a. Enter your items into cart
b. At Check out- Look under the "Special Offers" box (bottom left)
c. Enter HOSTESS CODE in box and hit apply, then complete your order

d. After you receive your order confirmation, keep track of your JO JO POINTS earned on your JO JO POINTS Tracking Sheet! Earn 1 JO JO POINT for every $40 you spend before taxes and shipping!

e. Once you have 10 JO JO POINTS, email me your Tracking Sheet and choice of photopolymer or clear-mount stamp set FREE!!

NOTE: If your order is over $200, do not use the Hostess Code so that you to claim the Stampin' Rewards (more FREE items!) on your order! You will still earn JO JO POINTS on that order!

… READ MORE “Stained Glass Reason for the Season & Embellished Ornaments”
Read more

Posts pagination

  • Previous
  • 1
  • …
  • 286
  • 287
  • 288
  • 289
  • 290
  • 291
  • 292
  • …
  • 587
  • Next

go to store