Skip to content
Hand Stamped Cards with Josee Smuck-Stampin' Up! Canada Demonstrator
Menu
  • Home
  • JO JO POINTS
  • **Join**
  • Monthly Craft Kit
  • Weekly News
  • Shop Now
  • Contact Me
Menu

Blog

Christmas Pines Christmas Card

Posted on November 22, 2016November 22, 2016 by Josee

Hello! 

In case you missed the announcement, the ONLINE EXTRAVAGANZA is on! Make sure you shop early for best selection because everything is while supplies last!

onlineex_shareable-2_nov2116_na

Now, today's card features the Christmas Pines stamp set for a different look than the last few cards I made using this set (check them out here and here), as I did not use the matching framelits on this card! I went for a different color scheme, and I really like how it turned out. Kind of reminds me of ice and snow. Hmmm…now that say that out loud, maybe that's not such a good thing? 

Christmas Pines, Stampin Up, Christmas Card by StampingJo

How To Make It: 

This card starts with a base of Whisper White Thick cardstock. The card base was stamped with the background stamp from Christmas Pines using Night of Navy ink. While I was stamping the front of the card, I stamped the inside too and added the sentiment.

christmas-pines-inside-of-card-by-stampingjo

Then I added a strip of the striped Floral Boutique Designer Washi Tape to the edge of the cardbase. 

Then on a piece of Whisper White cardstock, I stamped the little border stamp from Christmas Pines and the 'Noel' sentiment both using the Night of Navy ink. 

I added a Christmas Trinkets Embellishment to the center of a long string of Silver Metallic Thread and tied it, then I wrapped the thread around the stamped Whisper White cardstock piece securing it at the back with some Tear & Tape Adhesive.

christmas-pines-night-of-navy-close-up-by-stampingjo

I used the Tear & Tape Adhesive to adhere the piece to the Silver Glimmer Paper and then added that to the card front with some Tear & Tape Adhesive also. 

To finish off the card, I added some Rhinestones Basics Jewels to the stamped border- this helped fill in any imperfect stamp alignment and added more sparkle to the card. 🙂

Stamps: 

Christmas Pines-142049

Paper: 

Whisper White cardstock-100730, Whisper White Thick Cardstock-140272, Silver Glimmer Paper-135314

Ink:

Night of Navy-126970

Other: 

Floral Boutique Designer Washi Tape- 141664, Rhinestones Basics Jewels- 119246, Christmas Trinkets Embellishments-141997, Silver Metallic Thread-138402, Tear & Tape Adhesive- 138995

I hope you have a stampin' good day!


blog-signature-holiday

QUICK LINKS: 

ONLINE EXTRAVAGANZA! – until November 28th

25% OFF SELECTED STAMPS – Until Nov. 30th

HOLIDAY CATALOGUE – Sept. 1 to Jan. 3

CLEARANCE RACK– Save up to 60%

 JO JO POINTS– Earn free stamps with my Jo Jo Points Program    

Read more

My Crafty Friends Monday: Shake & Celebrate, Plus Online Extravaganza!

Posted on November 21, 2016November 21, 2016 by Josee

onlineex_flash-shareable_nov2116_na


Welcome to "My Crafty Friends Monday!" 

My Crafty Friends Monday-NEW-SMI hope you enjoyed a great weekend!!
 
Each Monday, I like to feature different projects that have inspired me and I know they'll inspire you too!
 
Each project was created by different & amazingly talented stampers- make sure you check out their blogs for more details and to check out their other amazing projects!!
(**Note…don't worry- I've contacted each of these stampers and allowed them to decline if they choose.) 

This week's featured stamp set is Shake & Celebrate (142059) and the coordinating Shaker Shapes Framelits (141834).

Available as a bundle-143502 english, 143504 french (and you will want to get them together!)

This stamp set and matching framelits are perfect for any occasion as you will see from the samples I found!


***This stamp set and matching dies on SALE this week only during the ONLINE EXTRAVAGANZA!! While supplies last!!***


Carole Payne: her blog

shake-and-celebratey-by-carol-payne

A lovely birthday shaker card by Carol! Carol also used the Pretty Paisleys Textured Impressions Embossing Folder– also on sale this week only!


Katy McGloin: her blog

shake-and-celebrate-by-katy-mcgloin shake-and-celebrate-2-by-katy-mcgloin

Love Katy's birthday and wedding shaker cards!


Lou Kitzelman: her blog

shake-and-celebrate-by-lou-kitzelman

So many great ways to use these dies! Lou has demonstrated just how versatile this bundle is!


Wendy Cranford: her blog

shakeandcelebrate-by-wendy-cranford shake-and-celebrate-by-wendy-cranford

I mean really, how many stamp sets and dies can you say make Christmas, Birthday and Wedding cards? Love these ones by Wendy.


Love these ideas? You can purchase this stamp set through my ONLINE STORE! 

I hope you've enjoyed this week's "My Crafty Friends Monday" Make sure you visit the talented artist's featured on this post! Thanks for stopping by today!

Were you featured here? Here's a badge you can add to your blog!
My Crafty Friends Monday-featured-NEW-SM


blog-signature-holiday

QUICK LINKS: 

ONLINE EXTRAVAGANZA! – until November 28th

25% OFF SELECTED STAMPS – Until Nov. 30th

HOLIDAY CATALOGUE – Sept. 1 to Jan. 3

CLEARANCE RACK– Save up to 60%

 JO JO POINTS– Earn free stamps with my Jo Jo Points Program    

Read more

Hang Your Stocking Gift Card Holder

Posted on November 18, 2016November 17, 2016 by Josee

Hello! Happy Friday!

Before I show you today's project, I have a preview for you of what's coming on Monday!

starts-mondayYes! Who doesn't love a sale!? You can download the full list of what's going to be on sale so you can start making your wish list and shop early for best selection! All products will be available only while supplies last!

Yesterday I told you all about the On Stage Event and one thing I forgot to mention about the event is that many demontrators at events like these do card swaps.  In case you don't know, a card swap is when you make x number of the same identical card and 'swap' that card with several others for their card creations- then you end up with a stack of x number of different cards! It's a great way to share card ideas and inspiration. And, you get to see the talented work of other stampers in person! Unfortunately, I didn't have time to create cards for a card swap for this event, so I opted out, but one of my fellow demontrators was kind enough to hand me one of her super cute creations. I am so glad she did! I had to share it with you, because I got totally inspired by it! 

treat-pouch-by-heather-arsenault

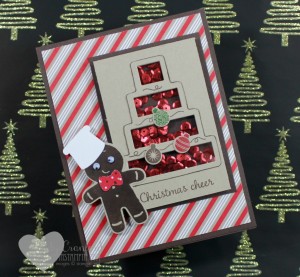
This is Heather Arsenault's treat holder- isn't it cute? What I was totally inspired by was the way she used the new Classic Label punch to create the opening inside the little 'card' to hold the mini chocolate and the way she used the Duet Banner Punch to create a holder for the lid! Of course the Bella & Friends dog with the Jolly Hat Builder Punch hat is too cute!

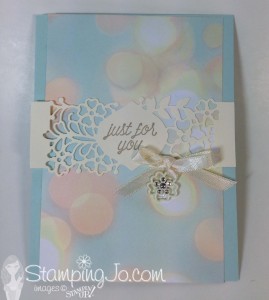
Now, when I looked at it I knew I was going to recreate it, but then I had a light bulb moment! 🙂 I wondered if a gift card would fit in the pouch— but it didn't! 🙁 It was a bit too short to fit a standard credit card size gift card and the opening the punch creates inside the pouch is a smidge too small for the gift card to fit in it. So…I made some modifications and came up with this!

gift-card-holder-by-stampingjo-2

It is a little taller than Heather's original so the inside allows room for a gift card. Perfect for Christmas gift giving!

How To Make It: 

This project starts with a sheet of Crumb Cake cardstock cut to 2.75" x 10". The great part about that is that you can get 3 of these Gift Card Holders out of ONE sheet of cardstock!

Next, on the Simply Scored Scoring Tool score the cardstock strip along the long side at the 3" and 3 1/4" mark and then at the 6 3/4" and 7" mark (or you can turn the sheet around and score again at the 3" and 3 1/4" mark if that's easier for you). Fold at the score lines, using a Bone Folder. 

gift-card-holder-cut-score-diagram-by-stampingjo

To create the gift card slot we are going to use the same punch twice to create a slightly wider slot: Take the Classic Label Punch and insert the 'inside' Crumb Cake flap bringing the edge of the punch to the edge of the fold (just to help keep it straight), just slightly off center and punch a slot, before moving the punch, slide it over slightly keeping it aligned with the original punch out. You will punch one edge of the punch out just a bit more to give more room for the gift card to fit in the slot. It is very important to keep the punch aligned here as any movement will distort the punched hole and not look very good! 

Of course, if you want to use this as a treat pouch like Heather's original, you could just punch the Classic Label Punch once and use it's original size to hold the treat as she did!

To finish off the inside,  I used a strip of Tear & Tape Adhesive to adhere the inside flap to the back of the holder- this will allow you to insert the gift card and keep the gift card securely in place. 

gift-card-holder-by-stampingjo

Now, you can decorate the inside of this gift card holder any way you want! I used the Merriest Wishes stamp set to stamp the background dots. 

Then, I used the NEW Stitched Shaped Thinlits to die cut the stitched circle out of Whisper White cardstock. I used the Jar of Cheer stamp set to stamp the sentiment with Basic Black ink onto the die cut circle. This was adhered to the stamped background with SNAIL Adhesive. 

Then, I stamped the super cute stocking from the Hang Your Stocking stamp set with Real Red ink on Whisper White cardstock and used the matching stocking die from the Christmas Stockings Thinits Dies. Before adding it to the die cut circle, I took a small string of Candy Cane Lane Baker's Twine and tied it around the stocking. I added some Stampin' Dimensionals and added it to the die cut circle.

Then, on a scrap of Whisper White cardstock I stamped the banner from the Thoughtful Banners stamp set in Basic Black and then stamped the little hearts from the Designer Tin of Cards stamp set in Real Red. This was then added to the bottom of the inside flap using Stampin' Dimensionals, allowing room for the outside flap to fit inside the banner but also allowing it to come out to open up the gift card holder. You may find it helps to close the gift card holder then adhere the banner to the bottom layer so you can see where the 'lid' will line up. 

Stamps: 

Merriest Wishes- 142063 wood, 142066 clear mount; Designer Tin of Cards-141739 , Hang Your Stocking- 142114, Jar of Cheer- 142161, Thoughtful Banners-141614

Paper: 

Crumb Cake-120953 , Whisper White-100730

Ink:

Real Red-126949 , Basic Black-140931

Other: 

Classic Label Punch- 141491, Duet Banner Punch-141483, Stitched Shape Framelits-145372 , Christmas Stockings Thinits Dies- 141841, Candy Cane Lane Baker's Twine-141983 , Wink of Stella Clear-141897 , Tear & Tape Adhesive-138995 , Stampin' Dimensionals-104430, Stampin' Trimmer- 126889, Simply Scored Scoring Tool- 122334, Bone Folder-102300, SNAIL Adhesive- 104332, Refill- 104331

I hope you enjoyed today's project! Have a great weekend and make sure you check back here on Monday- Stampin' Up has the ONLINE EXTRAVAGANZA starting Monday! You won't want to miss it!


blog-signature-holiday

QUICK LINKS: 
1. 25% OFF SELECTED STAMPS – Until Nov. 30th
2. HOLIDAY CATALOGUE – Sept. 1 to Jan. 3
3. CLEARANCE RACK– Save up to 60%
4. JO JO POINTS– Earn free stamps with my Jo Jo Points Program    

Read more

OnStage and New Catalogue Sneak Peek

Posted on November 17, 2016November 15, 2016 by Josee

stampin-up-on-stage-ottawa-josee-smuck

Good Morning!

If you follow my Facebook page, you may have seen that last weekend I was so excited to be able to attend a Stampin' Up On Stage event here in Ottawa! It was Stampin' Up's first time in Ottawa so it was a great opportunity for many of the Canadian demonstrators to get together, some for the first time!stampin-up-onstage-ottawaI am very proud to say that I earned some awards at this event! It's so exciting to hear your name called to come up on stage! I have YOU, my customers to thank for that! Having my own Stampin' Up business for the last 14 years would not be what it is without wonderful people like you to share my love of stamping with! So, THANK YOU!

Imagine my surprise and delight when I saw these slides show up on the big screen…

stampin-up-onstage-ottawa-awards2 stampin-up-onstage-ottawa-awards3

Thanks to my amazing customers, I earned the spot of #2 Demonstrator of the Year in Canada, and #52 Globally! Out of 46,700 demonstrators world wide, I am pretty proud of that! I also earned #4 for Recruiting in Canada and #5 for Leadership in Canada! A huge THANK YOU to my wonderful Inky Divas demonstrator team! They have really worked so hard over the past year!  

stampin-up-on-stage-ottawa-awards

Me, with some of the other award earners, including my team member Nancy Gauthier. Congrats Nancy Gauthier on all your amazing accomplishments with Stampin' Up! this past year! #2 for Recruiting in Canada #3 for Leadership in Canada #4 Demonstrator of the Year in Canada #65 Demonstrator of the Year Globally (out of 46,700 demonstrators!!)

 stampin-up-on-stage-ottawa-event-awards

The lovely packaging my awards came in. Aren't those such cute tags?


The perks of being a Stampin' Up demonstrator is not only attending events like this, earning awards, seeing old friends and making new ones, but also getting a first look and feel on new products coming soon! That is one of my favorite parts of being a demonstrator, because not only do we get the 'first peek' at these new products, but we also get to order them so we can get creating with them! At an event like this with Stampin' Up, we had the opportunity to create with the new products right there! Here are two of the projects I had the opportunity to create.

stampin-up-new-catalogue-sneak-peek-cards2 stampinup-occasions-catalogue-sneak-peek-cards

The first card shown features the Falling in Love Designer Series Paper, Falling in Love Embellishments, Very Vanilla Satin Ribbon, the So In Love Stamp Set and the gorgeous So Detailed Thinlits Dies. The second card features the Birthday Blast stamp set. 


20161007_occ17_en-ca-1 sab_2017_ca-1

January 4th will be the launch of the 2017 Occasions Catalogue AND 2017 Sale-A-Bration! There are some amazing new products coming and here is a little peak for you….

stampinup-saleabration-sneak-peek stampin-up-saleabration-sneak-peek-3

If you LOVE coloring, you will love this paper! Inside the Lines Designer Series Paper will be in the Sale-A-Bration brochure- that means FREE with your qualifying Sale-A-Bration purchase! Woohoo!


stampinup-on-stage-ottawa-sneak-peek1 stampin-up-occasions-catalogue-sneak-peek2

Next up, the Cupcakes & Carousels Embellishment Kit and a great masculine stamp set: Urban District.


stampin-up-occasions-catalogue-sneak-peek stampin-up-occasions-catalogue-sneak-peek-3

These gorgeous cards feature the Lift Me Up stamp set and Up & Away Thinlits Dies! 


stampin-up-occasions-catalogue-sneak-peek-3 stampin-up-occasions-catalogue-sneak-peak3

The first card features the new Dragonfly Dreams stamp set and the Detailed Dragonfly Thinlits Dies. The second card features the Cool Treats stamp set and coordinating Frozen Treats Framelits Dies. 


stampin-up-occasions-catalogue-sneak-peek-2

And last, but certainly not least, I am so excited to tell you that Stampin' Up will have a new coloring tool to add to our arsenal: Watercolor Pencils!! A pack of 13 pencils in Stampin' Up colors!

Would you like to be part of this fun? Become a Stampin' Up demonstrator on my Inky Divas team, check out all the details here!

Thanks for stopping by today and allowing me to share these sneak peeks with you! I know you are going to love the upcoming catalogue and I will be showing you even more samples of the new upcoming products late next month! 


blog-signature-holiday

QUICK LINKS: 
1. 25% OFF SELECTED STAMPS – Until Nov. 30th
2. HOLIDAY CATALOGUE – Sept. 1 to Jan. 3
3. CLEARANCE RACK– Save up to 60%
4. JO JO POINTS– Earn free stamps with my Jo Jo Points Program    

Read more

Christmas Pines Christmas Card

Posted on November 16, 2016November 16, 2016 by Josee

Hello! 

Today's card is another card using the Christmas Pines stamp set and the coordinating Pretty Pines Thinlits Dies. This card came together very quickly with the help of the Big Shot and the Thinlits 🙂 Using the already embossed Fancy Frost Specialty Designer Series Paper makes cardmaking easier too! 

christmas-pines-razzleberry-by-stampingjo

How To Make It: 

This card starts with a cardbase of Rich Razzleberry cardstock. Then, a layer of Fancy Frost Specialty Designer Series Paper was added. 

Next, the banner from the Christmas Pines stamp set was stamped with Old Olive ink on Whisper White cardstock and then the sentiment from Christmas Pines was stamped inside the banner with Rich Razzleberry ink.  Paper Snips were then used to hand cut the banner.

Using the Pretty Pines Thinlits Dies, I cut the pine boughs using Old Olive cardstock and Crushed Curry cardstock. You may find the dies cut easier using the Precision Plate and Die Brush to remove the cardstock from the dies. 

I put a strip of Tear & Tape Adhesive behind the hand cut sentiment and then layered the die cut pieces on the adhesive as shown behind the sentiment. Another strip of Tear & Tape Adhesive was added then the cluster was added to the card front. 

christmas-pines-close-up-by-stampingjo

The bow from the Pretty Pines Thinlits Dies was die cut and added to the sentiment banner with a Mini Glue Dot and then a Rhinestones Basics Jewel was added for a little sparkle.

Stamps: 

Christmas Pines-142049 (bundle: 143496)

Paper: 

Rich Razzleberry-115316 , Old Olive-100702, Crushed Curry- 131199, Whisper White-100730 , Fancy Frost Designer Series Paper-142014

Ink:

Old Olive-126953 , Rich Razzleberry- 126950

Other: 

Pretty Pines Thinlits Dies-141851, Rhinestones Basics Jewels- 119246, Paper Snips- 103579, Tear & Tape adhesive-138995, Mini Glue Dots- 103683, Die Brush- 140603, Precision Base Plate- 139684

I hope you have a stampin' good day!


blog-signature-holiday

QUICK LINKS: 
1. 25% OFF SELECTED STAMPS – Until Nov. 30th
2. HOLIDAY CATALOGUE – Sept. 1 to Jan. 3
3. CLEARANCE RACK– Save up to 60%
4. JO JO POINTS– Earn free stamps with my Jo Jo Points Program    

Read more

Posts pagination

  • Previous
  • 1
  • …
  • 224
  • 225
  • 226
  • 227
  • 228
  • 229
  • 230
  • …
  • 587
  • Next

go to store