Skip to content

Hand Stamped Cards with Josee Smuck-Stampin' Up! Canada Demonstrator

Stampin' Up! Canada Demonstrator; Rubber Stamps & Supplies for Cardmaking & Scrapbooking in Stittsville, Ontario (near Ottawa)

Menu
  • Home
  • JO JO POINTS
  • **Join**
  • Monthly Craft Kit
  • Weekly News
  • Shop Now
  • Contact Me
Menu

Author: Josee

Balloon Adventures, Stampin Up, 2017 Occasions Catalogue, Stamped Birthday card, masculine card

Balloon Adventures Stamped Birthday Card

Posted on February 8, 2017February 17, 2017 by Josee

Hello! Today's card features Stampin' Up's Balloon Adventures stamp set to create a fun stamped birthday card! This would be a great masculine card for any guy or boy on your birthday card list.

 Balloon Adventures, Stampin Up, 2017 Occasions Catalogue, Stamped Birthday card, masculine card

How To Make This Stamped Birthday Card:

This card starts with a base of Pacific Point cardstock.

Then, on a strip of Whisper White cardstock, I used the confetti and ribbon strings stamps from the Balloon Adventures stamp set to stamp a background with Tangerine Tango, Emerald Envy and Pacific Point ink. Adhere the stamped strip to the cardbase.

Stamp the greeting from the Balloon Adventures stamp set on Whisper White cardstock and cut out with the Layered Circles Framelits. Then cut a mat layer with the scalloped circle die from the Layered Circles Framelits out of Tangerine Tango cardstock. Adhere the two layers together and then adhere to the cardfront.

Stamp the balloons in Emerald Envy and Tangerine Tango ink on Whisper White cardstock and then punch out using the Balloon Bouquet Punch.

Add some Stampin' Dimensionals to the back of the punched balloons and then add two strands of Emerald Envy 1/8” Taffetta Ribbon, one to each balloon, and add to the cardfront as shown. Use a small piece of ribbon to tie the two strands of ribbon together and add a Mini Glue Dot to the back to the tied piece to keep it in place on the card front.

Stampin' Up Stamps:

Balloon Adventures- 142823 (Photopolymer)

Stampin' Up Paper:

Pacific Point-111350, Tangerine Tango-111349, Whisper White-100730

Stampin' Up Ink:

Basic Black-140931, Tangerine Tango-126946, Emerald Envy-141396, Pacific Point- 126951

Other Stamp Supplies and Tools:

Emerald Envy 1/8” Taffetta Ribbon-142742, Balloon Bouquet Punch-140609, Layered Circles Framelits-141705, Stampin Dimensionals-104430, Mini Glue Dots- 103683, SNAIL Adhesive- 104332, Refill- 104331

Thanks for stopping by the blog today! I hope you enjoyed today's stamped birthday card!


blog-signature-spring

QUICK LINKS: 
2017 OCCASIONS CATALOGUE– NEW Spring Catty!! Check it out! Available January 4th to May 31st

SALE-A-BRATION– Choose a FREE Sale-A-Bration product with every $60 you spend before taxes and shipping! January 4th to March 31st! NEW freebies coming February 21st!

CLEARANCE RACK– Save up to 60%  

JO JO POINTS– Earn free stamps with my Jo Jo Points Program    

Read more

Detailed Dragonfly Thinlits Canvas Wall Decor

Posted on February 7, 2017February 17, 2017 by Josee

Good Morning!  I am so glad you stopped by today! I have an amazing project to show you which features Stampin' Up's Detailed Dragonfly Thinlits Dies, Dragonfly Dreams stamp set, Timeless Textures stamp set and Letters for You stamps and matching Framelits to create this gorgeous canvas wall decor! It was fun to experiment with the different textures and colors on this canvas and I just love those Detailed Dragonfly Thinlits!!

Detailed Dragonfly Thinlits, Stampin Up, Home Decor, Wall Canvas, Wall Art

How To Make This Stamped Canvas Wall Art:

Start by choosing a canvas. I found this pack of three 5×7 canvases at my local Dollarama. On each canvas I essentially used the same technique but the placement was different on each canvas.

Add color and texture to your canvas wall decor

I started by laying down some color all over the base of the canvas- I used an Aqua Painter and Pool Party ink to cover the canvas in color. Then, I added some Dapper Denim ink to parts of the canvas, using the Stampin' Spritzer to wet the ink and spread it out more. I used the Heat Tool to dry the ink on the canvas before moving on.

I used the various texture stamps from Timeless Textures to stamp Rich Razzleberry ink on the edges and then used the Stampin' Spritzer again to run the ink a bit. The Heat Tool was used again to dry the wet canvas.

The dotted background stamp from the Dragonfly Dreams stamp set was used to add the Crushed Curry ink.

Then, the Timeless Textures grid stamp was stamped in Early Espresso ink and the flourish stamp from Timeless Textures was stamped in Old Olive ink.

The Early Espresso ink pad was run along the canvas edges to create a frame.

Create your main images

While the stamped images dried, the Detailed Dragonfly Thinlits Dies were used to cut the dragonflies out of Rich Razzleberry cardstock and Dazzling Diamonds Glimmer Paper.

The words Live, Love, Laugh were stamped using using the Letters to You stamp set and Early Espresso ink and then die cut using the matching Large Letters Framelits Dies. Once the letters were die cut, some texture was added to them using the Timeless Textures stamp set.

Add glitter to your background

Before adhering the die cuts, I wanted to add some glitter to the canvas. I used the round swirl stamp from Timeless Textures to stamp Versamark ink on the background around where the die cuts would be placed. I think sprinkled Heat & Stick Powder on the ink, shaking off the excess and then used the Heat Tool to melt the powder- while the Heat & Stick Powder was still warm, I sprinkled Dazzling Diamonds Glitter then heat set that again with the Heat Tool.

Create the wall hanging

The canvases were layed in place and turned over to glue strips of 5/8" Burlap Ribbon to attach them together. A Glue Gun was used to adhere the ribbon to the backs of the canvas. Then pieces of Burlap Ribbon were tied around the strips.

The die cuts were then all glued down with the Fine Tip Glue Pen and allowed to dry. You may need to hold down some of the die cuts so they stick on the canvas.

Once the glue is all dry, you are ready to hang up your new canvas wall decor!

Stampin' Up Stamps:

Dragonfly Dreams-142924 (Photopolymer), Timeless Textures-140514 Wood, 140517 Clear Mount , Letters for You-141968 (Photopolymer)

Stampin' Up Paper:

Dazzling Diamonds Glimmer Paper-135315 , Rich Razzleberry Cardstock-115316 , Thick Whisper White- 140272

Stampin' Up Ink:

Old Olive-126953, Dapper Denim-141394 , Rich Razzleberry-126950 , Early Espresso-126974 , Crushed Curry-131173 , Pool Party-126982 , Versamark-102283

Other Stamp Supplies and Tools:

5/8” Burlap Ribbon-141487, Heat & Stick Powder-100625, Dazzling Diamonds Glitter-133751 , Fine Tip Glue Pen-138309 , Aqua Painters-103954, Stampin Spritzer (filled will water)- 126185, Detailed Dragonfly Thinlits Dies- 142749, Large Letters Framelits Dies-141712 , Heat Tool- 129053, 5×7 Canvas (from Dollarama or local craft store)

I hope you enjoyed today's stamped canvas wall decor project!


blog-signature-spring

QUICK LINKS: 
2017 OCCASIONS CATALOGUE– NEW Spring Catty!! Check it out! Available January 4th to May 31st

SALE-A-BRATION– Choose a FREE Sale-A-Bration product with every $60 you spend before taxes and shipping! January 4th to March 31st! NEW freebies coming February 21st!

CLEARANCE RACK– Save up to 60%  

JO JO POINTS– Earn free stamps with my Jo Jo Points Program    

Read more

Beautiful You Stamp Set

Posted on February 6, 2017February 17, 2017 by Josee

My Crafty Friends Monday-NEW-SMEach Monday, I like to feature different Stampin' Up project ideas that have inspired me and I know they'll inspire you too! This week we've got some great samples of hand made cards using the Beautiful You stamp set!

 
Each project was created by different & amazingly talented stampers-that shared their stamped cards in a swap I participated in a few weeks back. I will have more to show you from this swap over the next few weeks too!
 

This week's featured stamp set is the Beautiful You stamp set, from the 2017 Occasions Catalogue (143004 wood mount, 143637 clear mount).

This stamp set can really take on so many different looks! Check out all the different cards made with this set.

Designer Series Papers to add color to your card!


This card by Carolyn-DelGrosso looks great colored with the new Watercolor Pencils and the Designer Series Paper Stack for the background (from the Annual Catalogue)


The next card by Jessica Brigden also uses the Designer Series Papers– so differently than the previous card! The girl from the Beautiful You stamp set was colored using one of the stamps from the same stamp set.


This card by Sharon McNeely uses the Designer Series Paper Stacks as well for another different look for this stamp set.


The next card by Ruth Murphy uses the new Falling In Love Designer Series Paper and just by adding a light touch of color to the stamped image it created a nice soft look.


This card by Linda Heller shows how even though the image is not colored in, just by adding a mat to the stamped image and adding a framed in background creates such a pop on this card front.

Try coloring with Bleach!


Also by Linda Heller really has that image standing out with woman dancing stamped on the colored cardstock and then colored in with bleach to remove the color on the stamped image. The little splatters are bleached splatters too. She also use a bit of Blooms and Bliss Designer Series Paper from the Annual Catalogue.


I hope you've enjoyed this week's "My Crafty Friends Monday" featuring Stampin' Up's Beautiful You stamp set! Thanks for stopping by today!   


blog-signature-spring

QUICK LINKS: 
2017 OCCASIONS CATALOGUE– NEW Spring Catty!! Check it out! Available January 4th to May 31st

SALE-A-BRATION– Choose a FREE Sale-A-Bration product with every $60 you spend before taxes and shipping! January 4th to March 31st! NEW freebies coming February 21st!

CLEARANCE RACK– Save up to 60%  

JO JO POINTS– Earn free stamps with my Jo Jo Points Program    

Read more

Valentine Treat Box- Curvy Keepsake Box Thinlits

Posted on February 3, 2017February 17, 2017 by Josee

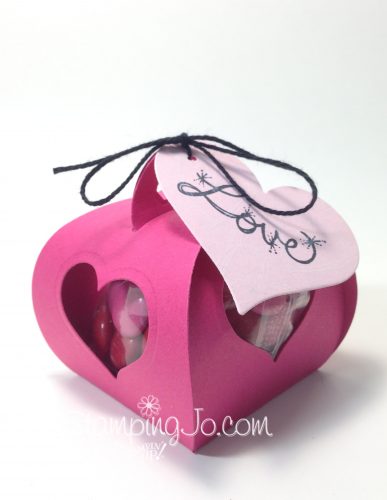
Happy Friday! With Valentine's Day less than two weeks away I wanted to show you a quick and easy Valentine Treat Box that you can put together in a jiffy!  Today's Valentine Treat Box features Stampin' Up's Curvy Keepsake Box Thinlits Dies, the Sweet and Sassy Heart Framelits and the Love Sparkles stamp set to create this quick and cute Valentine gift!

Curvy Keepsake Box Thinlits Dies, Stampin Up, Valentine Treat Box, Quick and Easy Gift

How To Make This Valentine Treat Box:

Start by taking a large sheet of Melon Mambo cardstock (about 6"x8) and lining it up on the cutting mat for the Big Shot.  Place the Curvy Keepsake Box Thinlit die on top of the sheet of cardstock, then add a small heart die from the Sweet and Sassy Framelits to the middle of one of the box sides. Die cut the sheet, then remove the Curvy Keepsake Box Thinilit and run the die cut through again to cut a second heart shape from the other box side.

You will repeat step one again to get TWO Curvy Keepsake Box die cuts– you need 2 of them to make the box. Once you have both peices, fold at the score lines and place some Tear and Tape Adhesive across the top of the bottom square piece of the box and add the second square to adhere on top. Your box bottom will be made of two of the square shapes from the die cut and you will be left with all four sides to fold up.

Before folding up your box, add some treats (I added red and pink Smarties) to a Cellophane Bag and tape or tie the bag. My bag was tall, so I cut some of the top of the bag off and then taped down the side to keep the goodies secure.

Add the bag to the bottom square of the box and start bringing up the sides to close it. You will bring together the two loops and then feed the slotted sides over top of the looped sides. This keeps the box closed.

I cut a small tag by die cutting a slightly larger heart from the Sweet and Sassy Framelits from Pink Pirouette cardstock.

Then, I stamped the word Love from the Love Sparkles stamp set in Tuxedo Black ink and added some hearts using the heart stamp from the same stamp set in White Craft ink.

I punched a hole in the heart shaped tag and ran some Black Baker's Twine through it, tying it onto the loops on the Curvy Keepsake Box and tying a bow.

And now my Valentine treat box is ready for a special little Valentine! 😉

Stampin' Up Stamps:

Love Sparkles- 143114 wood, 143183 clear mount

Stampin' Up Paper:

Melon Mambo cardstock-115320 , Pink Pirouette cardstock- 111351

Stampin' Up Ink:

Memento Tuxedo Black- 132708, Refill-133456; White Craft Stampin'Pad-101731

Other Stamp Supplies and Tools:

Curvy Keepsake Box Thinlits-135853, Sweet and Sassy Heart Framelits-141707, 1/8" Handheld Circle Punch-134365,Basic Black Baker's Twine- 141682, Tear & Tape Adhesive- 138995, Magnetic Platform- 130658, Cellophane Bag (2×8)-141703

I hope you get a chance to do some stamping this weekend and give this Valentine treat box a try! Have a great weekend!


blog-signature-spring

QUICK LINKS: 
2017 OCCASIONS CATALOGUE– NEW Spring Catty!! Check it out! Available January 4th to May 31st

SALE-A-BRATION– Choose a FREE Sale-A-Bration product with every $60 you spend before taxes and shipping! January 4th to March 31st! NEW freebies coming February 21st!

CLEARANCE RACK– Save up to 60%  

JO JO POINTS– Earn free stamps with my Jo Jo Points Program    

Read more

Watercolor stamped card using Beautiful You

Posted on February 2, 2017February 17, 2017 by Josee

Good day! Today's card features Stampin' Up's Beautiful You stamp set to create this fun and simple watercolor stamped card. This card definitely required embracing non-perfection when making the rain drops 🙂 but I do love how the card came together in the end. This will be a good sympathy card or just for someone who needs a pick me up.

Beautiful You stamp set, Stampin Up, 2017 Occasions Catalogue, watercolor stamped card

How To Make This Watercolor Stamped Card:

This card starts with Tempting Turquoise cardstock for the card base.

Then on a sheet of Shimmery White cardstock, I stamped the girl with the umbrella image from the Beautiful You stamp set in Archival Basic Black ink. Allow the ink to dry or use a Heat Tool to set the ink so it doesn't smudge.

Watercolor the image:

Take the Tempting Turquoise ink pad and press the ink pad surface into the lid to get a pool of ink to watercolor with. Take an Aqua Painter filled with water and dip into the pool of ink in the lid to pick up the ink color. Use the Aqua Painter to paint the puddle under the inked image and then add drops of inky water to the card to create raindrops, doing the same with the Soft Sky ink to create a little dimension with the rain drops. You may want to tip the cardstock to allow the drops to run a bit.

With a paper towel handy, use the Heat Tool to dry the rain drops, using the paper towel to dab them if needed.

Once the Shimmery White cardstock layer is dry, use the Daffodil Delight Watercolor Pencil and a Blender Pen to color in the girl with the umbrella's dress and shoes.

Once everything is dry, adhere the Shimmery White cardstock layer to the cardbase.

Take a strip of Whisper White cardstock about 1" thick and stamp the sentiment from the Beautiful You stamp set with Basic Black ink. Use the Banner Triple Punch to punch the end.

Take a strip of Daffodil Delight cardstock slightly larger than the Whisper White strip and punch the end of that with the Banner Triple punch as well. Layer the two strips together and then adhere to the cardfront as shown.

As a final touch, add a Daffodil Delight enamel heart shape from the Subtles Enamel Shapes pack to the greeting strip.

Stampin' Up Stamps:

Beautiful You-143637 clear mount, 143004 wood mount

Stampin' Up Paper:

Tempting Turquoise cardstock- 102067, Shimmery White- 101910, Daffodil Delight cardstock-119683 , Whisper White- 100730

Stampin' Up Ink:

Archival Basic Black- 140931, Refill- 140928; Tempting Turquoise-126952, Soft Sky-131181

Other Stamp Supplies and Tools:

Subtles Enamel Shapes- 141679, Watercolor Pencils-141709, Blender Pen-102845 , Aqua Painter-103954 , Banner Triple Punch- 138292, Heat Tool- 129053

I hope you enjoyed today's watercolor stamped card! I hope you have a stampin' good day!


blog-signature-spring

QUICK LINKS: 
2017 OCCASIONS CATALOGUE– NEW Spring Catty!! Check it out! Available January 4th to May 31st

SALE-A-BRATION– Choose a FREE Sale-A-Bration product with every $60 you spend before taxes and shipping! January 4th to March 31st! NEW freebies coming February 21st!

CLEARANCE RACK– Save up to 60%  

JO JO POINTS– Earn free stamps with my Jo Jo Points Program    

Read more

Posts pagination

  • Previous
  • 1
  • …
  • 213
  • 214
  • 215
  • 216
  • 217
  • 218
  • 219
  • …
  • 587
  • Next

go to store

Promos

Paper Bouquet Kit

josee smuck

Josée Smuck

Stampin’ Up! Canada Demonstrator since 2002
Ottawa, ON, Canada
Contact me with questions!
Josee@StampingJo.com
(613) 831-2917

Current Catalogues

Annual Catalogue (May2024-April2025)Stampin' Up! Annual CatalogueView Catalogue-ENG | Shop Online
View Catalogue- FR

——————

Looking for something?

Get the news


Click HERE to download Jo-Jo’s FREE Sketches & Tips Guide

Updates

Receive NEXT-DAY updates by email:

Receive SAME DAY updates by subscribing in a reader:
Click to Subscribe in a reader

Recent Posts

  • Embrace the Journey April 11, 2025
  • For the Books April 8, 2025
  • Beautiful Birthday April 5, 2025
  • Happy Retirement April 2, 2025
  • Frame & Flowers March 28, 2025

Categories

Proud Member…

Inky_Divas800

The content of this blog is the sole responsibility of Josee Smuck as a Stampin’ Up! Independent Demonstrator.  The use of and content of classes, services or products offered is not endorsed by Stampin’ Up! Unless otherwise indicated, images © Stampin’ Up! 1990 – present.

© 2025 Hand Stamped Cards with Josee Smuck-Stampin' Up! Canada Demonstrator | Powered by Superbs Personal Blog theme