Good Morning! Happy, Happy Friday!
Oh, Friday, how I love thee 🙂 Especially when it means great shopping deals!! Make sure you check out the Year End Clearance Sale here! Only While Quantities Last! So get them while you can!
I've got a gorgeous card to share today! I hope you like it! And, it really is much simpler to make than it looks thanks to the Big Shot and the Snowflake Card Thinlet!
Doesn't that vellum look gorgeous?!! The silver foil is an easy way to add so much impact to a card!
You can download the project sheet here: Silver Snowflakes Project Sheet
Measurements:
· Whisper White Base – 5 ½” x 11”
· Whisper White Scrap – 1” x 3”
· Silver Fancy Foil Designer Vellum – 2” x 5 ¼”
· Silver Foil Sheets – 2 ¼” x 2 ¼”, 1” x 1 ½”, 1” x 1”
Instructions:
1. Using the Big Shot, cut the Whisper White card base out with the Snowflake Card Thinlet.
2. Stamp the large snowflake from the Letterpress set on to both sides of the cut out snowflake shape with Smoky Slate ink pad.
3. Using the Big Shot, cut the Silver Foil Sheets with “Joy”, the large snowflake, and the small snowflake. Add a piece of wax paper between your framelit and the card stock so that the image releases from the die.
4. Using the Big Shot, cut the Whisper White 1” x 3” piece with the banner framelit.
5. Stamp the word “Christmas” from Endless Wishes on the cut out banner with Smoky Slate ink.
6. Carefully place some SNAIL adhesive on the back of each polka dot on the Vellum piece, attach it to the card.
7. Use the 2-Way Glue Pen to attach the word “Joy” and the large and small snowflakes. The cut out snowflakes go on top of the stamped snowflake – the large on the front, the small on the back.
8. Attach the “Christmas” banner to the front of the card with a dimensional.
9. Tie a knot in a small piece of the 1/8” Silver Ribbon – attach to the banner with a glue dot.
10. Attach a large Rhinestone to the center of the silver snowflake on the front of the card, and a small Rhinestone on top of the dot on the “i” in Christmas.
11. Write you greeting on the back of the card.
Supplies Used: Built for Free Using: My Stampin Blog
Have a wonderful weekend!!
December Hostess Code to use: SYB2AWN6
When you use this code, you will receive the FREE SGGW Tutorial with 6 EXCLUSIVE VIDEOS!

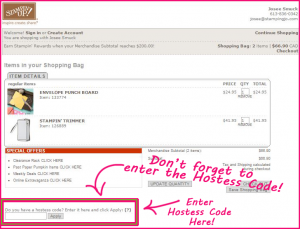
>>How to use the hostess code:a. Enter your items into cart
b. At Check out- Look under "Special Offers" (bottom left)
c. Enter HOSTESS CODE in box and hit apply
NOTE: if your order is over $200, do not use the code so that you to claim the Stampin' Rewards on your order!


