Skip to content

Hand Stamped Cards with Josee Smuck-Stampin' Up! Canada Demonstrator

Stampin' Up! Canada Demonstrator; Rubber Stamps & Supplies for Cardmaking & Scrapbooking in Stittsville, Ontario (near Ottawa)

Menu
  • Home
  • JO JO POINTS
  • **Join**
  • Monthly Craft Kit
  • Weekly News
  • Shop Now
  • Contact Me
Menu

Pop of Paradise Pineapple card

Posted on June 8, 2016June 6, 2016 by Josee

Hello! 

I've got another look today at the Pop of Paradise stamp set. Today's card looks so different from yesterday's card– it's amazing how many different looks you can really get from ONE stamp set! I will be showing you a few more from the Pop of Paradise stamp set over the next few weeks too! 

Pop of Paradise pineapple by StampingJo

How To Make It: 

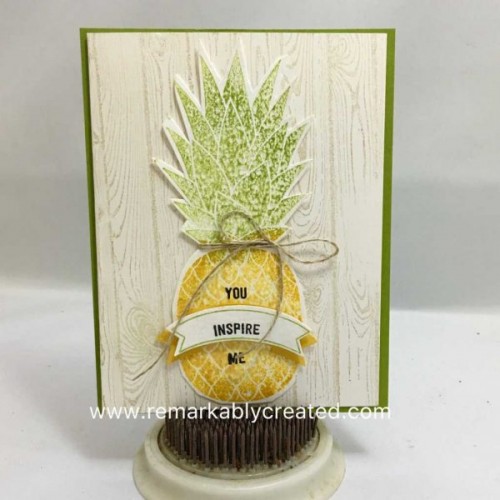
This card starts with a base of Whisper White Thick cardstock. Then, a strip of Dapper Denim cardstock was adhered to the card base. 

The little pineapple from Pop of Paradise was inked up using Always Artichoke and Crushed Curry Stampin' Write markers, stamped on Whisper White cardstock. 

The pineapple layer was then die cut with the scalloped Layering Squares Framelits and the Crushed Curry was die cut with the larger die from the same set. This NEW Layering Squares Framelits make cutting and matting your stamped images SO easy!! This layer was then adhered to the card front. 

The Gold Wink of Stella was used to add some fun dots to the scallop square. 

The 'Hello' stamp was stamped with Dapper Denim ink on Whisper White, punched with the 1 3/8" circle punch and then mounted on a punch out of Crushed Curry- punched with the 1 1/2" circle punch. This was adhered onto the stamped squares.

As a final touch, the Bow Paper Clip Embellishment was added to the Dapper Denim strip! 

Stamps: 

Pop of Paradise-141578 wood, 141581 clear-mount

Paper: 

Whisper White Thick-140272 , Whisper White- 100730, Crushed Curry- 131199, Dapper Denim-141414

Ink:

Dapper Denim- 141394, Crushed Curry & Always Artichoke Stampin' Write Markers- 131262 (Regals Collection) , Wink of Stella-Gold-141898

Other: 

Bow Paper Clips Embellishments- 140559 , 1 3/8" circle punch-119860 , 1 1/2 circle punch-138299 , Layering Squares Framelits-141708

I hope you enjoyed today's different take on Pop of Paradise! What do you think about this stamp set?     su blog signature


     June Hostess Code to use: YGAHA3TT  

jojopoints blog post footer

Read more

Pop Of Paradise- Hello card

Posted on June 7, 2016June 6, 2016 by Josee

Hello! 

Welcome back to the blog! Today's look at the NEW Annual catalogue features the Pop of Paradise stamp set! This is a fun, tropical set which would be great for summer birthday cards, bbq/party invites, vacation scrapbook pages, zoo scrapbook pages and whatever else you can think of!

Pop of Paradise by Stampin Up

How To Make It: 

Score the Melon Mambo cardstock at 4 ¼” and fold it for your card base.

Add three pieces of Pop of Pink Specialty paper to card front. Add the Pop of Pink Designer Washi Tape in between the rows of patterned paper.

Stamp the flamingo from Pop Of Paradise on Whisper White cardstock with Melon Mambo ink. Adhere the flamingo to Basic Black cardstock.

Stamp “Hello” from Pop of Paradise onto a scrap of Whisper White cardstock and punch out with 1 ¼” circle punch. Punch out another circle using Basic Black cardstock and 1 3/8” circle punch. Layer “Hello” onto black circle.

Tie Melon Mambo Thick Baker’s Twine around flamingo cardstock pieces; fray ends.

Assemble card, using Stampin' Dimensionals to raise the flamingo pieces and the “Hello.”

Stamps: 

Pop of Paradise – 141578 wood, 141581 clear-mount

Paper: 

Melon Mambo – #115320, Basic Black – #121045, Whisper White – #100730, Pop of Pink Specialty Designer Series Paper # 141648

Ink:

Melon Mambo – #126948

Other: 

1 ¼” circle – #119861, 1 3/8” circle – 119860, Melon Mambo Thick Baker’s Twine – 141689, Pop of Pink Designer Washi Tape – 141649, Dimensionals – 104430

Thanks for stopping by the blog!      su blog signature


     June Hostess Code to use: YGAHA3TT  

jojopoints blog post footer

Read more

My Crafty Friends Monday: Pineapple Background Stamp

Posted on June 6, 2016June 6, 2016 by Josee

Welcome to "My Crafty Friends Monday!" 

NEW! 2016-2017 Annual Catalogue Edition

My Crafty Friends Monday-NEW-SMI hope you enjoyed a great weekend! Each Monday, I like to feature different projects that have inspired me and I know they'll inspire you too!
 
Each project was created by different & amazingly talented stampers- make sure you check out their blogs for more details and to check out their other amazing projects!!
(**Note…don't worry- I've contacted each of these stampers and allowed them to decline if they choose.) 
 

This week's featured stamp set is the Pineapple Background Stamp (141746 clear-mount, 141743 wood mount)


Claudia Becht: her blog

Pineapple stamp-Stampin-Up-Stempelherz-Inspiration-Art-Lieblingsstempelset-Stempelset-Pineapple-Vielen-Dank-ans-Team-01

Love the idea of using this Pineapple stamp for fun gift bags!


Tricia Chuba: her blog

Pineapple stamp by Tricia Chuba-ButterDish-Designs-CADIM-8

Love the way this looks in white with the soft colorful background- so tropical!


Jackie Bolhuis: her blog

pineapple stamp by jackie bolhuis

I love this! It almost looks real!


Janet Wakeland: her blog

pineapple stamp by janet wakeland

I love the muted colors on this and it looks lovely with the woodgrain background too.


Kim Williams: her blog

pineapple stamp by kim williams

I just love all the dimension on this- I am loving the pink pineapples too! So fun!


Love these ideas? You can purchase this stamp set through my ONLINE STORE! 

I hope you've enjoyed this week's "My Crafty Friends Monday" Make sure you visit the talented artist's featured on this post! Thanks for stopping by today!

Were you featured here? Here's a badge you can add to your blog!
My Crafty Friends Monday-featured-NEW-SM


su blog signature


     June Hostess Code to use: YGAHA3TT  

jojopoints blog post footer

Read more

NEW Annual Catalogue Blog Hop

Posted on June 3, 2016June 6, 2016 by Josee

Blog Hop LogoWelcome to the Hello! Annual Catalogue 2016-2017 Blog Hop! You’ll be hopping around 11 amazing Stampin’ Up!® Independent Demonstrators blogs, each with an inspirational project, featuring NEW catalogue products. 

Hello there! Currently you’re visiting Josee Smuck from Ottawa, Canada. You can continue hopping by using the previous and next buttons at the end of this post. Now, let’s scroll down to see what I’ve been making!

There are so many new stamp sets to play with in this new catalogue!  For today's card I chose to use the new Swirly Bird stamp set and coordinating Swirly Scribbles Thinlits! This is a fun new set that is so versatile! At first glance, you may think that it just creates flowers or swirly designs, but you can also use the stamps to create this fun sail boat, which I thought was perfect for a masculine card! With Father's Day coming up in the next few weeks, the timing was perfect for a Father's Day Card!

Swirly Bird Stamp set-Fathers Day card 2 by StampingJo

How To Make It: 

First, I stamped the sailboat by placing each individual stamp on one acrylic block, and then used the NEW Peekaboo Peach (2016-18 In Color) to stamp it onto a Whisper White strip.

Swirly Scribbles Thinlits- wave
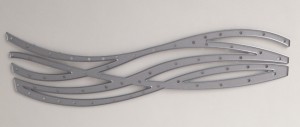
<<<Then I used the multi wave die from the NEW Swirly Scribbles Thinlits to cut out some Bermuda Bay and NEW Dapper Denim (2016-18 In Color) cardstock. I adhered the 'waves' to the Whisper White piece with the Fine Tip Glue Pen and then used Paper Snips to trim off the excess die cut.  

The Bermuda Bay card base was scored, folded and cut along the one edge using the same 'multi wave' die from the Swirly Scribbles Thinlits, but only using the edge of the die to create the wavy edge. 

Inside the card I placed a piece of the NEW Playful Palette Designer Series Paper in Peekaboo Peach. 

Swirly Bird stamp set-Fathers Day Card by StampingJo

To finish off the card, I stamped the banner frame and sentiment from the NEW Thoughtful Banners stamp set onto a piece of Whisper White cardstock. When I mounted the sentiment stamps onto the acrylic block, I rounded the photopolymer stamps a bit so they would fit the round edge of the NEW Duet Banner Punch. 

I then punched a layering piece from Dapper Denim cardstock by punching out two of the banners and trimming off one side of each to layer so that the Dapper Denim can be seen behind the stamped banner.  

Before adhering the layers to the card base, some Bermuda Bay Stitched Ribbon was tied on. Then the banner punch outs were added on using Stampin' Dimensionals. 

Stamps: 

Swirly Bird– 141749 (Get the bundle with Swirly Scribbles Thinlits and SAVE: 142353), Thoughtful Banners-141614 (Get the bundle with Duet Banner Punch and SAVE: 142330)

Paper: 

Bermuda Bay-131197 , Whisper White- 100730, Dapper Denim-141414 , Playful Palette Designer Series Paper-141657

Ink:

Peekaboo Peach- 141398, Dapper Denim-141394

Other: 

Duet Banner Punch-141483 , Bermuda Bay Stitched Ribbon-140569 , Swirly Scribbles Thinlits- 141497, Big Shot- 113439, Paper Snips-103579, Fine Tip Glue Pen- 138309

Thank you for visiting today. The next stop is the talented Sarah Berry. There’s lots of inspiration to be found in this group – and you don’t want to miss it! 

Previous ButtonNext button


su blog signature


     June Hostess Code to use: YGAHA3TT  

jojopoints blog post footer

Read more

Marquee Messages Birthday Card

Posted on June 2, 2016June 1, 2016 by Josee

Hello! 

Have you had a chance to browse the NEW catalogue?? If you have, I'd love to know what the first things on your wish list are? Let me know in the comments! 

In case you missed yesterday's blog post, you can download the NEW 2016-2017 Annual Catalogue by clicking the photo below!  

Download catalogue

Here is another look at one of the NEW stamp sets- Marquee Messages. What a fun look for your cards! 

Marquee Messages by Stampin Up

How To Make It: 

First, stamp the Marquee Messages main image with Basic Black Ink in center of the Very Vanilla layer

Stamp 'It’s Your' and 'Birthday' with Emerald Envy ink

Stamp the Marquee Main Image on a Whisper White scrap and color with Peekaboo Peach Stampin' Write Marker, then cut out with Paper Snips

Attach Stampin' Dimensionals on the back of cutout piece and attach to Marquee stamped image on Whisper White layer

Color side stripes and stars with Peekaboo Peach Stampin' Write Marker

Tie Emerald Envy Ruched Ribbon around bottom of the layer

Adhere the Very Vanilla layer to the Peekaboo Peach card base with SNAIL Adhesive 

Use the Wink of Stella and color over the Peekaboo Peach cutout layer to add some shimmer and add some Rhinestones to the marquee to bling it up too!

Stamps: 

Marquee Messages-141727

Paper: 

Very Vanilla (101650); Peekaboo Peach (141417)

Ink:

Emerald Envy (141396); Basic Black (140931)

Other: 

Dimensionals (104430); Emerald Envy Ruched Ribbon (141425), Peekaboo Peach Marker (2016-2018 In color Markers #141393) Rhinestones Basic Jewels (119246); Wink of Stella Clear (141897)

     su blog signature


     June Hostess Code to use: YGAHA3TT  

jojopoints blog post footer

Read more

Posts pagination

  • Previous
  • 1
  • …
  • 248
  • 249
  • 250
  • 251
  • 252
  • 253
  • 254
  • …
  • 587
  • Next

go to store

Promos

Paper Bouquet Kit

josee smuck

Josée Smuck

Stampin’ Up! Canada Demonstrator since 2002
Ottawa, ON, Canada
Contact me with questions!
Josee@StampingJo.com
(613) 831-2917

Current Catalogues

Annual Catalogue (May2024-April2025)Stampin' Up! Annual CatalogueView Catalogue-ENG | Shop Online
View Catalogue- FR

——————

Looking for something?

Get the news


Click HERE to download Jo-Jo’s FREE Sketches & Tips Guide

Updates

Receive NEXT-DAY updates by email:

Receive SAME DAY updates by subscribing in a reader:
Click to Subscribe in a reader

Recent Posts

  • Embrace the Journey April 11, 2025
  • For the Books April 8, 2025
  • Beautiful Birthday April 5, 2025
  • Happy Retirement April 2, 2025
  • Frame & Flowers March 28, 2025

Categories

Proud Member…

Inky_Divas800

The content of this blog is the sole responsibility of Josee Smuck as a Stampin’ Up! Independent Demonstrator.  The use of and content of classes, services or products offered is not endorsed by Stampin’ Up! Unless otherwise indicated, images © Stampin’ Up! 1990 – present.

© 2025 Hand Stamped Cards with Josee Smuck-Stampin' Up! Canada Demonstrator | Powered by Superbs Personal Blog theme