Skip to content

Hand Stamped Cards with Josee Smuck-Stampin' Up! Canada Demonstrator

Stampin' Up! Canada Demonstrator; Rubber Stamps & Supplies for Cardmaking & Scrapbooking in Stittsville, Ontario (near Ottawa)

Menu
  • Home
  • JO JO POINTS
  • **Join**
  • Monthly Craft Kit
  • Weekly News
  • Shop Now
  • Contact Me
Menu

Layering Love: Enjoy the Little Things

Posted on July 20, 2016July 19, 2016 by Josee

Social1B_BonusDays_demo_July0716_CAGood Morning!

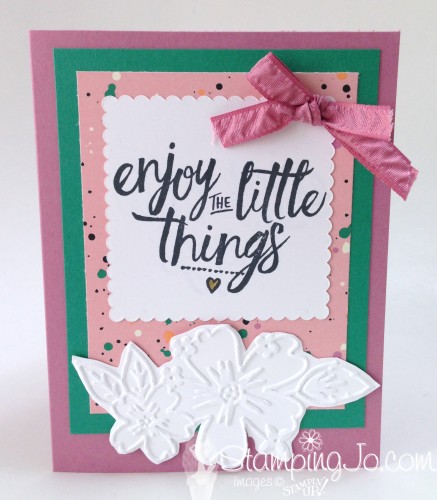
Today's card features the Layering Love stamp set paired with the new Floral Affection Textured Impressions Embossing Folder for a quick and easy card!

Layering Love by StampingJo


How To Make It: 

This card starts with a cardbase of Sweet Sugarplum cardstock. Then a layer of Emerald Envy cardstock was added, as well as a layer of the splatter paint paper from the Playful Palette Designer Series Paper. 

On some Whisper White cardstock, I stamped the sentiment from Layering Love with Basic Black ink and then used the Square Layering Framelits to cut a scallop square and adhered that over the Playful Palette layer. The Gold Wink of Stella was used to color in the little heart.  

Some Whisper White cardstock was run through the Floral Affection Textured Impressions Embossing Folder and then the Paper Snips were used to cut around the embossed edge. 

Layering Love close up by StampingJo

The embossed flower piece was adhered to the card front. As a final touch, the Sweet Sugarplum Ruched Ribbon was tied in a little bow and added on with a Glue Dot. 

Stamps: 

Layering Love-141962 wood, 141965 clear mount

Paper: 

Playful Palette Designer Series Paper Stack-141657, Emerald Envy-141415, Sweet Sugarplum-141418, Whisper White-100730

Ink:

Basic Black-140931, Gold Wink of Stella-141898

Other: 

Layering Squares Framelits-141708, Floral Affection Textured Impressions Embossing Folder -141713, SS Ruched Ribbon-141428, Paper Snips-103579, Glue Dots-103683, SNAIL Adhesive- 104332, Refill- 104331

Thanks for stopping by the blog today! Have a great day! su blog signature


    hostess code graphic

jojopoints blog post footer

Read more

Touches of Texture and Butterfly Basics Card

Posted on July 19, 2016July 11, 2016 by Josee

Good Morning!

Today's card features the new Touches of Texture stamp set combined with the Butterfly Basics stamp set for a gorgeous card! 

Touches of Texture and Butterfly Basics

How To Make It: 

Stamp all outline flower images from the Touches of Texture stamp set randomly in Early Espresso ink

Stamp the solid flower images: the large flowers are Watermelon Wonder and the small flowers in Sweet Sugarplum stamped multiple times without re-inking to create variation of tone

Add some background texture with the dotted splatter stamp from Touches of Texture in Crumb Cake ink stamping twice without re-inking to create variations of tone

Add second background texture stamp with So Saffron stamping twice without re-inking to create variations of tone.

Attach stamped piece to Early Espresso layer and add Watermelon Wonder ribbon (adhere to back)

Stamp greeting on scrap of white in Early Espresso ink along with second texture stamp in So Saffron

Punch out greeting using the Decorative Label punch and attach over the ribbon with Stampin' Dimensionals

Stamps: 

Touches of Texture(w-141934, 143251 clear mount), Butterfly Basics (138813 wood, 138816 clear mount, 137154 photopolymer )

Paper: 

Flirty Flamingo(141416), Early Espresso(119686), Whisper White(100730)

Ink:

Flirty Flamingo(141416), Early Espresso(119686), Whisper White(100730), So Saffron (126957), Watermelon Wonder (138323)

Other: 

5/8" mini Striped Ribbon-Watermelon Wonder(141433), Decorative Label punch(120907), Stampin' Dimensionals(104430)

Have a great day! Thanks for stopping by the blog today!  su blog signature


    hostess code graphic

jojopoints blog post footer

Read more

My Crafty Friends Monday: Detailed Floral Thinlits

Posted on July 18, 2016July 14, 2016 by Josee

Welcome to "My Crafty Friends Monday!" 

NEW! 2016-2017 Annual Catalogue Edition

My Crafty Friends Monday-NEW-SMI hope you enjoyed a great weekend! Each Monday, I like to feature different projects that have inspired me and I know they'll inspire you too!
 
Each project was created by different & amazingly talented stampers- make sure you check out their blogs for more details and to check out their other amazing projects!!
(**Note…don't worry- I've contacted each of these stampers and allowed them to decline if they choose.) 
 

This week's featured stamp set is actually not a stamp set smiley the Detailed Floral Thinlits (141482) are a gorgeous new die set from Stampin' Up. The dies coordinate with the Floral Phrases stamp set (141764 wood, 141767 clear mount).

You can bundle and SAVE with these bundles- 142354 wood mount stamp and dies, 142355 clear mount and dies! Plus, there is a french bundle too!

Plus, this bundle is also part of the Floral Boutique Suite, found on page 76 of the 2016-2017 Annual Catalogue- it includes coordinating Floral Boutique Designer Washi Tape– 141664, Floral Boutique Designer Series Paper–141663, and Solid Baker's Twine in Night of Navy– 141684

You can see the whole Floral Boutique Suite here. 


Gosia McKinnon: her blog

detailed floral thinlits by gosia mckinnon

These dies create gorgeous 3d projects! This candle holder and gift 'bag' are amazing!


Sarah Jane Rae: her blog

Watercoloured Ombre Effect Stampin' Up! Floral Thinlits Dies by Sarah Jane Rae (8)

This looks amazing with the watercolored background behind the die cut!


Lynn Starzl: her blog

detailed floral thinlits by lynn starzl

So pretty paired up with the coordinating stamp set!


Tammy Shaia: her blogfloral phrases by Tammy Shaia

This is just gorgeous as this wedding card! 


Bev Adams: her blog

detailed floral thinlits by Bev Adams

I love the die cut as a card pocket on this gift bag! Also, this bag uses the coordinating Designer Series Paper and Washi Tape.


Connie Collins: her blogdetailed floral thinlits by Connie Collins

This looks amazing with the white on white and the pop of color with the flowers!


Sandi Hartka: her blog

detailed floral thinlits by Sandi Hartka

I love how the orientation on this card is landscaped and the sentiment is vertical and it looks great with the color under the die cut. So pretty!


Love these ideas? You can purchase this stamp set through my ONLINE STORE! 

I hope you've enjoyed this week's "My Crafty Friends Monday" Make sure you visit the talented artist's featured on this post! Thanks for stopping by today!

Were you featured here? Here's a badge you can add to your blog!
My Crafty Friends Monday-featured-NEW-SM


su blog signature


     hostess code graphic 

jojopoints blog post footer

Read more

Confetti Celebration Gift Bag

Posted on July 15, 2016July 11, 2016 by Josee

Good Morning!

Have you got plans for this weekend? Maybe some stampin' time? I've got a fun project to show you today that would be great to have a few ready made on hand for those last minute gift giving occasions 🙂  This one uses the Confetti Celebration stamp set for a fun birthday package! 

Confetti Celebration Party Favor

How To Make It: 

Score Cucumber Crush 12×12 Cardstock at 2”, 5-1/2”, 7-1/2”, and 11” along one side and 2” along the other side. Cut score marks up to the 2” mark and remove small rectangle in corner (as shown below). 

Confetti Celebration bag instructions

Fold along all score lines and form into a box by applying Tear & Tape to long flap and bottom flaps.

Wrap box with strip of Affectionately Yours Designer Series Paper, creasing each edge as you go. Adhere to the bag with Tear & Tape.

Squeeze top of 'box' together into a bag shape and punch 2 holes at top through all layers using the 1/8" circle punch (or even 1/4" circle punch). Thread all 3 lengths of Thick Baker’s Twine through holes and tie in a bow.

Stamp “YAY!” from the  Confetti Celebration stamp set on Whisper White cardstock two times for each color and die cut with star shape. Stamp “HAPPY BIRTHDAY” and “It’s YOUR day!” two times each with Cucumber Crush ink and punch with Classic Label punch.

Working in pairs, adhere each colored star and each colored sentiment together at bottom edge of twine, holding together with Stampin’ Dimensionals, trimming twine as needed to get the desired length to get the fun tag tassel look.

Stamps: 

Confetti Celebration (wood: 141510, clear: 142034)

Paper: 

In Color 2015-2017 12×12 Cardstock (138340); Whisper White Cardstock (100730), Affectionately Yours Specialty Designer Series Paper (DSP) (141632);

Ink:

Cucumber Crush (138324); Delightful Dijon (138327); Mint Macaron (138326); Watermelon Wonder (138323)

Other: 

Stars Framelits (133723); Classic Label Punch (141491); Cucumber Crush Thick Baker’s Twine (141662); Tear & Tape (138995); Stampin’ Dimensionals (104430); 1/8” hole punch (134365) 

Thanks for stopping by the blog today!  Have a great weekend!su blog signature


    hostess code graphic

jojopoints blog post footer

Read more

Swirly Bird Flower Patch Birthday Card

Posted on July 14, 2016July 11, 2016 by Josee

Good Morning!

Today's card is a fun take on the Swirly Bird stamp set flowers and uses the flower pieces and sentiment from the Flower Patch stamp set for a quick and easy card! 

Blooming Flower, Swirly Bird by Stampin Up


How To Make It: 

Start with a Crumb Cake card base. Then, use Memento Black ink to stamp sentiment from the Flower Patch stamp set on lower bottom of 4 x 2 ½ “ piece of Whisper White card stock.

Clean sentiment and ink again, using Flirty Flamingo, and stamp onto scrap piece of Whisper White card stock. Trim out the word “Blooming” and adhere on top of sentiment with Stampin’ Dimensionals, as shown in photo.

Ink up stem and leaf image from the Flower Patch stamp set using Cucumber Crush and stamp above sentiment.

On scrap piece of Whisper White ink up solid circle stamp from the Swirly Bird stamp set with So Saffron and stamp three circles. Ink the swirly line stamp from Swirly Bird with Flirty Flamingo and stamp over the three yellow circles. Punch each circle out using the circle punches so that you have one in each size.

Mist the circles lightly with water from a Stampin' Spritzer, scrunch up then open and set aside to dry.

Adhere Whisper White piece to card base using Stampin’ Dimensionals. 

Glue circles onto the Whisper White layer using Multipurpose Liquid glue, layering from largest to smallest. Put a large Rhinestone in centre of flower.

To finish it off, tie a bow with linen thread and adhere to stem using a glue dot.

Stamps: 

Swirly Bird – 141581, Flower Patch – 134207

Paper: 

Crumb Cake – 120953, Whisper White – 100730

Ink:

Flirty Flamingo – 141397, Cucumber Crush – 138324, Black Memento – 132708, So Saffron – 126957

Other: 

Stampin' Spritzer- 126185, 1 ¼” circle – #119861, 1 ¾ “ circle -119860, ¾” circle – 119873 , Stampin’ Dimensionals – 104430, Linen Thread – 104199, Rhinestones – 119246, Mini Glue Dots – 103683, Multipurpose Liquid Glue – 110755

Have a wonderful day! 
su blog signature


    hostess code graphic

jojopoints blog post footer

Read more

Posts pagination

  • Previous
  • 1
  • …
  • 242
  • 243
  • 244
  • 245
  • 246
  • 247
  • 248
  • …
  • 587
  • Next

go to store

Promos

Paper Bouquet Kit

josee smuck

Josée Smuck

Stampin’ Up! Canada Demonstrator since 2002
Ottawa, ON, Canada
Contact me with questions!
Josee@StampingJo.com
(613) 831-2917

Current Catalogues

Annual Catalogue (May2024-April2025)Stampin' Up! Annual CatalogueView Catalogue-ENG | Shop Online
View Catalogue- FR

——————

Looking for something?

Get the news


Click HERE to download Jo-Jo’s FREE Sketches & Tips Guide

Updates

Receive NEXT-DAY updates by email:

Receive SAME DAY updates by subscribing in a reader:
Click to Subscribe in a reader

Recent Posts

  • Embrace the Journey April 11, 2025
  • For the Books April 8, 2025
  • Beautiful Birthday April 5, 2025
  • Happy Retirement April 2, 2025
  • Frame & Flowers March 28, 2025

Categories

Proud Member…

Inky_Divas800

The content of this blog is the sole responsibility of Josee Smuck as a Stampin’ Up! Independent Demonstrator.  The use of and content of classes, services or products offered is not endorsed by Stampin’ Up! Unless otherwise indicated, images © Stampin’ Up! 1990 – present.

© 2025 Hand Stamped Cards with Josee Smuck-Stampin' Up! Canada Demonstrator | Powered by Superbs Personal Blog theme