Skip to content

Hand Stamped Cards with Josee Smuck-Stampin' Up! Canada Demonstrator

Stampin' Up! Canada Demonstrator; Rubber Stamps & Supplies for Cardmaking & Scrapbooking in Stittsville, Ontario (near Ottawa)

Menu
  • Home
  • JO JO POINTS
  • **Join**
  • Monthly Craft Kit
  • Weekly News
  • Shop Now
  • Contact Me
Menu

Sweet Cupcake Card

Posted on August 24, 2016August 22, 2016 by Josee

Hello! 

Today's card features the Sweet Cupcake stamp set to create this sweet card! 

sweet cupcake, stampin up

How To Make It: 

Score and fold the Crumb Cake Cardstock card base: 5 ½” x 8 ½”, scored @ 4 ¼”  and set aside.

Stamp the candle image from the Sweet Cupcake stamp set in Crumb Cake ink on the left side of the Crumb Cake cardstock layer (5 ¼” x 4”) . Then adhere the layer onto your card front with snail adhesive.

Use the corner rounder on the two left corners of your Pink Pirouette Subtles Designer Series Paper (5” x 2”) piece and adhere to the card with snail.

Next, stamp the cupcake from the Sweet Cupcake stamp set in the center of the Whisper White cardstock. For the bottom of the cupcake use Crumb Cake ink for the first two steps and Early Espresso for the third step. For the frosting stamp use Pink Pirouette ink for the first two steps and Watermelon Wonder ink for the third step.

Cut out your cupcake image with the Layering Circle Framelits. Then cut a scalloped circle a little bigger in Watermelon Wonder cardstock.

Lightly brush clear Wink of Stella across the 'frosting' to add shimmer.

Attach the cupcake circle image to the scallop circle with SNAIL adhesive and then adhere to the card front.

Cut out the 'Sweet' sentiment using the Cupcake Cutouts Framelits from a Silver Foil sheet and cut out two more sentiments from Early Espresso cardstock. Layer the sentiments and use the Fine Tip Glue Pen to adhere them together. The Espresso cardstock is going to make the sentiment stand out and give it dimension. This is totally optional.

Adhere the sentiment cutout to the card with the Fine Tip Glue Pen.

Finally, glue a few sequins from Silver Sequin Trim and Blushing Bride Sequin Trim to the front of the card to embellish!

Stamps: 

Sweet Cupcake (141498)

Paper: 

Crumb Cake Cardstock (120953), Whisper White Cardstock (100730), Early Espresso Cardstock (119686), Watermelon Wonder Cardstock (138334), Silver Foil Sheets (132178), Subtles DSP Stack (138437)

Ink:

Crumb Cake (126975), Watermelon Wonder (138323), Early Espresso (126974), Pink Pirouette (126956)

Other: 

Circle Framelits (141705), Wink of Stella brush – clear (141897), Cupcake Cutouts Framelits (141474), Corner Rounder (135346), Fine Tip Glue Pen (138309), Snail Adhesive (104332), Silver and Blushing Bride Sequin Trim (138399 or 138400)

Thanks for stopping by! Have a great day!
Social3_BonusDays_demo_July0716_NA


    hostess code graphic-monthly

jojopoints blog post footer

Read more

Flourishing Phrases Note Card

Posted on August 23, 2016August 22, 2016 by Josee

Good Morning! 

I've got a cute and simple note card to show you today. With the help of the Big Shot and the Birds and Blooms Thinlits, this project is SO EASY! With the Flourishing Phrases stamp set, you could add any sentiment you like to this one. 

Floral Phrases Note Card, Stampin Up

How To Make It: 

This card starts with a cardbase of Smoky Slate cardstock and then a layer of Soft Sky cardstock. Using Fast Fuse Adhesive adhere the Soft Sky mat to the card base.

Using your Big Shot and the Birds and Blooms Thinlits die cut one bird from Whisper White cardstock. Then, using the Lots of Labels Framelits, die cut one label from Crumb Cake cardstock. Finally, using the Flourish Thinlits,  die cut the flourish design from Sweet Sugarplum cardstock.

Emboss the Whisper White strip (1½” x 5”) in the Woodgrain Embossing Folder. Using Fast Fuse Adhesive adhere the strip of Whisper White Woodgrain embossed paper to the bottom of the Soft Sky mat.

Using Fast Fuse Adhesive adhere the Sweet Sugarplum decorative Flourish strip to the front of the Whisper White. Tip: Apply the the adhesive where it will be hidden by the label.

Using Fast Fuse adhere the bird to the Crumb Cake Label.

Using Stampin' Dimensionals attach the Label with Bird to the front of your card.

Stamp your sentiment at the top left of your card using Basic Gray ink.

Stamps: 

Flourishing Phrases (C: 141534 & W: 141531)

Paper: 

Smoky Slate (131202), Soft Sky (131203), Whisper White (100730), Sweet Sugarplum (141418), Crumb Cake (120953)

Ink:

Archival Stampin’ Pad Basic Gray (140932)

Other: 

Woodgrain Embossing Folder (127821), Lots of Labels Framelits (138281), Flourish Thinlits (141478), Birds & Blooms Thinlits (141477), Fast Fuse Adhesive (129026), Dimensionals (104430)

I hope you have a stampin' good day!
Social3_BonusDays_demo_July0716_NA


    hostess code graphic-monthly

jojopoints blog post footer

Read more

My Crafty Friends Monday: Weather Together

Posted on August 22, 2016August 17, 2016 by Josee

Welcome to "My Crafty Friends Monday!" 

NEW! 2016-2017 Annual Catalogue Edition

My Crafty Friends Monday-NEW-SMI hope you enjoyed a great weekend! Each Monday, I like to feature different projects that have inspired me and I know they'll inspire you too!
 
Each project was created by different & amazingly talented stampers- make sure you check out their blogs for more details and to check out their other amazing projects!!
(**Note…don't worry- I've contacted each of these stampers and allowed them to decline if they choose.) 
 

This week's featured stamp set is Weather Together (141543 Photopolymer) and coordinates with the Umbrella Weather Framelits Dies 141479; Bundle & Save! 142319 (also available in French)


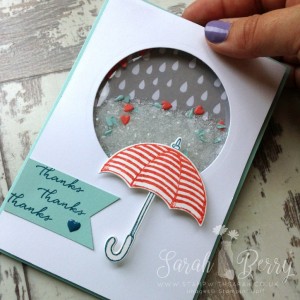
Sarah Berry: her blog

weather together by sarah berry

I just love this shaker card! It is just perfect for raindrops!


Mikaela Titheridge: her blog

weather together by mikaela titheridge

I love the way this looks with the heart and the way the umbrella is stamped on Designer Paper.


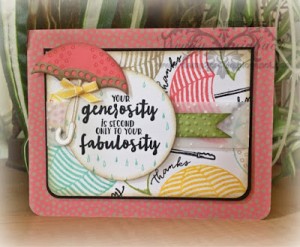
Wendy Stainback: her blog

weather together by wendy stainback

I really like the way Wendy designed this card with the umbrella and thanks in the background and the sentiment taking center stage- it looks great! 


Bekka Prideaux: her blog

Weather Together by Bekka Prideaux

Bekka's background really caught my eye. I love the colors and it just really works as a background for the umbrellas!


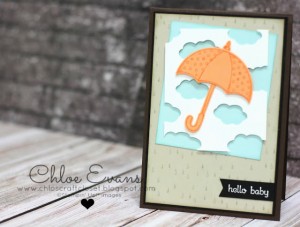
Chloe Evans: her blog

Weather Together by Chloe Evans

This is just perfect as a baby card! Very cute!


Tracy May: her blog

Christmas-In-July-Weather-Together-by-Stampin-Up-Tracy-May-00001

I love how Tracy's card doesn't even use the umbrella image, but rather the gifts- just goes to show how versatile this stamp set can be! 


Love these ideas? You can purchase this stamp set through my ONLINE STORE! 

I hope you've enjoyed this week's "My Crafty Friends Monday" Make sure you visit the talented artist's featured on this post! Thanks for stopping by today!

Were you featured here? Here's a badge you can add to your blog!
My Crafty Friends Monday-featured-NEW-SM


Social3_BonusDays_demo_July0716_NA


    hostess code graphic-monthly

jojopoints blog post footer

Read more

Celebrate Today Birthday Card

Posted on August 19, 2016August 17, 2016 by Josee

Hello! Happy Friday!

Today's card features the Celebrate Today stamp set and coordinating Balloon Framelits to make this fun 3D card! 

Celebrate Today Birthday Card

How To Make It: 

Score the 4 1/4" x 11” Very Vanilla card base at 5 1/2” and fold.

On a  2 3/8” x 5 1/2" piece of Very Vanilla cardstock stamp the basket from the Celebrate Today stamp set in Emerald Envy with basket bottom at approximately 4” from the top.

Glue this onto Emerald Envy cardstock mat and then onto Flirty Flamingo cardstock mat. Glue the triple mat centered onto card base.

Stamp sentiment in Emerald Envy ink onto smallest Very Vanilla piece 3 1/2” x 1 1/2” and trim into banner. Glue this onto Flirty Flamingo scrap and trim banner.

Take 2 3/4" strips of the Playful Palette Designer Series Paper and die cut 4 balloons using the Balloon Framelits. Fold balloons in half and glue together. Glue the 3-D balloon on top of the basket.

Using the Balloon Framelits, die cut 2 flag banner strips using opposite side of the Playful Palette Designer Series Paper and glue onto top of card.

Use Stampin’ Dimensionals to attach the sentiment.

Stamps: 

Celebrate Today (137138)

Paper: 

Very Vanilla (101650); Emerald Envy (141415); Flirty Flamingo (141416); Playful Palette Designer Series Paper Stack (141657)

Ink:

Emerald Envy (141396)

Other: 

Balloon Framelits (137362); Stampin’ Dimensionals (104430); SNAIL adhesive (104332); Big Shot (113439)

Enjoy your weekend!
Social3_BonusDays_demo_July0716_NA


    hostess code graphic-monthly

jojopoints blog post footer

Read more

Thoughtful Branches Christmas Card

Posted on August 18, 2016August 16, 2016 by Josee

Good Morning! 

I know, I know. How could I? How dare I? How could I possibly be thinking about Christmas in August?! Truthfully, I'm really not! lol! I am enjoying this heat and even the rain for as long as I can.  But, since the Thoughtful Branches bundle is only available until the end of August, I really wanted to show you how versatile it really is!! (AND…the Stampin' Up Holiday Catalogue is coming September 1st so you will start seeing more Christmas projects soon enough! As crafters you know we need to get an early start!! I'm curious actually, if you make Christmas cards, when do you start making yours? Let me know in the comments below!) 

thoughtful branches christmas

How To Make It: 

Score and fold the Whisper White Thick cardstock in half for the card base and layer with Real Red cardstock on top.

Stamp “Happy Wonderful Christmas” from the Wondrous Wreath stamp set in Real Red ink at bottom right corner of smaller piece of Whisper White cardstock and layer onto card base.

Die cut the Beautiful Branches Thinlit tree four times from Whisper White Thick cardstock scraps. Glue the layers together using the Fine Tip Glue Pen to make one thicker piece. Adhere to the card center.

Stamp the bird from Thoughtful Branches in Real Red on a scrap of Whisper White cardstock and die cut. Adhere to the tree with a Glue Dot.

On the inside of the card, stamp “Many Happy Moments. . .” and another bird.

Stamps: 

Thoughtful Branches (143539); Wondrous Wreath (135047)

Paper: 

Thick White Cardstock (140272); Real Red Cardstock (102482)

Ink:

Real Red Classic Stampin’ Pad (126949)

Other: 

Big Shot Machine (143263); Beautiful Branches Thinlits (143538), Fine Tip Glue Pen (138309), Mini Glue Dots (103683)

Thanks for stopping by! Have a wonderful day! 
Social3_BonusDays_demo_July0716_NA


    hostess code graphic-monthly

jojopoints blog post footer

Read more

Posts pagination

  • Previous
  • 1
  • …
  • 237
  • 238
  • 239
  • 240
  • 241
  • 242
  • 243
  • …
  • 587
  • Next

go to store

Promos

Paper Bouquet Kit

josee smuck

Josée Smuck

Stampin’ Up! Canada Demonstrator since 2002
Ottawa, ON, Canada
Contact me with questions!
Josee@StampingJo.com
(613) 831-2917

Current Catalogues

Annual Catalogue (May2024-April2025)Stampin' Up! Annual CatalogueView Catalogue-ENG | Shop Online
View Catalogue- FR

——————

Looking for something?

Get the news


Click HERE to download Jo-Jo’s FREE Sketches & Tips Guide

Updates

Receive NEXT-DAY updates by email:

Receive SAME DAY updates by subscribing in a reader:
Click to Subscribe in a reader

Recent Posts

  • Embrace the Journey April 11, 2025
  • For the Books April 8, 2025
  • Beautiful Birthday April 5, 2025
  • Happy Retirement April 2, 2025
  • Frame & Flowers March 28, 2025

Categories

Proud Member…

Inky_Divas800

The content of this blog is the sole responsibility of Josee Smuck as a Stampin’ Up! Independent Demonstrator.  The use of and content of classes, services or products offered is not endorsed by Stampin’ Up! Unless otherwise indicated, images © Stampin’ Up! 1990 – present.

© 2025 Hand Stamped Cards with Josee Smuck-Stampin' Up! Canada Demonstrator | Powered by Superbs Personal Blog theme