Skip to content

Hand Stamped Cards with Josee Smuck-Stampin' Up! Canada Demonstrator

Stampin' Up! Canada Demonstrator; Rubber Stamps & Supplies for Cardmaking & Scrapbooking in Stittsville, Ontario (near Ottawa)

Menu
  • Home
  • JO JO POINTS
  • **Join**
  • Monthly Craft Kit
  • Weekly News
  • Shop Now
  • Contact Me
Menu
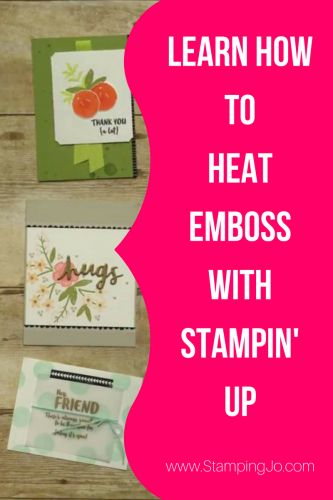
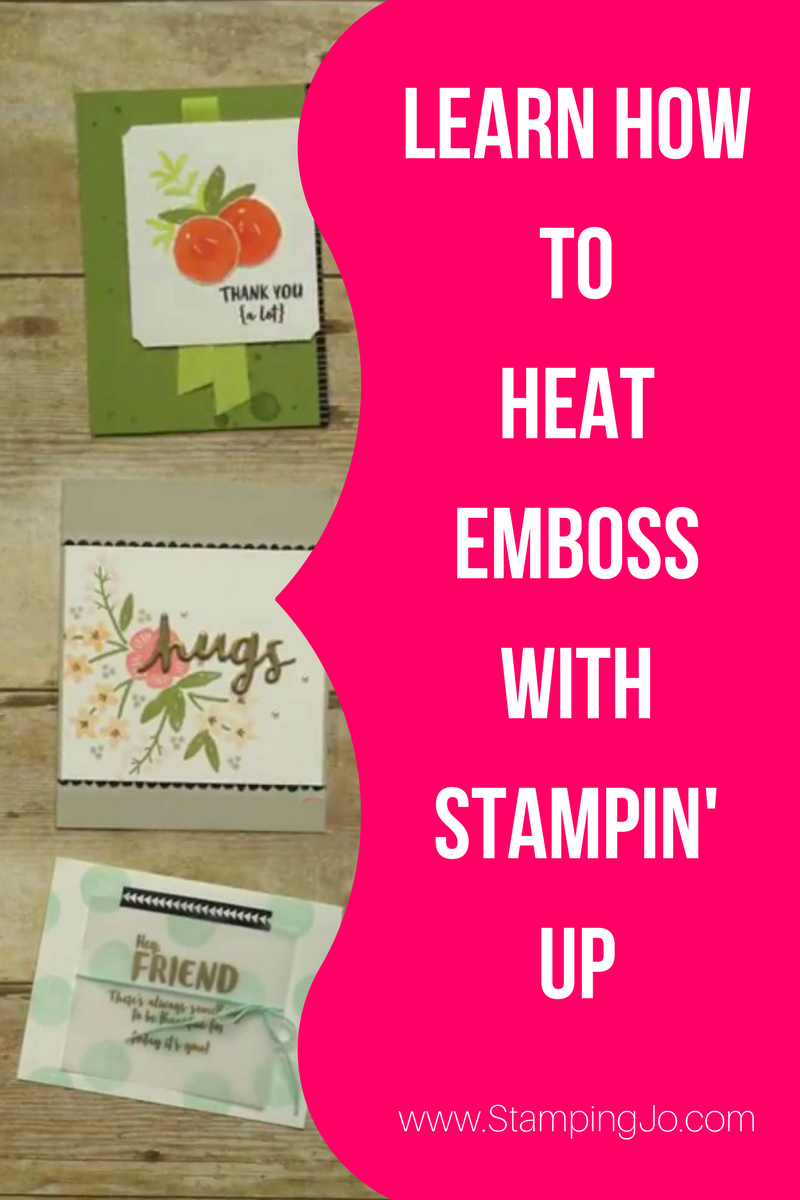
Learn how to heat emboss on your hand stamped cards using Stampin' Up papercrafting products!

Learn How to Heat Emboss on your Cards

Posted on July 25, 2017July 21, 2017 by Josee

Learn how to heat emboss on your hand stamped cards using Stampin' Up papercrafting products!Have you tried to Heat Emboss on your cards? If you haven't, maybe you feel a little intimidated by the process or just don't know where to start? Or don't know the difference between heat embossing and dry embossing (ie: using the Big Shot and Embossing Folders)? Check out this video from Stampin' Up that shows you how to heat emboss with Stampin' Up Embossing Powders and Heat Tool. I think you will fall in love with this technique!

Great Tips from This Video on how to Heat Emboss:

→To create the splotches, you'll take an Aqua Painter filled with water, and just drop a few dribbles of water on there. Then you'll take your Clear Embossing Powder and pour it over the water. 

→You'll want to hold the Heat Tool up high enough that you don't scorch your paper and you'll want to move the Heat Tool back and forth to keep the heat moving.

→You can get any color of embossing powder by using our ink pads and clear powder. So you'll want to make sure that the ink pad you're working with is nice and juicy.

→You can heat emboss on vellum.

→The Stampin' Up Heat Tool comes with two settings. And it has a low setting, so that you can emboss on delicate papers like vellum and keeps small die cuts from blowing away.

→VersaMark is great for heat embossing because it stays tacky for longer, so you have plenty of time to pour your powder on. 

→The circle used to make the orange from the Orange Blossom stamp set can be stamped on the background to make the little polka dots.

→Use Gold or Silver Embossing Powder to create a faux metal.

→Die cut the Lovely Words Thinlits and use Paper Snips to cut out and use just the die cut word.

→Use two pieces of scrap paper: One is for inking up your image and the other is for pouring on your powder.

→Use a pair of household tweezers to help lift your die cuts out of the powder.

Supplies used for these heat embossed cards: 

Orange Blossom stamp set, Aqua Painter, Clear Embossing Powder, Heat Tool, Vellum Cardstock, Versamark Ink, Lovely Words Thinlits, Big Shot, Paper Snips, Gold Embossing Powder


QUICK LINKS: 

FREE GIFT Essentials Pack– When You Join My Team in July!

NEW! 2017-2018 ANNUAL CATALOGUE– Download the PDF version or check out the new products in store

NEW! MEMORIES AND MORE and PLANNER KIT product line- check them out here!

CLEARANCE RACK– Save up to 60% —NEW products added!!

JO JO POINTS– Earn free stamps with my Jo Jo Points Program    

NEW to STAMPIN' UP? Check out my tips here.
Read more

Full of Love Shaker card

Posted on July 20, 2017July 20, 2017 by Josee

Sharing Sweet Thoughts set from Stampin Up- proceeds from the purchase of this stamp set benefit RMHC!I just love the fun bright colors of today's shaker card!  I used the Sharing Sweet Thoughts stamp set and coordinating Everyday Jar Framelits dies from Stampin' Up's NEW 2017-2018 Annual Catalogue. Of course, I had to add a fun, textured background with the new Embossing Paste and Pattern Party Decorative Mask too.

Learn to make this cute glitter filled shaker card using Stampin Up's Sharing Sweet Thoughts stamp set and Everyday Jar Framelits dies. Add a fun background with the embossing paste and Pattern Party Decorative Masks.

How To Make This Hand Stamped Card:

Start this card with a card base of Peekaboo Peach cardstock. Then you can cut a layer of Whisper White and Melon Mambo cardstock to layer on top of the cardbase.

To Create the Fun Embossed Background:

On the Melon Mambo layer, lay the small diamond Pattern Party Decorative Masks and hold in place with some washi tape or a post-it note. Begin adding some Embossing Paste with a Palette Knive. See the video here on how to do this. Allow the Embossing Paste to dry and then assemble the Whisper White and Melon Mambo layers, adhering with SNAIL Adhesive. Add the Peekaboo Peach 5/8" Crinkled Seam Binding Ribbon wrapped around the layers (adhered to the back of the Whisper White layer) and tied on front. Adhere these layers to the card base.

To Create the Jar Shaker:

Start with some pieces of Whisper White cardstock. Stamp the jar image from the Sharing Sweet Thoughts stamp set twice.

On the background stamped jar you will stamp the butterflies and hearts from the Sharing Sweet Thoughts stamp set and color them in using the Peekaboo Peach and Melon Mambo Stampin' Pads and an Aqua Painter. (You can check out my watercoloring techniques here).

Learn to make this cute glitter filled shaker card using Stampin Up's Sharing Sweet Thoughts stamp set and Everyday Jar Framelits dies. Add a fun background with the embossing paste and Pattern Party Decorative Masks.

Next, you will die cut the two stamped jars using the matching Everyday Jar Framelits Dies– using the proper sized die to cut the inside of the top jar image. You will also die cut a jar shape from the Window Sheet– which you will then stamp the greeting 'Full of Love For You' from the Sharing Sweet Thoughts stamp set with Basic Black Archival Ink and then carefully set it with the Heat Tool so it does not smudge.

Start to assemble to jar by adhering the Window Sheet jar to the top frame jar with a light strip of Fine Tip Glue Pen, (allow it to dry) and then laying the Foam Adhesive Strips along the edge of the inside of this jar layer making sure not to leave any gaps. Add a small bit of Dazzling Diamonds Stampin' Glitter to the bottom stamped jar and then peel off the Foam Adhesive Strips and add it to the stamped jar bottom sandwiching the glitter between the layers. (Try not to get glitter on the adhesive!)

Then, stamp the jar lid using Peekaboo Peach ink and die cut it using the matching Everyday Jar Framelit– this will be adhered to the jar front using some Mini Glue Dots or the Fine Tip Glue Pen.

Finally, use a few small strips of Tear & Tape Adhesive to add the 3d jar to the cardfront.

Stampin' Up Stamps:

Sharing Sweet Thoughts stamp set

Stampin' Up Paper:

Peekaboo Peach cardstock, Melon Mambo cardstock, Whisper White cardstock, Window Sheet

Stampin' Up Ink:

Basic Black Archival, Peekaboo Peach Stampin' Pad, Melon Mambo Stampin' Pad

Other Stampin' Up Supplies and Tools:

Everyday Jar Framelits dies, Foam Adhesive Strips, Embossing Paste, Palette Knives, Pattern Party Decorative Masks, Peekaboo Peach 5/8" Crinkled Seam Binding Ribbon, AquaPainter, Dazzling Diamonds Stampin' Glitter, Heat Tool, Fine Tip Glue Pen, Tear & Tape Adhesive

Thanks for stopping by today! Next time you sit down to stamp, give making a shaker card a try!


QUICK LINKS: 

FREE GIFT Essentials Pack– When You Join My Team in July!

NEW! 2017-2018 ANNUAL CATALOGUE– Download the PDF version or check out the new products in store

NEW! MEMORIES AND MORE and PLANNER KIT product line- check them out here!

CLEARANCE RACK– Save up to 60% —NEW products added!!

JO JO POINTS– Earn free stamps with my Jo Jo Points Program    

NEW to STAMPIN' UP? Check out my tips here.

Read more

Coffee Break Designer Series Paper

Posted on July 18, 2017July 12, 2017 by Josee

I had a little fun with today's card. I never really think of using our Designer Series Papers to create the card bases for my cards but I was having a little trouble cutting into this Coffee Break Designer Series Paper! The designs on the paper are so cute, and they are double sided so I just couldn't decide which side of the paper I wanted to use- so I came up a way to use both! This stamped thank you card also uses the Coffee Cafe stamp set and Coffee Cups Framelits from Stampin' Up's NEW 2017-2018 Annual Catalogue. You can see the other cards I made here.

Hand stamped thank you card using Stampin Up Coffee Cafe stamp set and Coffee Break Designer Series Paper.

How To Make This Hand Stamped Thank You Card:

The first thing to do is to cut the Coffee Break Designer Series Paper to 4.25"x11" and score at 5.5".

Next, cut the Whisper White cardstock to 3.75"x 5", stamp the hearts from the Coffee Cafe stamp set in Pear Pizzazz ink and then adhere the sheet to the inside of the card. The smaller insert size allows the gorgeous paper to show around the edges. This will be the perfect spot to add your hand written personal message too.

Inside of Coffee Break stamped thank you card using Stampin Up products.

Then, die cut the Crumb Cake cardstock with the largest oval Stitched Shape Framelit.

To make the coffee cup:

The next step is to make the coffee cup. On some scrap pieces of Whisper White cardstock you will stamp the following, all from the Coffee Cafe stamp set:

  • →Stamp the wood grain cup with Early Espresso ink
  • →The greeting 'Thanks A Latte' with Early Espresso ink
  • →Stamp the cup lid with Pear Pizzazz ink

Then, die cut all the cup pieces with their matching die from the Coffee Cups Framelits dies, also die cutting a piece of Pear Pizzazz cardstock with the cup sleeve die.

Finally, assemble all the coffee cup pieces to the Crumb Cake oval die cut using SNAIL Adhesive, add the greeting oval with some Stampin' Dimensionals. Adhere the oval ensemble to the cardfront using SNAIL Adhesive.

Stamped thank you card using Stampin Up Coffee Cafe stamp set and Coffee Break Designer Series Paper

Stampin' Up Stamps:

Coffee Cafe stamp set

Stampin' Up Paper:

Coffee Break Designer Series Paper, Whisper White cardstock, Pear Pizzazz cardstock, Crumb Cake Cardstock

Stampin' Up Ink:

Pear Pizzazz Stampin' Pad, Early Espresso Stampin' Pad,

Other Stampin' Up Supplies and Tools:

Coffee Cups Framelits, Stitched Shape Framelits, Stampin' Dimensionals, SNAIL Adhesive

I hope you enjoyed today's hand stamped thank you card using the new Coffee Cafe stamp set and Coffee Break Designer Series Paper! Don't forget when you buy in July, you get Bonus Days Coupons to spend in August! Get the full details here.


QUICK LINKS: 

FREE GIFT Essentials Pack– When You Join My Team in July!

NEW! 2017-2018 ANNUAL CATALOGUE– Download the PDF version or check out the new products in store

NEW! MEMORIES AND MORE and PLANNER KIT product line- check them out here!

CLEARANCE RACK– Save up to 60% —NEW products added!!

JO JO POINTS– Earn free stamps with my Jo Jo Points Program    

NEW to STAMPIN' UP? Check out my tips here.

Read more
Create amazing texture on your handmade stamped cards using Stampin' Up's new Embossing Paste. Get more card ideas and purchase stamp supplies at www.StampingJo.com

Embossing Paste Glitter Medallion

Posted on July 13, 2017July 6, 2017 by Josee

If you follow me on Facebook, you may have noticed me posting quite a bit about the new Embossing Paste, now available in Stampin' Up's NEW 2017-2018 Annual Catalogue. I just love the texture embossing paste gives and as you will see on this card, adding some Stampin' Glitter to it before it dries adds another dimension to it! Here are some of the card ideas using Embossing Paste I created so far:

Create amazing texture on your handmade stamped cards using Stampin' Up's new Embossing Paste. Get more card ideas and purchase stamp supplies at www.StampingJo.com

The Embossing Paste is super simple to use, but if you are new to it, check out how to use it here on this blog post. Today, I will be showing you this simple but gorgeous Glitter Medallion I created using the Pattern Party Decorative Masks.

How To Make This Hand Stamped Glitter Embossing Paste Card:

Start with a card base of Thick Whisper White cardstock.

Take the Pattern Party Decorative Mask of your choice- there are 4 in the package, I chose to use the Medallion for this card. Lay the mask on the card front where you would like your design to be. Use some washi tape or even a post-it note to hold it in place on your work surface. Then take the Embossing Paste and a Palette Knife and spread the paste over the mask working it into all the mask openings. Carefully pull the mask off and clean off the palette knife. I like to scrape the excess back into the jar and then clean the palette knife before it dries.  Sprinkle some Dazzling Diamonds Stampin' Glitter all over the medallion and allow it to dry while you create the greeting.

Label Me Pretty stamp set and Pretty Label Punch, card idea using Embossing Paste, Stampin UpCreate the greeting:

Stamp the lovely label design from the Label Me Pretty stamp set with Basic Gray Archival ink onto the Powder Pink cardstock and punch it out using the Pretty Label Punch.

Then stamp the round greeting from the Label Me Pretty stamp set on Whisper White cardstock with the Basic Gray ink and punch it out using the 1 3/4" Circle Punch. Adhere the punched circle onto the Powder Pink label with Stampin' Dimensionals.

When the card base is dry, you can start assembling the card. Wrap some Silver 1/8" Ribbon around the card front and then adhere the greeting label on top of that using more Stampin' Dimensionals.

Stampin' Up Stamps:

Label Me Pretty stamp set

Stampin' Up Paper:

Thick Whisper White cardstock, Powder Pink cardstock, Whisper White cardstock

Stampin' Up Ink:

Basic Grey Archival ink

Other Stampin' Up Supplies and Tools:

Pretty Label Punch, Embossing Paste, Pattern Party Decorative Masks, Palette Knives, Dazzling Diamonds Stampin' Glitter, Silver 1/8" Ribbon, 1 3/4" Circle Punch, Stampin' Dimensionals

You will love playing with the Embossing Paste! Give it a try! Make sure you come back to check out my instructions for the other cards I made using the embossing paste – I will be sharing that over the next few weeks!


QUICK LINKS: 

FREE GIFT Essentials Pack– When You Join My Team in July!

NEW! 2017-2018 ANNUAL CATALOGUE– Download the PDF version or check out the new products in store

NEW! MEMORIES AND MORE and PLANNER KIT product line- check them out here!

CLEARANCE RACK– Save up to 60% —NEW products added!!

JO JO POINTS– Earn free stamps with my Jo Jo Points Program    

NEW to STAMPIN' UP? Check out my tips here.

Read more

Life Happens, Coffee Helps

Posted on July 11, 2017July 12, 2017 by Josee

I sat down to play with the new Coffee Cafe stamp set and Coffee Cups Framelits Dies and have decided that I am totally in LOVE with this bundle!! I had so much much fun coming up with different ways to use the Coffee Cafe Bundle. You will find this money saving bundle on page 31 of Stampin' Up's NEW 2017-2018 Annual Catalogue.

Here is a peek at all the cards I made so far:

Get your creative and coffee fix in one with the Coffee Cafe bundle from Stampin Up, www.StampingJo.com

Today, I will show you how I made this iced coffee card :

Get your coffee fix with the Coffee Cafe stamp set and matching Coffee Cups Framelits from Stampin Up, StampingJo.com

How To Make This Hand Stamped Card:

Start this card with a base of Soft Sky cardstock. Then, take the Coffee Break Designer Series Paper and cut the coffee stained one as a larger background and cut a few smaller strips using both sides of the paper as you wish. Adhere all the patterned papers on the card base one layered on top of the previous one.

Using the Stitched Shape Framelits and the Big Shot, cut two nesting circles out of Whisper White cardstock. On the inside circle, use Berry Burst ink to stamp the little hearts from the Coffee Cafe stamp set.

Use the Decorative Ribbon Punch to cut a fancy strip of Whisper White to layer in between the two die cut circles. Adhere all the pieces to the card front using SNAIL Adhesive and the Fine Tip Glue Pen for the punched trim.

For the Iced Coffee Cup

Start by stamping the following stamps, all from the Coffee Cafe stamp set:

  • →the straw with Soft Sky ink on Whisper White
  • →the cup with Basic Black ink on a Window Sheet and on Soft Suede cardstock; stamp the ice cubes with Basic Black ink on the Window sheet cup
  • →the whipped topping with Soft Suede ink on Whisper White cardstock
  • →the cup top with Basic Black Archival ink on Vellum Cardstock
  • →the greeting with Basic Black ink on Vellum cardstock

Use the Heat Tool to carefully set the ink on the Vellum and Window Sheets– just make sure not to melt them 🙂 Then, you will die cut all the stamped pieces with their matching dies from the Coffee Cup Framelits dies.

Now it's time to put the iced coffee cup together:

Before gluing the cup pieces together, use the Heat Tool and shape the Window Sheet cup die cut to curve it a bit. Then, use the Fine Tip Glue Pen to adhere all the pieces together in order stamped as above, layering the straw in between the Soft Suede die cut and Window Sheet die cut, but under the whipped topping.

Note: The Fine Tip Glue pen did smudge some of the ink on the whipped topping and can be seen under the window sheet cutout which works well to make the coffee cup seem real, but definitely something to keep in mind for other projects.

Once all the cup pieces are dry, add Stampin' Dimensionals to the back of the cup, doubling up the dimensionals in the middle to allow the curve to remain on the cup front.

That's it! Now you've got this fun card you can give to a coffee loving friend!

Stampin' Up Stamps:

Coffee Cafe stamp set (SAVE 10% with the Coffee Cafe Bundle)

Stampin' Up Paper:

Soft Sky cardstock, Coffee Break Designer Series Paper, Whisper White cardstock, Soft Suede cardstock, Vellum cardstock, Window Sheets

Stampin' Up Ink:

Basic Black Archival ink, Berry Burst ink, Soft Sky ink, Soft Suede ink

Other Stampin' Up Supplies and Tools:

Coffee Cup Framelits Dies (or get the bundle!), Stitched Shape Framelits, Decorative Border Ribbon Punch, Stampin' Dimensionals, Fine Tip Glue Pen, SNAIL Adhesive, Heat Tool

Thanks for stopping by to check out today's hand stamped card using the Coffee Cafe Bundle. Come back soon, as I will be showing you how I made the other two cards shown above using the new Embossing Paste and the Designer Series Paper as the cardbase over the next few weeks!

In the meantime, if you love the look of these cards and would love to make these too, you can purchase the Coffee Cafe Bundle from my store.


QUICK LINKS: 

FREE GIFT Essentials Pack– When You Join My Team in July!

NEW! 2017-2018 ANNUAL CATALOGUE– Download the PDF version or check out the new products in store

NEW! MEMORIES AND MORE and PLANNER KIT product line- check them out here!

CLEARANCE RACK– Save up to 60% —NEW products added!!

JO JO POINTS– Earn free stamps with my Jo Jo Points Program    

NEW to STAMPIN' UP? Check out my tips here.

Read more

Posts pagination

  • Previous
  • 1
  • …
  • 191
  • 192
  • 193
  • 194
  • 195
  • 196
  • 197
  • …
  • 587
  • Next

go to store

Promos

Paper Bouquet Kit

josee smuck

Josée Smuck

Stampin’ Up! Canada Demonstrator since 2002
Ottawa, ON, Canada
Contact me with questions!
Josee@StampingJo.com
(613) 831-2917

Current Catalogues

Annual Catalogue (May2024-April2025)Stampin' Up! Annual CatalogueView Catalogue-ENG | Shop Online
View Catalogue- FR

——————

Looking for something?

Get the news


Click HERE to download Jo-Jo’s FREE Sketches & Tips Guide

Updates

Receive NEXT-DAY updates by email:

Receive SAME DAY updates by subscribing in a reader:
Click to Subscribe in a reader

Recent Posts

  • Embrace the Journey April 11, 2025
  • For the Books April 8, 2025
  • Beautiful Birthday April 5, 2025
  • Happy Retirement April 2, 2025
  • Frame & Flowers March 28, 2025

Categories

Proud Member…

Inky_Divas800

The content of this blog is the sole responsibility of Josee Smuck as a Stampin’ Up! Independent Demonstrator.  The use of and content of classes, services or products offered is not endorsed by Stampin’ Up! Unless otherwise indicated, images © Stampin’ Up! 1990 – present.

© 2025 Hand Stamped Cards with Josee Smuck-Stampin' Up! Canada Demonstrator | Powered by Superbs Personal Blog theme