Skip to content

Hand Stamped Cards with Josee Smuck-Stampin' Up! Canada Demonstrator

Stampin' Up! Canada Demonstrator; Rubber Stamps & Supplies for Cardmaking & Scrapbooking in Stittsville, Ontario (near Ottawa)

Menu
  • Home
  • JO JO POINTS
  • **Join**
  • Monthly Craft Kit
  • Weekly News
  • Shop Now
  • Contact Me
Menu
Cheers to the Year stamp set, wedding card, Champagne Foil, Year of Cheer Designer Series Paper

Cheers to the Year Wedding Card

Posted on September 26, 2017October 13, 2017 by Josee

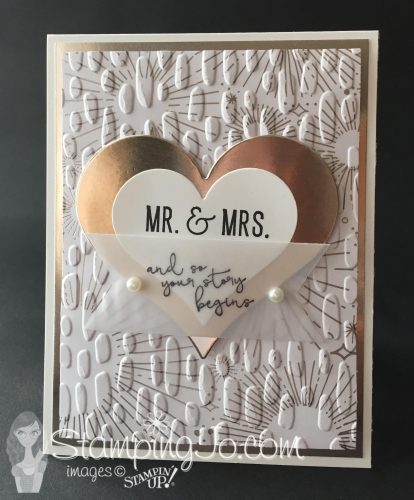
If you visit here often, you may know I love a good, versatile stamp set. A stamp set that can be used for several occasions is a great bang for your buck! The new Cheers to the Year stamp set from the 2017 Holiday Catalogue is one of those stamp sets.  Here I used the stamp set and some of the products from the Year of Cheer Suite to create this gorgeous stamped wedding card!
Cheers to the Year stamp set, wedding card, Champagne Foil, Year of Cheer Designer Series Paper

How To Make This Hand Made Wedding Card:

This card starts with a base of Thick Whisper White cardstock. Then a piece of Champagne Foil sheet was cut to fit on top.

The Year of Cheer Designer Series Paper was cut to mat on top of the Champagne Foil Sheet, but first it was run through the Big Shot in the Sweetheart Textured Impressions Embossing Folder– making sure to keep the heart centered. This embossed layer was adhered to the Champagne layer with Stampin’ Dimensionals and then added to the cardfront.

Then, the Sweet & Sassy Framelits were used to cut a piece of Champagne Foil sheet to the create the large heart and a piece of Whisper White cardstock to fit on top with a smaller heart die.

The Mr & Mrs from the Cheers to the Year stamp set was then stamped in Basic Black ink in the Whisper White heart. Cheers to the Year stamp set, wedding card, Champagne Foil, Year of Cheer Designer Series Paper

On a strip of Vellum Cardstock, the supporting greeting was stamped with Basic Black ink and heat set with the Heat Tool so it wouldn’t smudge.  Then, the ends were cut with the Triple Banner Punch.

The hearts were adhered to the debossed heart on the cardfront with Stampin’ Dimensionals. The vellum was laid over top with some Mini Glue Dots that were then hidden under some Pearls Basics Jewels.

Cheers to the Year stamp set, wedding card, Champagne Foil, Year of Cheer Designer Series Paper

Stampin’ Up Stamps:

Cheers to the Year stamp set

Stampin’ Up Paper:

Thick Whisper White, Whisper White, Year of Cheer Designer Series Paper and Champagne Foil (from Year of Cheer Suite, page 36 of 2017 Holiday catalogue), Vellum cardstock,

Stampin’ Up Ink:

Basic Black

Other Stampin’ Up Supplies and Tools:

Sweetheart Textured Impressions Embossing Folder, Big Shot, Sweet & Sassy Framelits, Triple Banner Punch, Pearls Basics Jewels, Stampin’ Dimensionals, Mini Glue Dots, Heat Tool


QUICK LINKS:

[su_button url=”http://su-media.s3.amazonaws.com/media/catalogs/2017%20Holiday%20Catalog/Holiday%20Catalogs/20170614_Holiday17_en-CA.pdf ” target=”blank” style=”stroked” background=”#ff0066″ size=”4″ center=”yes” icon=”icon: book”]Download the 2017 Holiday Catalogue[/su_button]

NEW! 2017-2018 ANNUAL CATALOGUE– Download the PDF version or check out the new products in store

CLEARANCE RACK– Save up to 60%

JO JO POINTS– Earn free stamps with my Jo Jo Points Program

NEW to STAMPIN’ UP? Check out my tips here.

Save

Save

Save

Save

Save

Save

Save

Save

Save

Save

Read more
Painted Harvest, Mini Pizza Box, mini stamped cards

Painted Harvest Mini Pizza Box Card Set

Posted on September 21, 2017September 18, 2017 by Josee

If you have not had a thorough look through the new 2017 Holiday Catalogue, you may have missed seeing these super cute Mini Pizza Boxes! There are so many ways to use them and of course you can decorate them any way you like as they come as a blank canvas! I had a chance to sit down and make a few different versions of these pizza boxes and today’s project is one of them- a super simple way to use Designer Series Papers to create a lovely mini card gift set.


Painted Harvest, Mini Pizza Box, mini stamped cards

How To Make This Hand Made Card Set:

To make this project you will need a 3″x12″ strip of Painted Autumn Designer Series Paper and one sheet of Whisper White cardstock, and some scrap pieces of Lemon Lime Twist cardstock. You will also want the new Mini Envelopes to fit inside the Mini Pizza Box!

First thing, the Whisper White cardstock was cut to make 3 x 3″x6″ strips, which were scored and folded to create 3 x 3″ mini cards. You can fit more cards in this box, but I wanted to keep this project simple.

My goal with this project was to use what I had in front of me to create some quick matching cards to go in this box. Since I had used a piece of the Painted Autumn Designer Series Paper for the cover of the box, I used what was left over from the strip I had cut to finish off the cards inside the box.

Painted Harvest, Mini Pizza Box

I also used what was left of the Whisper White cardstock to finish off the box front and cards. I stamped the leaves from the Painted Harvest stamp set in Lemon Lime Twist and then in Garden Green ink- then punched them with the Leaf Punch.

I used the Whisper White pieces to stamp the greetings from the Painted Harvest stamp sets and since I wanted to add a few birthday cards to the card set, I used the Tabs for Everything stamp set too. I used the Classic Label Punch and the Pretty Label Punch to punch out the greetings.

Painted Harvest, Mini Pizza Box, mini stamped cards

The Happy Birthday card also uses the Pretty Label punch, but I turned the punch around and only used one side to punch out the tiny greeting.

I had some Lemon Lime Twist cardstock scraps, so I punched them with the Decorative Ribbon Border Punch and Classic Label punch to add some accents to the cards.

All the cards were put together and put into the Mini Envelopes to gift together inside the Mini Pizza Box.

All ready for gift giving! A perfect little hostess gift for Thanksgiving or any other fall gathering, or even just as a little thank you gift.

Stampin’ Up Stamps:

Painted Harvest stamp set, Tabs for Everything stamp set

Stampin’ Up Paper:

Painted Autumn Designer Series Paper, Whisper White cardstock, Lemon Lime Twist cardstock

Stampin’ Up Ink:

Early Espresso ink, Lemon Lime Twist ink, Garden Green ink, Crushed Curry ink

Other Stampin’ Up Supplies and Tools:

Mini Pizza Box, Whisper White Mini Envelopes-3″, Decorative Ribbon Border Punch, Pretty Label Punch, Leaf Punch, Classic Label Punch, Burlap Ribbon


QUICK LINKS:

[su_button url=”http://su-media.s3.amazonaws.com/media/catalogs/2017%20Holiday%20Catalog/Holiday%20Catalogs/20170614_Holiday17_en-CA.pdf ” target=”blank” style=”stroked” background=”#ff0066″ size=”4″ center=”yes” icon=”icon: book”]Download the 2017 Holiday Catalogue[/su_button]

NEW! 2017-2018 ANNUAL CATALOGUE– Download the PDF version or check out the new products in store

NEW! MEMORIES AND MORE and PLANNER KIT product line- check them out here!

CLEARANCE RACK– Save up to 60%

JO JO POINTS– Earn free stamps with my Jo Jo Points Program

NEW to STAMPIN’ UP? Check out my tips here.

Save

Save

Save

Save

Save

Save

Save

Read more
Handmade gift bags using Designer Series Papers from Stampin' Up

Large Hostess Gift Bag

Posted on September 19, 2017September 12, 2017 by Josee

On Friday I showed you a great, easy project to create a small and tall gift bag– perfect for a small bottle, pillar candle or lots of little goodies. I loved that gift bag, but admittedly it was a bit small for a regular bottle of wine, and since it was created from one full sheet of Designer Series Paper, how could I make it bigger? Well, there was the challenge! So, I had to figure it out!

Handmade gift bags using Designer Series Papers from Stampin' Up


How To Make This Large Gift Bag:

First off, this gift bag is going to need 2 and a half sheets of Designer Series Papers (12″x12″ size)- I used the Lemon Lime Twist colored Fresh Florals Designer Series Paper Stack.  Keep one sheet uncut, and cut the other two sheets in half- 6″x12″- you will be using 3 of these 4 cuts. You can use the leftover sheet to create some cards!

The bag was created larger than the original by adhering the 3 half sheets to the full sheet to create one larger sheet- so, take your Tear and Tape Adhesive and add a long strip to one side of the 12″x12″ sheet. Adhere one of the 6″x12″ sheets lengthwise, overlapping the edge about an inch.

Next, score your fold lines. This is where it will create a larger gift bag.

Score each fold at 4.25″– to make this easier with the long piece, I scored the first score line, folded it over and lined up the folded edge with the scoring tool to score the next line at 4.25″ again, and continued this for all the folds. Score the two 6″x12″ sheets as well, there will be larger sections ‘leftover’ but that’s okay.

Then, add a long strip of Tear and Tape Adhesive to the bottom of the large, now very long edge of the paper and add the next 6″x12″ sheet lining up the folds.

Now, this is where it gets tricky. You will need to fill a gap in the paper where we extended it, that’s where the next 6″x12″ piece comes in. You will want to add Tear and Tape Adhesive to the bottom edge of the added strip, and then add the last strip to the bottom of the large sheet overlapping the paper- I overlapped where the section was smaller to ensure I had two 4.25″ sections remaining- you can cut the overlap if you prefer but since it’s not going to show I didn’t worry about it.

Turn the large sheet 90 degrees to score the bottom fold– this will be scored at 4.25″ along the bottom edge so you will want to turn the sheet around to use the score tool, or just use a long ruler to guide your fold.

Use some scissors to cut the slits at the bottom- these will become the bottom of the bag. You can use some scissors to cut off the excess piece that will now be hanging over the edge of the large sheet of paper- as you can see I didn’t worry about it being the same size as the first sheet as it will be hidden. Add Tear and Tape Adhesive to the edges where the gift bag will be assembled.

Assemble the bag, peeling of the adhesive and creating the bag. I start with the long edge and then do the bottom sections.

Pinch the top of the bag just like we did for the small gift bag. For this version of the gift bag, I used a 1/2″ Circle Punch to punch two holes at the top of the bag for the ribbon to thread through. You may find the punch won’t punch through the 4 paper layers the folded top creates, so just press as hard as you can to create a mark with the punch, then go back and punch each layer individually following the marks you created as a guide.

Add your bottle of choice- this bag now fits a 750ml bottle and add some Lemon Lime Twist Finely Woven Ribbon and tie it. Add the tag, which was stamped with the Tags & Trimmings stamp set and punched with the Scallop Tag Topper Punch. Tie the ribbon in a bow.

Note: Be careful carrying this bag! Although the adhesive and paper is sturdy, it may not fully hold a bottle of wine if carried from the top- always carry holding the bottom! Don’t want any spilled wine!

Stampin’ Up Stamps:

Tags & Trimmings stamp set, Painted Harvest Stamp Set (both from 2017 Holiday Catalogue)

Stampin’ Up Paper:

Fresh Florals Designer Series Paper (for large gift bag), Painted Autumn Designer Series Paper (for small gift bag), Whisper White cardstock

Stampin’ Up Ink:

Lemon Lime Twist and Basic Black (for large gift bag tag), Peekaboo Peach, Tangerine Tango & Early Espresso (for the small gift bag tag)

Other Stampin’ Up Supplies and Tools:

Burlap Ribbon, Lemon Lime Twist Finely Woven Ribbon, 1/2″ circle punch, Scallop Tag Topper Punch, Simply Scored Scoring Tool, stapler, scissors


QUICK LINKS:

[su_button url=”http://su-media.s3.amazonaws.com/media/catalogs/2017%20Holiday%20Catalog/Holiday%20Catalogs/20170614_Holiday17_en-CA.pdf ” target=”blank” style=”stroked” background=”#ff0066″ size=”4″ center=”yes” icon=”icon: book”]Download the 2017 Holiday Catalogue[/su_button]

NEW! 2017-2018 ANNUAL CATALOGUE– Download the PDF version or check out the new products in store

NEW! MEMORIES AND MORE and PLANNER KIT product line- check them out here!

CLEARANCE RACK– Save up to 60%

JO JO POINTS– Earn free stamps with my Jo Jo Points Program

NEW to STAMPIN’ UP? Check out my tips here.

Save

Save

Save

Save

Save

Save

Read more

Small Hostess Gift Bag

Posted on September 14, 2017September 12, 2017 by Josee

Today’s project is a fun and easy gift bag you can create to give a hostess gift, or any other occasion you might be gifting a small bottle- be it a favorite wine, fancy olive oil or flavored vinegar or this bag will also fit a pillar candle or lots of little goodies too. 🙂  This handmade gift bag uses the new Painted Autumn Designer Series Paper and the Half Full stamp set from Stampin’ Up’s 2017 Holiday Catalogue. A great project to keep in mind for your Thanksgiving hostess!

Hostess Gift, Bottle Bag, Handmade Gift Packaging, Stampin Up, Painted Autumn Designer Series Paper, Half Full stamp set

Note: This gift bag will be 2 3/4″ wide, small to fit a small bottle about 300ml- think short and thin.  Check your bottle size to ensure it will fit. Since I was curious, I came up with a way to make a larger version of this gift bag, so come back here on Tuesday for the instructions for the larger version of this bag!

How To Make This Gift Bag:

Start with a full sheet of Painted Autumn Designer Series Paper. Along one edge of paper, score at 2-3/4”, 5-1/2”, 8-1/4”, and 11”. Then, turn the sheet 90 degrees and score at 2-3/4” for the bottom.

Follow the diagram below to cut all score lines from the bottom edge to the bottom score mark; cut away the small rectangle that will be left on the edge.

Apply Tear & Tape Adhesive to the flap and form the paper into the gift bag/box shape; use Tear & Tape Adhesive to fold up the bottom pieces.

Squeeze the top to a milk box-like shape and hold it together with a Gold Binder Clip. (You can insert your favorite bottle here before clipping it)

To Make the Tag:

On a strip of 3″x2″ Very Vanilla cardstock, stamp the wine tag from the Half Full stamp set with Basic Black ink and color it in with the Garden Green and Cherry Cobbler Stampin’ Write markers

Punch the stamped strip with Scallop Tag Topper punch.

Then, thread the Very Vanilla Lace Trim through the hole in scallop top of the tag and tie in a bow. Use a Stampin’ Dimensional to attach to the Gold Binder Clip holding the bag closed.

Stampin’ Up Stamps:

Stamp Sets – Half Full (wood: 144996, clear: 144999)

Stampin’ Up Paper:

Very Vanilla Card Stock (101650), Painted Autumn Designer Series Paper (DSP) (144613)

Stampin’ Up Ink:

Garden Green and Cherry Cobbler Stampin’ Write Markers from the Regal Collection (131262), Basic Black Archival Stampin’ Pad (140931)

Other Stampin’ Up Supplies and Tools:

Scallop Tag Topper Punch (133324); Very Vanilla Lace Trim (141672); Gold Binder Clips (141673); Simply Scored Scoring Tool (122334); Tear & Tape (138995); Stampin’ Dimensionals (104430)


QUICK LINKS:

[su_button url=”http://su-media.s3.amazonaws.com/media/catalogs/2017%20Holiday%20Catalog/Holiday%20Catalogs/20170614_Holiday17_en-CA.pdf ” target=”blank” style=”stroked” background=”#ff0066″ size=”4″ center=”yes” icon=”icon: book”]Download the 2017 Holiday Catalogue[/su_button]

NEW! 2017-2018 ANNUAL CATALOGUE– Download the PDF version or check out the new products in store

NEW! MEMORIES AND MORE and PLANNER KIT product line- check them out here!

CLEARANCE RACK– Save up to 60%

JO JO POINTS– Earn free stamps with my Jo Jo Points Program

NEW to STAMPIN’ UP? Check out my tips here.

Save

Save

Save

Save

Save

Save

Save

Save

Save

Save

Save

Read more
Confetti Celebration stamp set, Birthday card

Confetti Celebration Birthday Card

Posted on September 12, 2017September 6, 2017 by Josee

I needed a masculine birthday card a few weeks ago, so I created this one using the Confetti Celebration stamp set from Stampin’ Up’s 2017-2018 Annual Catalogue.

Confetti Celebration stamp set, Birthday card

How To Make This Hand Stamped Card:

This card started with a base of Tempting Turquoise cardstock.

I then took some Watercolor Paper and wet it with my Aqua Painter. I then squeezed the lids of my ink pads: I used Tempting Turquoise, Wild Wasabi and Pumpkin Pie inks- and used the Aqua Painter to pick up the ink that pooled in the lid (see the technique here) and dropped the ink onto the wet paper and spread it around and blended it, being careful not to let the colors mix too much or they would get muddy!

Next, the watercolor paper was dried using the Heat Tool to speed things up so I could get to the next step. 🙂  The lights from the Confetti Celebration stamp set were stamped with Memento Tuxedo Black Ink and then colored in using a Wild Wasabi Stampin’ Write Marker.

The balloons from the Confetti Celebration stamp set were stamped with Tempting Turquoise ink and Pumpkin Pie ink. The watercolor paper was then adhered to the card base.

To create the greeting:

The Happy Birthday greeting from the Confetti Celebration stamp set was stamped on Whisper White using the Memento Tuxedo Black ink and the letters were colored in using Tempting Turquoise, Pumpkin Pie and Wild Wasabi Stampin’ Write Markers. Then, it was punched out using the Pretty Label Punch.

To create the mat layer for the greeting, I punched some Pumpkin Pie cardstock with the Pretty Label Punch, cut the punch out in half and adhered it to the back of the stamped greeting.

Finally, the greeting was added to the cardfront with Stampin’ Dimensionals.

Stampin’ Up Stamps:

Confetti Celebration stamp set

Stampin’ Up Paper:

Tempting Turquoise cardstock, Watercolor Paper, Whisper White, Pumpkin Pie

Stampin’ Up Ink:

Tempting Turquoise Stampin’ Pad & Stampin’ Write Marker, Pumpkin Pie Stampin’ Pad & Stampin’ Write Marker, Wild Wasabi Stampin’ Pad & Stampin’ Write Marker, Memento Tuxedo Black Ink Pad

Other Stampin’ Up Supplies and Tools:

Pretty Label Punch, Stampin’ Dimensionals, Heat Tool, AquaPainter


QUICK LINKS:

[su_button url=”http://su-media.s3.amazonaws.com/media/catalogs/2017%20Holiday%20Catalog/Holiday%20Catalogs/20170614_Holiday17_en-CA.pdf ” target=”blank” style=”stroked” background=”#ff0066″ size=”4″ center=”yes” icon=”icon: book”]Download the 2017 Holiday Catalogue[/su_button]

NEW! 2017-2018 ANNUAL CATALOGUE– Download the PDF version or check out the new products in store

NEW! MEMORIES AND MORE and PLANNER KIT product line- check them out here!

CLEARANCE RACK– Save up to 60%

JO JO POINTS– Earn free stamps with my Jo Jo Points Program

NEW to STAMPIN’ UP? Check out my tips here.

Save

Save

Save

Save

Save

Save

Save

Read more

Posts pagination

  • Previous
  • 1
  • …
  • 187
  • 188
  • 189
  • 190
  • 191
  • 192
  • 193
  • …
  • 587
  • Next

go to store

Promos

Paper Bouquet Kit

josee smuck

Josée Smuck

Stampin’ Up! Canada Demonstrator since 2002
Ottawa, ON, Canada
Contact me with questions!
Josee@StampingJo.com
(613) 831-2917

Current Catalogues

Annual Catalogue (May2024-April2025)Stampin' Up! Annual CatalogueView Catalogue-ENG | Shop Online
View Catalogue- FR

——————

Looking for something?

Get the news


Click HERE to download Jo-Jo’s FREE Sketches & Tips Guide

Updates

Receive NEXT-DAY updates by email:

Receive SAME DAY updates by subscribing in a reader:
Click to Subscribe in a reader

Recent Posts

  • Embrace the Journey April 11, 2025
  • For the Books April 8, 2025
  • Beautiful Birthday April 5, 2025
  • Happy Retirement April 2, 2025
  • Frame & Flowers March 28, 2025

Categories

Proud Member…

Inky_Divas800

The content of this blog is the sole responsibility of Josee Smuck as a Stampin’ Up! Independent Demonstrator.  The use of and content of classes, services or products offered is not endorsed by Stampin’ Up! Unless otherwise indicated, images © Stampin’ Up! 1990 – present.

© 2025 Hand Stamped Cards with Josee Smuck-Stampin' Up! Canada Demonstrator | Powered by Superbs Personal Blog theme