Skip to content
Hand Stamped Cards with Josee Smuck-Stampin' Up! Canada Demonstrator
Menu
  • Home
  • JO JO POINTS
  • **Join**
  • Monthly Craft Kit
  • Weekly News
  • Shop Now
  • Contact Me
Menu

Blog

Many Mittens Framelits Mini Pizza Box

Posted on November 14, 2017November 20, 2017 by Josee

Today I’ve got another Mini Pizza Box gift box to show you. In case you missed the last one I made, check it out here.

How To Make This Christmas Gift Box:

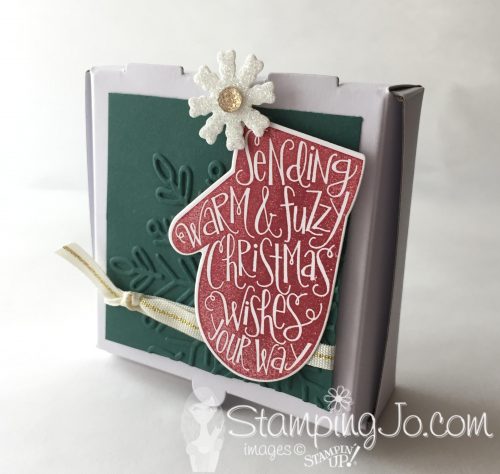
Cut the Berry Burst cardstock to fit the Mini Pizza Box top. Then cut a piece of Vellum cardstock to fit on top- run the Vellum through the Big Shot in the Polka Dot Basics Textured Impressions Embossing Folder. Attach the vellum to the Berry Burst layer with Mini Glue Dots in the areas where you will be adhering the other elements- I hid the glue dots under the ribbon, mitten and snowflake 🙂 Add ribbon to the layers and add to the box top with Tear & Tape Adhesive.

Die cut the mitten using the Many Mittens Framelits and Powder Pink cardstock. Add to the box top using Mini Glue Dots.

With Berry Burst ink, stamp the snowflake and tag using the stamps from the Smitten Mitten stamp set and then die cut with the matching dies from the Many Mittens Framelits dies. Adhere to the box top using Stampin’ Dimensionals for the snowflake and a Mini Glue Dot for the tag.

Stampin’ Up Stamps:  (click on item #’s to see product!)

Smitten Mitten Bundle (stamp set + framelits) #146070

Stampin’ Up Paper:

Berry Burst cardstock #144243, Powder Pink cardstock #144244, Vellum cardstock #101856, Whisper White cardstock #100730

Stampin’ Up Ink:

Berry Burst ink #144083

Other Stampin’ Up Supplies and Tools:

Berry Burst Crinkled Seam Binding Ribbon #144191, Mini Pizza Boxes #144645, Polka Dot Basics Textured Impressions Embossing Folder #143709, Mini Glue Dots #103683, Tear & Tape Adhesive #138995, Stampin’ Dimensionals #104430


NOVEMBER HOSTESS CODE FOR SHOPPING >> YMMSRVMY<<


QUICK LINKS:

  1. SHOP FOR PRODUCTS ONLINE
  2. WEEKLY NEWSLETTER & TUTORIALS: Sign up for my newsletter to get updates, specials & card ideas!
  3. STAMPIN’ BLENDS: New Product Alert!!! Coloring made easy!
  4. JO JO POINTS: Earn free stamps with my VIP reward program!
  5. New to Stampin’ Up? Check out my STAMPING 101 TIPS here!
  6. CLEARANCE RACK: Save up to 60% on great products!

Save

Save

Save

Save

Read more

Introducing the STAMPARATUS: a new way to stamp!

Posted on November 13, 2017November 13, 2017 by Josee

I love NEW TOOLS…don’t you?! Stampin’ Up! has just introduced a new tool that is going to fly off the shelves! I can hardly wait to get mine!

If you love things to be perfecly lined up OR struggle to get a nice bold impression…YOU WILL WANT THIS TOO!

This great tool  will help you get crisp, clean stamped images; plus, you can make multiple projects in minutes— all with an accuracy and consistency that makes stamping easier than ever before!!

Don’t take my word for it…check out this GREAT video that’ll show you how it works!

You’ll be able to RESERVE YOURS starting November 16th, but, you want to act FAST as reservation quantities are WHILE SUPPLIES LAST. 
If you want to get ahead and you don’t have one yet…you can create your CUSTOMER PROFILE HERE. 

Why do YOU need one? You’ll fall in love with stamping all over again when you learn everything you can do with it!

  • – You’ll be able to make multiples of the same project with ease
  • – You’ll consistently stamp crisp, clean images
  • – If you want a darker impression, apply more ink and restamp—no need to start over as it’ll stamp in the exact same spot again
  • – You’ll make fewer mistakes, saving time and money
  • – You’ll easily create 2-step, 3-step, and 4-step stamped images using reversible plates
  • – You’ll get to create new and specialized stamping techniques with adjustable stamping plates and precision placement


Q&A

  1. How do I get one?
    Stampin’ Up! has created a new RESERVATION SYSTEM for this amazing product as they know it’ll sell out! The reservation system acts like a true preorder: you reserve your spot and they’ll guarantee shipment as soon as the product arrives in our warehouse. They’ll be able to avoid backorders and be able to adequately manage inventory.
  2.  Will I be billed at time of reservation?
    No, your credit card number will reserve your product, but, you will only be charged when the product ships from Stampin’ Up!
  3. What if I change my mind after my reservation?
    No problem! You can change your reservation at anytime.

So, who’s excited??


NOVEMBER HOSTESS CODE FOR SHOPPING >> YMMSRVMY<<


QUICK LINKS:

  1. SHOP FOR PRODUCTS ONLINE
  2. WEEKLY NEWSLETTER & TUTORIALS: Sign up for my newsletter to get updates, specials & card ideas!
  3. STAMPIN’ BLENDS: New Product Alert!!! Coloring made easy!
  4. JO JO POINTS: Earn free stamps with my VIP reward program!
  5. New to Stampin’ Up? Check out my STAMPING 101 TIPS here!
  6. CLEARANCE RACK: Save up to 60% on great products!

Save

Read more

Emboss Resist Birthday Card

Posted on November 10, 2017November 13, 2017 by Josee

I thought I would show you this fun and colorful birthday card today. This card was created using the emboss resist technique on Glossy Cardstock with the Playful Backgrounds stamp set.

How To Make This Emboss Resist Card:

Start with a card base of Pool Party cardstock and set it aside.

Cut some Glossy Cardstock and cut to fit the cardfront. Stamp the circles all over the glossy background using the Playful Backgrounds stamp set in Versamark ink– then add Clear Stampin’ Emboss Powder and melt with the Heat Tool.

Using the Sponge Brayer, roll some Berry Burst and Peekaboo Peach ink over the embossed background and wipe off any excess with a tissue.

Add some Peekaboo Peach Crinkled Seam Binding to this layer and adhere to the cardbase with Tear & Tape Adhesive.

On Whisper White cardstock, stamp the Playful Backgrounds solid circles with Peekaboo Peach ink and then die cut with the Lots of Labels Framelits dies. Die cut a mat layer for the greeting with Pool Party cardstock and the next size label die.

Adhere the die cuts together and add to the cardfront using Stampin’ Dimensionals.

As a final touch, add some Glitter Enamel Dots around the greeting for some lovely sparkle!

Stampin’ Up Stamps:

Playful Backgrounds stamp set #141920, Cool Treats stamp set #142982 (for the greeting)

Stampin’ Up Paper:

Pool Party cardstock #122924, Whisper White cardstock #100730, Glossy cardstock #144240

Stampin’ Up Ink:

Berry Burst ink #144083, Peekaboo Peach ink #141398, Basic Black #140931, Versamark #102283

Other Stampin’ Up Supplies and Tools:

Peekaboo Peach Crinkled Seam Binding #144192, Clear Embossing Powder #109130, Heat Tool #129053, Glitter Enamel Dots #144200 , Sponge Brayer #141714, Lots of Labels Framelits dies #138281, Stampin’ Dimensionals #104430, Tear & Tape Adhesive #138995


NOVEMBER HOSTESS CODE FOR SHOPPING >> YMMSRVMY<<


QUICK LINKS:

  1. SHOP FOR PRODUCTS ONLINE
  2. WEEKLY NEWSLETTER & TUTORIALS: Sign up for my newsletter to get updates, specials & card ideas!
  3. STAMPIN’ BLENDS: New Product Alert!!! Coloring made easy!
  4. JO JO POINTS: Earn free stamps with my VIP reward program!
  5. New to Stampin’ Up? Check out my STAMPING 101 TIPS here!
  6. CLEARANCE RACK: Save up to 60% on great products!

Save

Save

Save

Save

Read more

Heartfelt Sympathy Card for my Uncle

Posted on November 9, 2017November 9, 2017 by Josee

At the beginning of this summer, I re-united with some of my family members. It is a long complicated explanation, but, in short…my biological father was very dysfunctional and I chose to stop talking to him about 25 years ago so and stop causing myself pain by staying in touch with him. In doing so, I lost touch with my 7 aunts and uncles on his side and 2 half brothers. I hated losing touch with his side of the family, but, I could not stay away from him while keeping in contact with the others.

A few months ago, I came across the fact that he passed away in 2015. While I was sad that he passed, because he is a person, I DID NOT feel sad for me as I really never had an emotional connection to him.

His passing gave me emotional permission to reach out to my family on his side though and I have found great joy in reconnecting with them.

I know…too much information, maybe…but I just wanted to share. Before we get onto today’s card, I hope it’s ok to show you a couple photos of some of my family.

Recently, my uncle J-G’s wife passed away of cancer and I wanted to make him a special card. I had met her when I was young, but, had the privilege to see her again this summer. She was such a ray of sunshine and I really wouldn’t of know anything was wrong with her if my uncle had not told me.

I know how special she was to him and I cannot imagine how hard it must be for him. 🙁

How To Make This Hand Stamped Card:

Cut the Chocolate Chip Cardstock to 5 1/2 x 8 1/2″ and fold and score at the 4 1/4″ mark.

Cut a piece of Soft Suede Cardstock to 2 1/2 x 3 1/2″ and stamp the greeting from Heartfelt Sympathy stamp set in Versamark on to the cardstock. Sprinkle with Gold Embossing powder and heat set with Embossing Tool. When layer has cooled off, take versamark ink pad and drag it across the cardstock piece to create a textured look.

Take background card and drag your versamark across it as well. Cut a piece of Wood Textures Designer Paper Stack to 2 1/2 x 5 1/2″ and adhere to center of card. Cut a piece of Sahara Sand cardstock an 1/8″ bigger and adhere embossed layer to it.

Taker layer and add dimensionals to back and then add to card.

Stampin’ Up Stamps:

Heartfelt Sympathy #138764 (photopolymer)

Stampin’ Up Paper:

Chocolate Cardstock #102128, Sahara Sand Cardstock #121043, Wood Textures Designer Paper Stack #144177

Stampin’ Up Ink:

Versamark #102283

Other Stampin’ Up Supplies and Tools:

Gold Embossing Powder #109129, Heat Tool #129053, Dimensionals #104430, SNAIL Adhesive #104332


NOVEMBER HOSTESS CODE FOR SHOPPING >> YMMSRVMY<<


QUICK LINKS:

  1. SHOP FOR PRODUCTS ONLINE
  2. WEEKLY NEWSLETTER & TUTORIALS: Sign up for my newsletter to get updates, specials & card ideas!
  3. STAMPIN’ BLENDS: New Product Alert!!! Coloring made easy!
  4. JO JO POINTS: Earn free stamps with my VIP reward program!
  5. New to Stampin’ Up? Check out my STAMPING 101 TIPS here!
  6. CLEARANCE RACK: Save up to 60% on great products!

Save

Read more

Smitten Mitten Gift Box

Posted on November 7, 2017October 23, 2017 by Josee

Today’s project is another cute Mini Pizza Box decorated for Christmas gift giving! This gift box is a quick and easy way to give a small gift, like a locket or bracelet, treats or other small items.

Mini Pizza Box, Christmas Gift Box, Gift Packaging, Stampin Up

How To Make This Hand Stamped Gift Box:

Cut the Tranquil Tide cardstock to size (about 3″square) and run through the Big Shot in the Winter Wonder Textured Impressions Embossing Folder. Add some Gold Natural Trim around the embossed paper and adhere to the Mini Pizza Box with Tear & Tape Adhesive.

Stamp the mitten greeting from the Smitten Mitten stamp set and then die cut with the Many Mittens Framelits dies. Adhere the mitten die cut to the front of the Mini Pizza Box with Stampin’ Dimensionals.

Die cut the Dazzling Diamonds Glimmer Paper using the snowflake die from the Many Mittens Framelits dies and add a Gold Faceted Gem to the center. Add the embellishment to the box front with a couple of Stampin’ Dimensionals.

Stampin’ Up Stamps:

Smitten Mitten stamp set

Stampin’ Up Paper:

Tranquil Tide cardstock, Whisper White cardstock, Dazzling Diamonds Glimmer Paper

Stampin’ Up Ink:

Cherry Cobbler ink pad

Other Stampin’ Up Supplies and Tools:

Mini Pizza Boxes,Winter Wonder Textured Impressions Embossing Folder, Many Mittens Framelits, Gold Faceted Gems, Gold Natural Trim, Tear & Tape Adhesive and Stampin’ Dimensionals


QUICK LINKS:

[su_button url=”http://su-media.s3.amazonaws.com/media/catalogs/2017%20Holiday%20Catalog/Holiday%20Catalogs/20170614_Holiday17_en-CA.pdf ” target=”blank” style=”stroked” background=”#ff0066″ size=”4″ center=”yes” icon=”icon: book”]Download the 2017 Holiday Catalogue[/su_button]

2017-2018 ANNUAL CATALOGUE– Download the PDF version or check out the new products in store

CLEARANCE RACK– Save up to 60%

JO JO POINTS– Earn free stamps with my Jo Jo Points Program

NEW to STAMPIN’ UP? Check out my tips here.

Save

Save

Save

Save

Save

Read more

Posts pagination

  • Previous
  • 1
  • …
  • 183
  • 184
  • 185
  • 186
  • 187
  • 188
  • 189
  • …
  • 587
  • Next

go to store