Skip to content

Hand Stamped Cards with Josee Smuck-Stampin' Up! Canada Demonstrator

Stampin' Up! Canada Demonstrator; Rubber Stamps & Supplies for Cardmaking & Scrapbooking in Stittsville, Ontario (near Ottawa)

Menu
  • Home
  • JO JO POINTS
  • **Join**
  • Monthly Craft Kit
  • Weekly News
  • Shop Now
  • Contact Me
Menu

Author: Josee

Jar of Love Gift Package

Posted on August 3, 2016July 28, 2016 by Josee

Hello!

Before I show you today's project, in case you missed it, I wanted to let you know that Stampin' Up not only released the new Thoughtful Branches bundle yesterday, but also a great new stamp set called I Stamped This, now available to order! 

I Stamped This, Stampin UpI Stamped This, Stampin Up

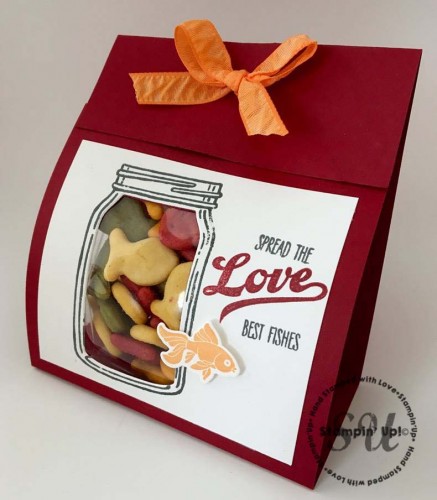
Now, onto the fun project I have to show you today! This super cute packaging uses the Jar of Love stamp set and the Everyday Jars Framelits to create a window to show a peek of the package contents!

Jar of Love, Stampin Up

How To Make It: 

Start with the Cherry Cobbler cardstock cut to 4” x 11” and scored at 1-1/2”, 5-1/2” and 7-1/4”

With Basic Gray ink, stamp the large jar from Jar of Love onto the left side of the Whisper White card stock (3-1/2” x 3”).

Stamp the word LOVE from Jar of Love in Cherry Cobbler ink to the right side of the jar image and add other words in Basic Gray ink.

Stamp the fish from Jar of Love inside the jar image in Peekaboo Peach (vertically- see hint below).

Lay the scored Cherry Cobbler Cardstock with largest area at the top. Adhere the Whisper White stamped layer (framed closest to the score line~ leaving more room at the top) using Fast Fuse.

Use the “inside jar” framelit from Everyday Jars Framelits to cut through both layers, leaving a window in your jar. HINT: You should be able to cut out the goldfish at the same time if you stamped him vertically!

Fill the 3×6 Cellophane Gusseted bag halfway with fish crackers. Fold top down and use the Handheld Stapler to staple each side.

Insert bag into cardstock pouch, folding 1-1/2” scored edge over the top. Staple the 8" piece of Peekaboo Peach Ruched Ribbon to the top edge of the pouch (through all four layers: ribbon, cardstock, cello bag and cardstock= creating a “matchbook” pouch)

Tuck the front of pouch (with the jar) under the top (stapled) edge to close.

Tie the bow. Add the fish cutout to the front with Stampin' Dimensionals.

Stamps: 

Jar of Love (141587)

Paper: 

Cherry Cobbler (119685); Whisper White (100730)

Ink:

Cherry Cobbler (126966); Peekaboo Peach (141398); Basic Gray (140932)

Other: 

Peekaboo Peach Rusched Ribbon (141427); Big Shot (143263); Everyday Jars Framelits (141490); 3×6 Gusseted Cellophane Bags (141704); Handheld Stapler (139083), Simply Scored (122334) ~OR~ Stampin’ Trimmer (126889); Stampin’ Dimensionals (104430); Fast Fuse adhesive (129026); Goldfish crackers

I hope you love today's project as much as I do! Have a wonderful day! Social3_BonusDays_demo_July0716_NA


    hostess code graphic-monthly

jojopoints blog post footer

Read more

Thoughtful Branches & Bonus Days Redemption

Posted on August 2, 2016July 25, 2016 by Josee

Good Morning!

Social3_BonusDays_demo_July0716_NA

Today is the first day that you can redeem your July Bonus Days Coupons!! And, you can use it on this Limited Time Bundle: Thoughtful Branches and Beautiful Branches Thinlits Dies!

Thoughtful Branches, Stampin Up

How To Make It: 

Start with a cardbase of Crumb Cake cut to 4 ¼ x 8 ½" and scored at 2 ¾"

Stamp the leaf image from Thoughtful Branches randomly on Very Vanilla piece (3 ½ x 4) using Garden Green, Cherry Cobbler (Stamped Off) and Crushed Curry.

Stamp the leaves again in Garden Green and Cherry Cobbler (Stamped Off) on a scrap piece of Very Vanilla. Cut out with Beautiful Branches Thinlits Dies.

Stamp the sentiment in Memento Tuxedo Black Ink on Vellum Cardstock. Immediately cover with Clear Embossing Powder and heat set using the Heat Tool.

Assemble the layers of Crushed Curry: 3 ¾ x 4 ¼ , Cherry Cobbler: 3 5/8 x 4 1/8 , Very Vanilla: 3 ½ x 4  and Vellum Cardstock: 3 ½ x 4.

Use the Fine-Tip Glue Pen to adhere to the Vellum cardstock to the Very Vanilla piece. Use Stampin’ Dimensionals on leaves and Crushed Curry piece.

Stamps: 

Thoughtful Branches #143539

Paper: 

Crumb Cake #120953, Crushed Curry #131199, Cherry Cobbler #119685, Very Vanilla #101650, Vellum Cardstock #101856

Ink:

Memento Tuxedo Black Ink Pad #132708, Garden Green #126973, Cherry Cobbler #126966, Crushed Curry #131173

Other: 

Beautiful Branches Thinlits Dies #143538, Heat Tool #129053, Clear Embossing Powder #109130, 5/8” Burlap Ribbon #141487, Linen Thread #104199, Fine-Tip Glue Pen #138309, Stampin’ Dimensionals #104430, SNAIL Adhesive #104332

Thanks for stopping by the blog today!  su blog signature


    hostess code graphic-monthly

jojopoints blog post footer

Read more

My Crafty Friends Monday: Flourishing Phrases & Flourish Thinlits Dies

Posted on August 1, 2016August 1, 2016 by Josee

Welcome to "My Crafty Friends Monday!" 

NEW! 2016-2017 Annual Catalogue Edition

My Crafty Friends Monday-NEW-SMI hope you enjoyed a great weekend! Each Monday, I like to feature different projects that have inspired me and I know they'll inspire you too!
 
Each project was created by different & amazingly talented stampers- make sure you check out their blogs for more details and to check out their other amazing projects!!
(**Note…don't worry- I've contacted each of these stampers and allowed them to decline if they choose.) 
 

This week's featured stamp set is Flourishing Phrases (141531 wood, 141534 clear mount) and the coordinated must have- the Flourish Thinlits Dies (141478). This stamp set is also available in French! 

Bundle and SAVE! Wood Mount bundle (142322) or clear mount bundle (142323). 


Katina Martinez: her blog

flourishing phrases by Katina martinez

I love this look of the White on the Crumb Cake and the pop of color is perfect!


Julia Quinn: her blog

flourishing phrases by Julia Quinn

This is so pretty with the watercolor effect and the delicate die cuts.


Sarah Schueler: her blog

flourishing phrases-Sarah Schueler

The blue and gold here is a lovely combination!


Sacha van de Kerkhof: her blog

SAM_3136 stampin up stampin sacha jaarcatalogus 2016-2017 flourishing phrases blooms & bliss dsp verjaardagskaart schudkaart metallics sequin assortment

This is lovely as a shaker card!


Lyssa Griffin Zwolanek: her blog

flourishing phrases by Lyssa Griffin Zwolanek

The white die cuts on the white background is amazing! 


Valerie Moody: her blog

stampin-up-flourishing-phrases-stamp-review-crew-valerie-moody-independent-stampin-up-demonstrator-x

Both versions of this card are wonderful! 


Kelly Kent: her blog

src-flourishing-phrases by Kelly Kent

This easle card and candle are gorgeous!


Love these ideas? You can purchase this stamp set through my ONLINE STORE! 

I hope you've enjoyed this week's "My Crafty Friends Monday" Make sure you visit the talented artist's featured on this post! Thanks for stopping by today!

Were you featured here? Here's a badge you can add to your blog!
My Crafty Friends Monday-featured-NEW-SM


su blog signature

     hostess code graphic-monthly 

jojopoints blog post footer

Read more

Crazy About You Birthday Card

Posted on July 29, 2016July 20, 2016 by Josee

Good day! 

Just a reminder! July 31st is the last day to get your BONUS DAYS COUPONS! 

I've got another card today using the Hello You Thinlits and the Crazy About You stamp set! The colors on this card are great colors for a summer birthday card!

crazy about you, stampin up


How To Make It: 

Stamp the leaves from Crazy About You with Cucumber Crush onto the 4” x 5-1/4” Whisper White panel as shown. Stamp the flower with the scallops onto that same card base as shown using Crushed Curry ink.

Stamp the flower that fits the Flower Medallion Punch with Watermelon Wonder ink onto the scrap of Whisper White card stock. Punch out with the Flower Medallion Punch. Adhere as shown using Stampin' Dimensionals.

Use the Banner Triple Punch to punch each end of the 1” x 6-1/4” Whisper White Panel. Adhere to the card as shown using Stampin' Dimensionals at the ends.

Stamp “birthday” under the banner as shown using Tuxedo Black ink.

Use the Big Shot Machine to cut out the “Happy” with the Hello You Thinlits. Adhere to the banner as shown.

Stamps: 

Crazy About You: Wood# 138856, Clear Mount #138859, Photopolymer #137137

Paper: 

Cucumber Crush #138335, Whisper White #100730

Ink:

Memento Tuxedo Black #132708, Cucumber Crush #138324, Crushed Curry #`131173, Watermelon Wonder #138323

Other: 

Big Shot #113439, Hello You Thinlits #137363, Flower Medallion Punch #137417, Banner Triple Punch #138292, Stampin’ Dimensionals #104430, SNAIL #104332

Have a great day!
Social2_BonusDays_demo_July0716_CA


    hostess code graphic

jojopoints blog post footer

Read more

Scenic Sayings Thank You Card

Posted on July 28, 2016July 20, 2016 by Josee

Good Morning!

Before I show you today's card, I just wanted to remind you that you only have a few more days to get your Bonus Days Coupons! Every $60 you spend gets you $6 to spend in August! 

Social2_BonusDays_demo_July0716_CA

Now, today's card is a fun way to use the Scenic Sayings stamp set and Playful Palette Designer Series Paper to create a quick and easy card! 

Scenic Sayings and Playful Palette DSP, Stampin Up

How To Make It: 

Fold Peekaboo Peach cardstock in half to form card base then run the card base through Big Shot using Large Polka Dot Textured Impresssions Embossing Folder.

Punch each end of Playful Palette Designer Series Paper (1 3/4” x 5”) using the Banner Triple punch. Adhere to the card front.

Stamp the sentiment from Scenic Sayings onto Very Vanilla cardstock using Memento Black ink, then color in the letters using Peekaboo Peach Stampin’ Write Marker. Adhere to the card front.

Stamp the sentiment again onto Very Vanilla card stock using Sweet Sugarplum ink. Fussy cut the banner out to pop it out from the main sentiment. Add to card front as shown using Stampin' Dimensionals.

Add a Rhinestones Basic Jewel to each end of the banner.

Add Playful Palette Washi tape to top left and bottom right corners as shown.

Thread a sliver of Sweet Sugarplum card stock through Classy Designer Button. Add to card front using Mini Glue Dots.

Stamps: 

Scenic Sayings (141599w; 141602c)

Paper: 

Peekaboo Peach (141417); Very Vanilla (101650); Sweet Sugarplum (141418)

Ink:

Sweet Sugarplum (141395); Memento Tuxedo Black (132708)

Other: 

Big Shot (143263); Large Polka Dot TIEF (133739); Playful Palette Designer Series Paper Stock (141657); 2016-2018 Stampin’ Write Markers- Peekaboo Peach(141393); Banner Triple punch (138292);Playful Palette Washi Tape (141659); Classy Designer Buttons (138393);Rhinestone Basic Jewels (119246); Dimensionals (104430); Mini Glue Dots (103683)

Thanks for stopping by the blog today!  su blog signature


    hostess code graphic

jojopoints blog post footer

Read more

Posts pagination

  • Previous
  • 1
  • …
  • 240
  • 241
  • 242
  • 243
  • 244
  • 245
  • 246
  • …
  • 587
  • Next

go to store

Promos

Paper Bouquet Kit