Skip to content

Hand Stamped Cards with Josee Smuck-Stampin' Up! Canada Demonstrator

Stampin' Up! Canada Demonstrator; Rubber Stamps & Supplies for Cardmaking & Scrapbooking in Stittsville, Ontario (near Ottawa)

Menu
  • Home
  • JO JO POINTS
  • **Join**
  • Monthly Craft Kit
  • Weekly News
  • Shop Now
  • Contact Me
Menu

Author: Josee

Detailed Floral Thinlits Easter treat bag

Posted on March 15, 2017March 27, 2017 by Josee

Good Morning! Today's project is an Easter treat bag that uses the gorgeous Detailed Floral Thinlits to create lovely gift packaging. These dies really make this project so quick and easy to put together! By just switching up the stamped greeting and the treats inside the cello bag, this treat bag could be used for wedding favors or briday shower favors.


How To Make This Hand Stamped Easter Treat Bag:

I started out with a sheet of Blushing Bride cardstock cut to 8"x4"- I die cut each end of the sheet with the Detailed Floral Thinlits. This die cut job is much easier with the help of the Precision Plate and the Die Brush! After both ends were die cut, I scored fold lines just below each die cut to create a flat spot for the cello bag to sit in.

Then I die cut a piece of Whisper White cardstock with the Lots of Labels Framelits and scored it down the middle of the long side to create the bag topper.

With Blushing Bride ink I stamped the filigree from the Designer Tin of Cards stamp set and then stamped the Easter greeting from the Suite Sentiments stamp set in Smoky Slate ink.

Then the cellophane bag was filled with some chocolate easter eggs and adhered closed (or staple it). Place the filled cello bag inside the Detailed Floral Thinlit die cut piece, then add the bag topper with a strand of Smoky Slate Stitched Ribbon in the middle of the fold. Adhere the tag to the top of both sides of the Easter treat bag (or just staple it).

To finish it off, tie the ribbon in a bow.

The best part about this project is that these can easily be duplicated for multiple Easter treat bags! (or wedding or shower favors!)

Stampin' Up Stamps:

Suite Sentiments- 142968 wood, 142971 clear mount; Designer Tin of Cards- 141739 (Photopolymer)

Stampin' Up Paper:

Blushing Bride cardstock- 131198, Whisper White- 100730

Stampin' Up Ink:

Blushing Bride ink- 131172, Smoky Slate ink-131179

Other Papercrafting Supplies and Tools:

Detailed Floral Thinlits-141482, Lots of Labels Framelits- 138281, Smoky Slate Stitched Ribbon-141687, Gusseted Cellophane bags- 141704, Precision Plate-139684 , Die Brush-139684

Thanks for taking the time to stop by today! I hope you enjoyed today's Easter treat bag and will give it a try!


QUICK LINKS: 
2017 OCCASIONS CATALOGUE– NEW Spring Catty!! Check it out! Available January 4th to May 31st

SALE-A-BRATION– Choose a FREE Sale-A-Bration product with every $60 you spend before taxes and shipping! January 4th to March 31st! NEW freebies now available!

CLEARANCE RACK– Save up to 60%  

JO JO POINTS– Earn free stamps with my Jo Jo Points Program    

Read more

Gate Fold card using Foxy Friends Easter bunny

Posted on March 14, 2017March 10, 2017 by Josee

Good Morning! Over the next two weeks I am going to be sharing Easter cards and gift ideas with you to get you inspired and ready for Easter weekend. In case you missed it, I showed you this card on Friday. Today's card is super cute! I decided to make a gate fold card featuring the Foxy Friends bundle to make the Easter bunny- perfect for an Easter card.

How To Make This Hand Stamped Gate Fold Card:

I started this gate fold card with Blushing Bride cardstock for the card base. The cardstock was cut to 5 1/2" x 8 1/2" and then scored on each side at 2 1/8"- if you have a scoring tool like the Simply Scored Scoring Tool you may find it easier to make the score lines. Essentially you want to make sure the middle of the card is 4 1/4" wide so it fits a standard envelope.

Then I cut strips of Pear Pizzazz cardstock to cover the gate fold card on the card front. These pieces were 5 1/4" x 1 3/4" wide. Then, the strips were run through the Big Shot in the Large Polka Dot Textured Impressions Embossing Folder and adhered to the card front.

On the inside of the card, I added a Whisper White panel (4 x 5 1/4") and stamped the Easter sentiment from the Suite Sentiments stamp set from the 2017 Occasions catalogue.

Then, I built the Easter bunny with the Fox Builder Punch and Whisper White cardstock. Some of the punched pieces were cut using Paper Snips to create the shapes I wanted for the arms and the carrot. The ears were the fox's tail, using the coordinating stamp from the Foxy Friends stamp set and Blushing Bride ink to create the pink inside the ear.

The tail was punched using the Blossom Punch.

Gate fold card, Easter card idea, Foxy Friends and Fox Builder Punch bunny, Stampin Up

All the pieces were inked up along the edges using the Soft Suede Stampin' Write Marker and then adhered together using the Fine Tip Glue Pen and Mini Glue Dots. The face was stamped using the Foxy Friends stamp set.

A strip of Vellum Cardstock was cut about 10" x 2" and scored to make wrapping it around the cardfront easier. The ends were adhered at the front of the card so that the main focal point would be adhered on top to hide the glue.

The Whisper White scallop circle and Blushing Bride circle were die cut using the Layering Circles Framelits. Before adhering them together, the Blushing Bride circle was inked along the edges and the filigree was stamped using the Designer Tin of Cards stamp set. I had to shape the photopolymer stamp to get it more rounded to fit the circle. Gotta love photopolymer stamps!!

The circles were added to the vellum strip and then the Foxy Friends bunny was adhered on top.

As a final touch, I added a Subtles Enamel Shapes heart to be the bunny's nose and also used a black marker to make some buck teeth for him.

Gate fold card, Easter card idea, Foxy Friends and Fox Builder Punch bunny, Stampin Up

Stampin' Up Stamps:

Foxy Friends-141459 (Photopolymer), Designer Tin of Cards-141739 (Photopolymer), Suite Sentiments- 142968 wood, 142971 clear mount

Stampin' Up Paper:

Blushing Bride- 131198, Pear Pizzazz- 131201, Vellum Cardstock- 101856, Whisper White-100730, scraps of Pumpkin Pie and Old Olive cardstock for carrot

Stampin' Up Ink:

Blushing Bride-131172 , Pear Pizzazz-131180 , Memento Tuxedo Black-132708, Soft Suede Stampin' Write Marker-131261 (Neutrals Collection)

Other Stamp Supplies and Tools:

Fox Builder Punch-141470, Blossom Punch- 140612, Layered Circle Framelits- 141705, Subltes Enamel Shapes-141679, Large Polka Dot Textured Impressions Embossing Folder- 133739, Big Shot-143263, Simply Scored Scoring Tool-122334

I hope you have a wonderful day! I hope you enjoyed today's hand stamped Easter card!


blog-signature-spring

QUICK LINKS: 
2017 OCCASIONS CATALOGUE– NEW Spring Catty!! Check it out! Available January 4th to May 31st

SALE-A-BRATION– Choose a FREE Sale-A-Bration product with every $60 you spend before taxes and shipping! January 4th to March 31st! Only a few weeks left to get your freebies!

CLEARANCE RACK– Save up to 60%  

JO JO POINTS– Earn free stamps with my Jo Jo Points Program    

Read more
Kids craft ideas using Stampin Up products

My Crafty Friends Monday: March Break Kids Craft Ideas

Posted on March 13, 2017March 10, 2017 by Josee

My Crafty Friends Monday-NEW-SMEach Monday, I like to feature different projects that have inspired me and I know they'll inspire you too! This week is March Break here and we are spending the week at home, instead of on the beach somewhere warm! (At least that's where I think I should be! lol!) If you are home with your kids, this post is for you! I have found some great kids craft ideas you can do with your kids and your Stampin Up papercrafting supplies!

Each project I have to show you today was created by different & amazingly talented stampers that I have contacted to make sure they were okay with me sharing their projects.

Kids craft ideas using Stampin Up products

Create a Diorama or Shadow Box

There are some amazing dioramas and framed shadow boxes to show you. This would be a great project to do with the kids, or something older kids could do on their own. 

Juana Ambida created this gorgeous fairy shadow box using the Fairy Celebration stamp set: You can find out how she made this on her blog here.

Sue Vine created this wonderful frame using Foxy Friends: You can find the instructions for this one on her blog here.

This is a great way for them to use their imagination!


Make a pretty Princess Crown (or for your Prince)

I LOVE this gorgeous crown I found by Joanne Rogers (her blog):


Make a Paper Lantern

I love this paper lantern I found by Kathleen Rotti (her blog):


Make Punch Art

Let the kids get creative with your punches and die cuts and see what creations they come up with! Here are a few ideas to get them started:

Jacquii McLeay made this cute monster card (her blog):

Jo Weeden created these super cute Minions using the Owl Builder punch (her blog)!


Make Your Own Bookmarks

I like this cute idea by Kylie Bertucci (her blog): (some of the products used may no longer be available, but I think you will be inspired none the less!)

I have a few ideas I shared here and here.


Make St. Patrick's Day Treat Bags

I like this idea I found by Linda Kaufman here (her blog):


Let them make their own stamped cards!

Most kids love to color and get creative, why not let them use your stamps to make their own cards? They can use outline stamps and color away or use different shaped stamps to create their own designs.

Margriet Tournier made these cute cards (her blog):

I thought this one by Sue Vine was a great example of a simple card kids might like to color (her blog):


Do you love these stamped card ideas? You can get the supplies you need to create these kids craft ideas in my ONLINE STORE. During Sale-A-Bration choose one FREE product with every $60 you spend before taxes and shipping!

I hope this week's My Crafty Friends Monday has inspired you to dig into your stamp supplies and get crafting with your kids this week! I will be back the rest of the week with some Easter craft ideas to get you started on your Easter projects!


blog-signature-spring

QUICK LINKS: 
2017 OCCASIONS CATALOGUE– NEW Spring Catty!! Check it out! Available January 4th to May 31st

SALE-A-BRATION– Choose a FREE Sale-A-Bration product with every $60 you spend before taxes and shipping! January 4th to March 31st! New Sale-A-Bration products now available!

CLEARANCE RACK– Save up to 60%  

JO JO POINTS– Earn free stamps with my Jo Jo Points Program    

Read more

Stamped Easter Card using Blooms and Wishes

Posted on March 10, 2017March 21, 2017 by Josee

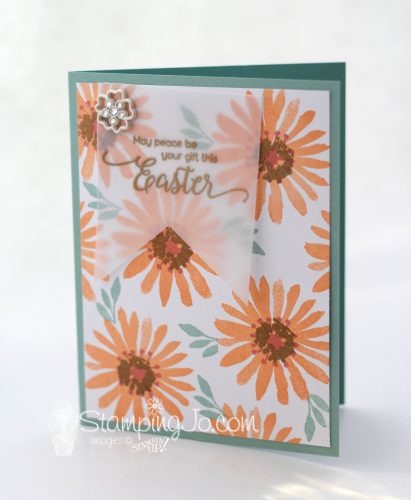
Hello! Today's card is a stamped Easter card that features the Blooms and Wishes stamp set from Stampin' Up's 2016-2017 Annual Catalogue as well as the Suite Sentiments stamp set from the 2017 Occasions Catalogue.

stamped Easter card, Blooms and Wishes, Suite Sentiments, Stampin Up

How To Make This Stamped Easter Card:

I started this card with a base of Mint Macaron cardstock.

Then on a layer of Whisper White, I used the flower stamp from the Blooms and Wishes stamp set to stamp the Peekaboo Peach flowers. In the middle of each flower, I stamped the stems in Sweet Sugarplum ink.

The leaves were stamped with Mint Macaron ink using a scrap of paper as a mask on the flowers so they would not get stamped on.

In the center of each flower, I stamped one of the flower middles using Versamark ink, then I sprinkled Gold Embossing Powder on them and then used the Heat Tool to melt the powder.  This layer was then adhered to the card base.

On a strip of Vellum cardstock, I stamped the Easter greeting from the Suite Sentiments stamp set using Versamark ink, and then also heat embossed that with the Gold Embossing powder. I used my Paper Snips to cut the end of the Vellum strip to look like a banner tip. The Vellum was adhered to the card using a Mini Glue Dot.

To finish off the card, the glue dot was then covered with one of the Falling In Love Embellishments adhered on top with a Mini Glue Dot.

Stampin' Up Stamps:

Blooms & Wishes- 141784 (Photopolymer); Suite Sentiments- 142968 Wood mount, 142971 clear mount)

Stampin' Up Paper:

Mint Macaron cardstock-138337 , Whisper White cardstock- 100730, Vellum Cardstock-101856

Stampin' Up Ink:

Mint Macaron-138326 , Peekaboo Peach-141398 , Sweet Sugarplum- 141395, Versamark-102283 (Versamark refill: 102193)

Other Papercrafting Supplies and Tools:

Gold Embossing Powder-109129 , Heat Tool- 129053, Mini Glue Dots-103683 , Falling In Love Embellishments- 142791, Paper Snips-103579

I hope you enjoyed today's stamped Easter card! Have a great weekend!


blog-signature-spring

QUICK LINKS: 
2017 OCCASIONS CATALOGUE– NEW Spring Catty!! Check it out! Available January 4th to May 31st

SALE-A-BRATION– Choose a FREE Sale-A-Bration product with every $60 you spend before taxes and shipping! January 4th to March 31st! NEW freebies now available!

CLEARANCE RACK– Save up to 60%  

JO JO POINTS– Earn free stamps with my Jo Jo Points Program    

Read more
Balloon Adventures stamp set, Stampin Up, 2017 Occasions Catalogue, hand stamped birthday card, quick and easy card

Balloon Adventures Stamp Set: Birthday Card

Posted on March 9, 2017March 7, 2017 by Josee

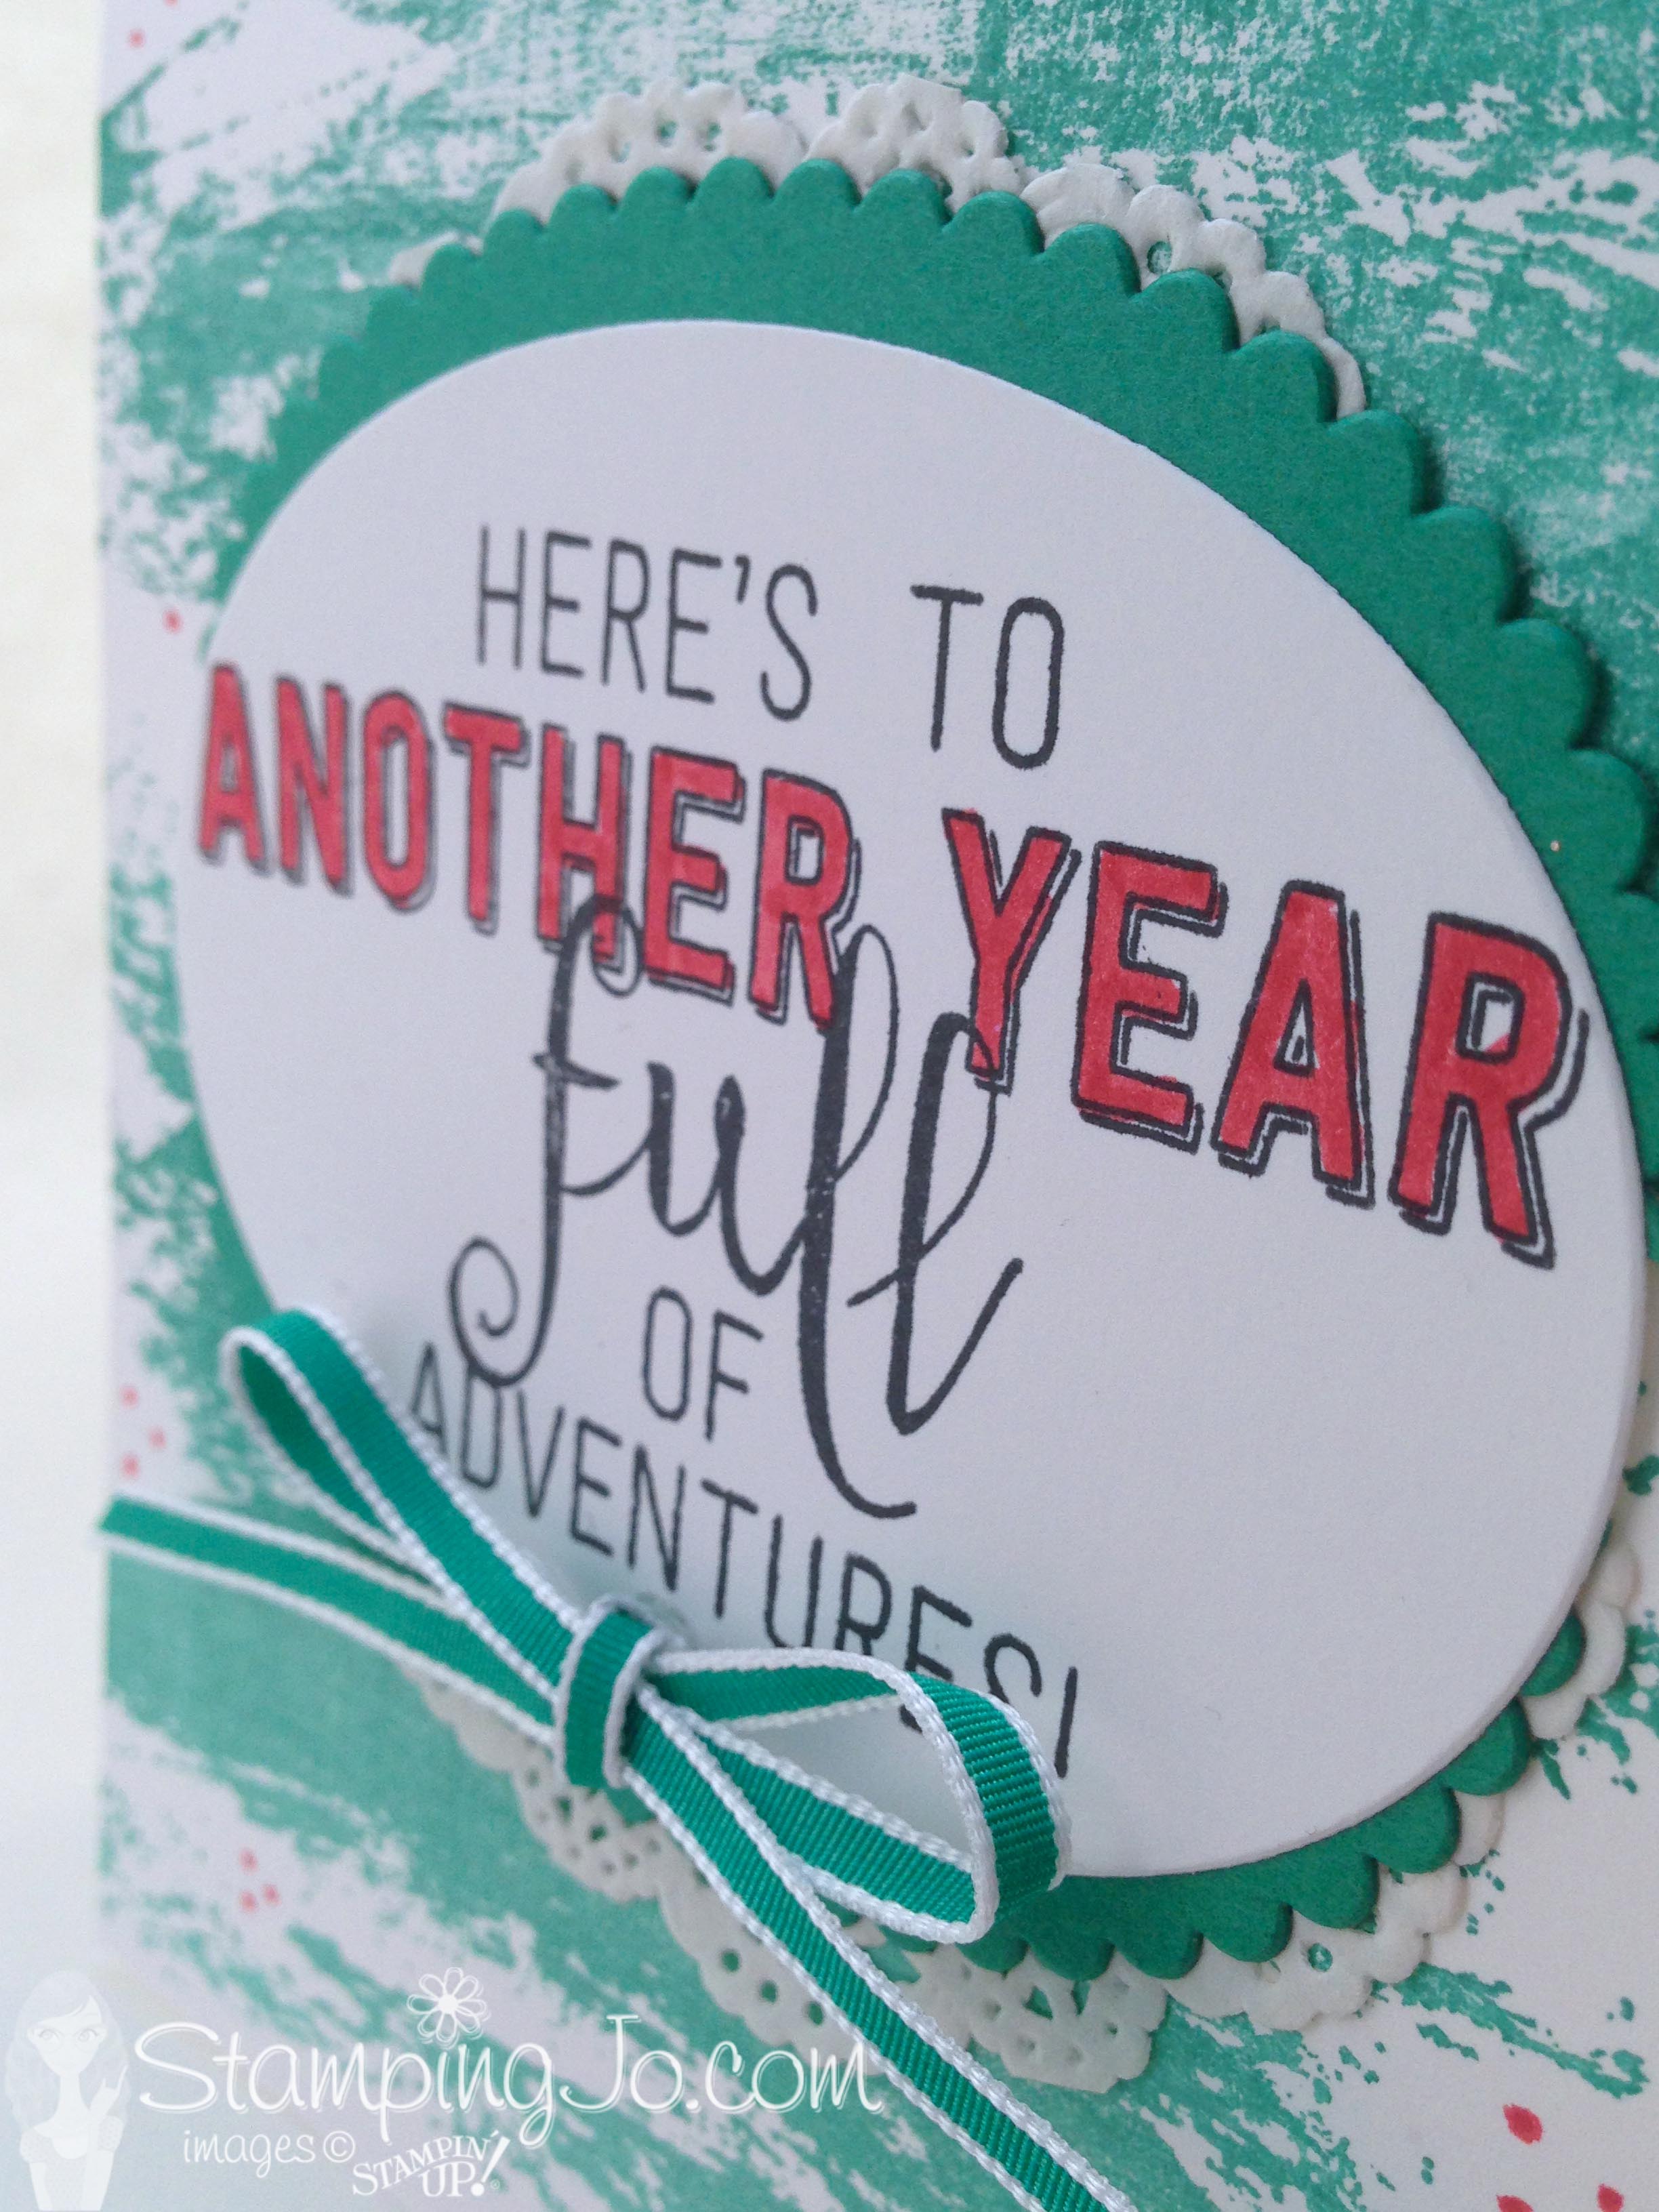
Hello! Today's card is another quick and easy card that features the Balloon Adventure stamp set from Stampin' Up's 2017 Occasions Catalogue. This card comes together quickly for an easy birthday card when you need one!

How To Make This Hand Stamped Birthday Card:

This birthday card starts simply with a base of Whisper White Thick cardstock.

The Watercolor Wash background stamp was inked up with Emerald Envy ink and stamped on the Whisper White Thick base.

The birthday card greeting was stamped with Tuxedo Black Ink on a piece of Whisper White cardstock and then die cut using the Big Shot and the Layering Ovals Collection dies.

A Watermelon Wonder Stampin Write marker was used to color in the letters in the greeting.

Balloon Adventures stamp set, Stampin Up, 2017 Occasions Catalogue, hand stamped birthday card, quick and easy card

A piece of Emerald Envy cardstock was cut with the scallop oval die from the same Layered Ovals die collection and then cut in half to mount behind the stamped Whisper White oval.

A Delicate White Doily was cut in half and then adhered behind the Emerald Envy scalloped oval. The greeting layers were then adhered to the card front.

I tied a bow with the Emerald Envy Taffeta Ribbon and then used a Mini Glue Dot to adhere it to the card front just below the birthday greeting.

As a final little touch, I used the Watermelon Wonder Stampin' Write marker to add a few little dots to the card front.

Stampin' Up Stamps:

Balloon Adventure stamp set-142823 (photopolymer); Watercolor Wash background stamp- 138704 wood mount, 139538 clear-mount

Stampin' Up Paper:

Whisper White Thick-140272, Whisper White- 100730, Emerald Envy cardstock-141415

Stampin' Up Ink:

Emerald Envy Stampin Pad-141396, Memento Tuxedo Black- 132708, Refill-133456; Watermelon Wonder Stampin Write Marker- 141393 (from In Color Collection)

Other Papercrafting Supplies and Tools:

Emerald Envy 1/8" Taffeta Ribbon-142742, Layering Ovals Framelits-141706, Delicate White Doilies-141701, Mini Glue Dots- 103683, SNAIL Adhesive- 104332, Refill- 104331

I hope you enjoyed today's hand stamped birthday card using the Balloon Adventures stamp set!


blog-signature-spring

QUICK LINKS: 
2017 OCCASIONS CATALOGUE– NEW Spring Catty!! Check it out! Available January 4th to May 31st

SALE-A-BRATION– Choose a FREE Sale-A-Bration product with every $60 you spend before taxes and shipping! January 4th to March 31st! NEW freebies now available!

CLEARANCE RACK– Save up to 60%  

JO JO POINTS– Earn free stamps with my Jo Jo Points Program    

Read more

Posts pagination

  • Previous
  • 1
  • …
  • 208
  • 209
  • 210
  • 211
  • 212
  • 213
  • 214
  • …
  • 587
  • Next

go to store

Promos

Paper Bouquet Kit

josee smuck

Josée Smuck

Stampin’ Up! Canada Demonstrator since 2002
Ottawa, ON, Canada
Contact me with questions!
Josee@StampingJo.com
(613) 831-2917

Current Catalogues

Annual Catalogue (May2024-April2025)Stampin' Up! Annual CatalogueView Catalogue-ENG | Shop Online
View Catalogue- FR

——————

Looking for something?

Get the news


Click HERE to download Jo-Jo’s FREE Sketches & Tips Guide

Updates

Receive NEXT-DAY updates by email:

Receive SAME DAY updates by subscribing in a reader:
Click to Subscribe in a reader

Recent Posts

  • Embrace the Journey April 11, 2025
  • For the Books April 8, 2025
  • Beautiful Birthday April 5, 2025
  • Happy Retirement April 2, 2025
  • Frame & Flowers March 28, 2025

Categories

Proud Member…

Inky_Divas800

The content of this blog is the sole responsibility of Josee Smuck as a Stampin’ Up! Independent Demonstrator.  The use of and content of classes, services or products offered is not endorsed by Stampin’ Up! Unless otherwise indicated, images © Stampin’ Up! 1990 – present.

© 2025 Hand Stamped Cards with Josee Smuck-Stampin' Up! Canada Demonstrator | Powered by Superbs Personal Blog theme