Good Morning!
I hope you are enjoying a gorgeous summer day this morning!
I am back today to share with you a wonderful set of notecards! They would make a lovely hostess gift for a bbq party or any gift occasion. Of course, they are just as nice to have on hand to use yourself!

This is a very simple, yet elegant card set, but also very appropriate for any occasion as you you can change the sentiment to any one you would like to fit the right occasion!
Supplies:
· Stamp Sets – Blended Bloom Wood #135906, A Dozen Thoughts Wood #131056 Clear #131059, Gorgeous Grunge Wood #131056 Clear #130517
· Card Stock & Stamp Pads – Whisper White Card Stock #100730, 2012-2014 Cardstock and Classic Ink In Color Kit #129503
- Misc. – Whisper White Note Cards & Envelopes #131527, Scalloped Tag Topper Punch #133324, Mini Glue Dots #103683, Dimensionals #104430, 3/8” Stain Stitched Ribbon: Blackberry Bliss #133668, Tangelo Twist #133669, Lost Lagoon #133672, Mossy Meadow 133670, Hello Honey 133671.
Measurements:
· Whisper White Card Stock 1 ¾” x 3 ¾”
· In Color layer of choice 2” x 4”
· Note Card: 3 ½” x 5”
Instructions:
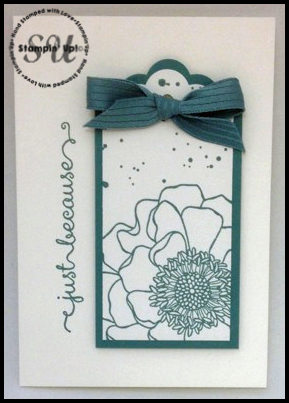
- Ink the Blended Bloom in the In Color of your choice and stamp it off center in the lower portion of the 1 ¾” x 3 ¾” piece of Whisper White.
- Stamp the speckle stamp from Gorgeous Grunge in the same color above the flower.
- Center the stamped piece in the Scallop Tag Topper Punch and punch.
- Insert the matching In Color layer piece in the punch and punch.
- Adhere the two pieces together. The holes won’t line up at the top of the tag but that is okay.
- Tie a bow with the coordinating In Color ribbon and attach it over the hole in the tag.
- On the note card, stamp the greeting.
- Attach the layered tag to the card with Dimensionals.
I hope you enjoyed today's project! Happy Stamping!

 July Hostess Code to use: NEHT69UF
When you use this code, you will receive the FREE SGGW Tutorial with 6 EXCLUSIVE VIDEOS!
>>How to use the hostess code:
a. Enter your items into cart
b. At Check out- Look under "Special Offers" (bottom left)
c. Enter HOSTESS CODE in box and hit apply
NOTE: if your order is over $200, do not use the code so that you to claim the Stampin' Rewards on your order!