Good Morning!
Today I wanted to show you a little bit more about Project Life. As you may have noticed, you can get the This Day Project Life Mini Card Collection for FREE with your Sale-A-Bration purchase!! If you are a scrapbooker, or just wish you were, Project Life is a great way to speed up page creation to be able to just get it done! Even if you aren't a scrapbooker, the Project Life cards can add alot to your regular photo albums too- especially if you are already printing 4×6" photos.
If you haven't heard– you SHOULD be printing your photos!! The reality is many of us take so many digital images- especially with the convenience of our phone cameras- but we don't print them out! If we share them at all, it is usually digitally, like on Facebook or Instagram.
In the 'paper' version of Project Life, all you do is add your printed photos to the Project Life album page protectors and then just add the Project Life cards and journal cards to add your title, a decorative card and/or journal about your photos. So easy!! And more importantly, it's done! Of course, if you want to make it more creative and want to spend some extra time on the pages, you can add stamping, ribbon, buttons, etc. just like a traditional scrapbook page.
Project Life is also available digitally, but that's a topic for another day! 
 Artwork by Sharlene Meyer and Sabine Tinkwalter Artwork by Sharlene Meyer and Sabine Tinkwalter
|

|
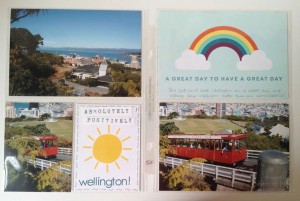 In these examples, you will notice there are 4"x6" photos as well as 3"x4" photos. I like to print 2- 3"x4" photos together on one 4"x6" sheet! Whether you are printing at home or at a lab, you can create a 'collage' in 4"x6" size using various free apps or software. In these examples, you will notice there are 4"x6" photos as well as 3"x4" photos. I like to print 2- 3"x4" photos together on one 4"x6" sheet! Whether you are printing at home or at a lab, you can create a 'collage' in 4"x6" size using various free apps or software.
|
The best part of Project Life is that it can be a super easy project to take along to the cottage or a friend's house, or even to just sit in front of the tv!— all you need with you is an album, page protectors, photos, Project Life cards and a pen!!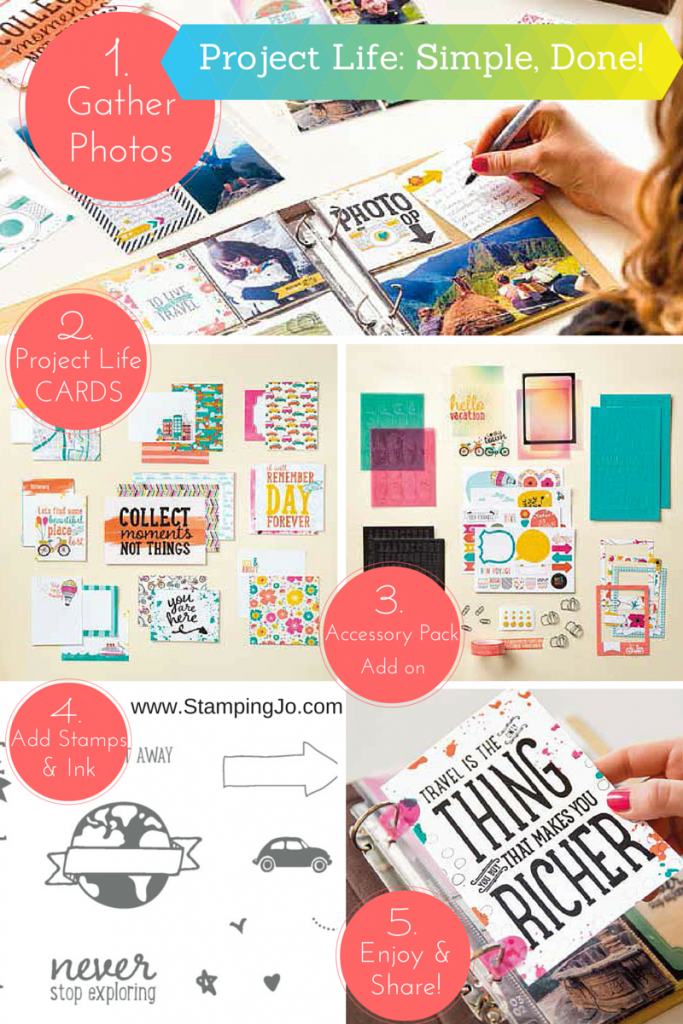
Take it up a notch and bring along an Accessory Pack and make it super easy to add more detail and be more creative with the Project Life cards by adding the accessory stickers! If you choose, take it up another notch by bringing an ink pad or two and one of the matching Project Life Stamp Sets!! Then sit back and enjoy your album all done and ready to share with family and friends! It really is that easy! The hardest part will be choosing the photos you want to print!! 
Of course, you can use the Project Life cards and Accessory Packs on traditional scrapbook pages and even use them to make cards!! Why not?!
 Artwork by Sharlene Meyer and Sabine Tinkwalter Artwork by Sharlene Meyer and Sabine Tinkwalter
|

|
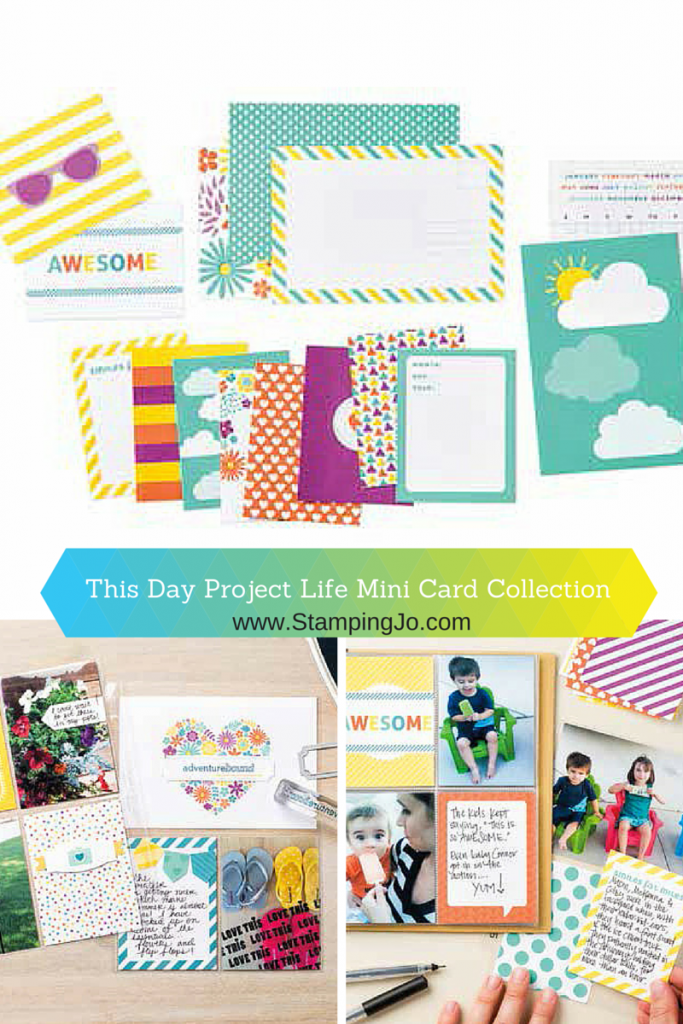
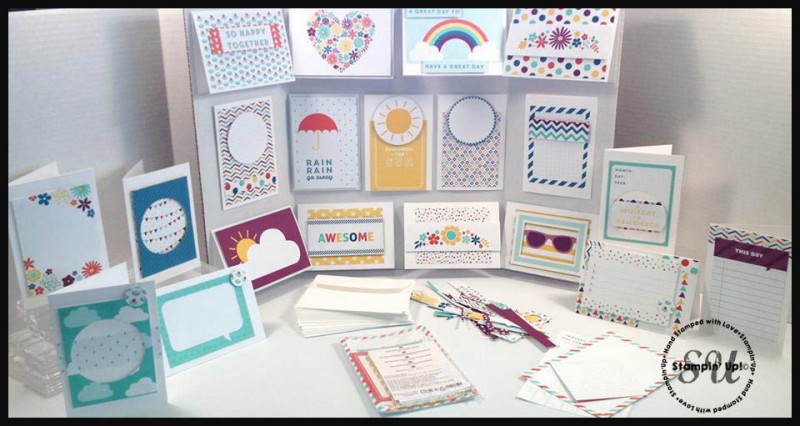
This Day is perfect for capturing the airy essence of summer and includes fresh spring and summer designs, as well as great everyday artwork in Coastal Cabana, Daffodil Delight, Island Indigo, Rich Razzleberry, and Tangerine Tango. The collection includes 30 double-sided cards: 20 3" x 4" and 10 4" x 6". You can get it for FREE with your Sale-A-Bration purchase!!
If you are looking for more Project Life cards, we've got some new collections available in the 2015 Occasions Catalogue! Check out Let's Get Away PL Card Collection, Let's Get Away PL Accessory Pack and Project Life Let's Get Away Stamps and of course, there are lots of Project Life collections in the original catalogue too!
Thanks for stopping by!! Tomorrow I have another super simple card to share and a Friday Freebie!! Don't miss it!


March Hostess Code to use: 326ZMCMW
NEW! A NEW way to earn FREE stamps! Use this monthly Hostess Code to earn JO JO POINTS for every $40 you spend (before taxes & shipping)!
Click here to learn more about this updated Loyalty Program!
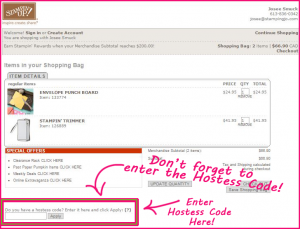
>>How to use the hostess code:
a. Enter your items into cart
b. At Check out- Look under the "Special Offers" box (bottom left)
c. Enter HOSTESS CODE in box and hit apply, then complete your order
d. After you receive your order confirmation, keep track of your JO JO POINTS earned on your JO JO POINTS Tracking Sheet! Earn 1 JO JO POINT for every $40 you spend before taxes and shipping!
e. Once you have 10 JO JO POINTS, email me your Tracking Sheet and choice of photopolymer or clear-mount stamp set FREE!!


 This Sale-A-Bration stamp set is FREE with every $60 (before taxes and shipping) purchase you make starting January 5th! This particular stamp set is a Limited Time Only set- so if you love this one, you may want to put it at the top of your wish list!


 It's the end of September and I finally got around to making my kids' Back to School pages. I'm really thrilled on how they turned out…I hope you are too! Let me know what you think!


.gif)
.jpg)


