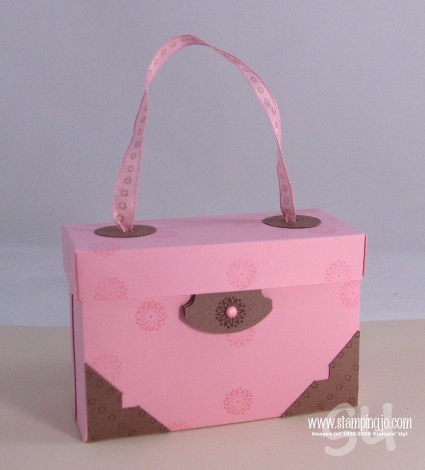
I came across the cutest little box the other day while searching online and I just had to make one. Since I was making it I thought I'd share my step-by-step tutorial to creating it!
I first saw the box posted on Splitcoaststampers by "flowerbugnd1" and she used the template from Julie Buhler on her blog.

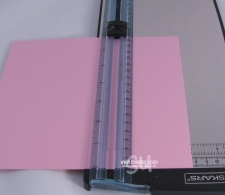
Step1: Cut Pretty in Pink cardstock to 7" x8"
Step2:
Score 8 in side at 3" and 5"
Score 7" side 1 1/4" from each end.

Step 3: Cut ends as in picture.
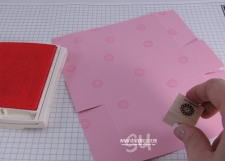
Step 4: Stamp randomn images in Pretty in Pink ink. I used the small stamp from One of a Kind.

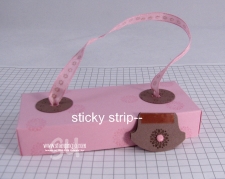
Step 5: Add Sticky Strip or a strong adhesive.
Tip: If you find it hard to take sticky strip apart, use the tips of your scissors to pull apart.

Step 6: Fold your box.
Create your "Faux Photo Corners":
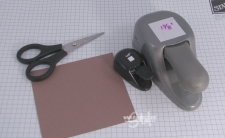
Materials: 1 3/8" square punch, 1/4" square punch, Scissors, Close to Cocoa cs

Step 7: Punch a square using the 1/4" sq. punch

Step 8: Center your punched square in the window of the 1 3/8" square punch and punch.
 Step 9: Use your scissors to cut the square in half from corner to corner.
 Step 10: Stamp your corners using Chocolate Chip ink.

Step 11: Punch out a Round Tab.

Step 12: Punch a 1/4" circle
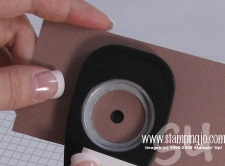
Step 13: Punch again using the 1 1/4 circle punch making sure to center.
Create your Lid:

Step 14: Cut Pretty in Pink to 3 5/8" x 6 1/8"

Step 15: Score 3/4" from all edges.

Step 16: Cut up to the 3/4" edge on the long ends and fold in. Add Sticky strip on 4 ends.

Step 17: Use the 1/8" circle punch to punch a hole for your ribbon.
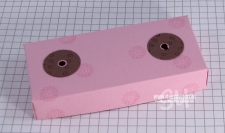
Step 18: Add your pre-punched circles.
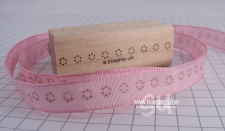
Step 19: Stamp your ribbon using Chocolate Chip Classic Ink

Step 20: Loop your ribbon through and form a double knot.
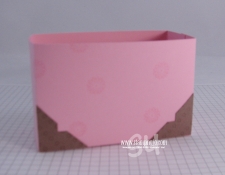 Step 21: Adhere your corners to your box. I added them to both sides.
 Step 22: Stamp your image to the middle of the round tab, punch a 1/16th circle through the front and back of your tab. Stick in your Pretty in Pink brad.
Step 23: Add sticky strip to front of your tab as shown and adhere the tab to the inside of the lid.
Here's a close up of the box open

Close up of box closed
Phew…all done!!! I sincerely hope you liked the tutorial! Again, I'd like to give credit to "flowerbugnd1" on Splitcoaststampers and Julie Buhler for the inspiration!
Josee
Wow, great tutorial….I’ll have to try this out!
Wow! I really need to try this one. I love boxes like this. Great Tutorial. You do great work.
S
I love this tutorial and I am going to make one of these today. Thank you for taking the time to do the tutorial.
Tai
hey there, I really like this project. I may try this one very soon.A nice snowy day project!
SOOOO Cute! I can’t wait to make one!
That is soooo GREAT!!! I can’t wait to do that one with my Stampers Club!
oooh, there’s just so much going on on that cute little box. I love the fact that you are using punches and the stamping on the ribbon… and the crop-a-dile… great idea!!
CC
thanks so much, great job!
This is theeeeeeeeee bwst demo of this box.
Thank you for your time, making this tutorial & shating to the stampers.
Great tutorial. Can’t wait to try it!
Great tutorial. I too love boxes and this would make a great mother’s day gift filled with goodies. Thanks for sharing. Rebecca
Great tutorial and the best part for me was the faux photo corners…..got me on that one! Nice work Josee!
Thanks Josee for taking the time to make this tutorial, very generous of you. Looking forward to trying it. Love KimT aka Crafty Kim
Thank you so very much! I decorate my baby girls room with paper purses, she loves them so much. This, I know for sure, will be a welcome addition in her growing collection.