Skip to content
Hand Stamped Cards with Josee Smuck-Stampin' Up! Canada Demonstrator
Menu
  • Home
  • JO JO POINTS
  • **Join**
  • Monthly Craft Kit
  • Weekly News
  • Shop Now
  • Contact Me
Menu

Category: Tips & Techniques

Sheltering Tree

Posted on April 2, 2015April 1, 2015 by Josee

Hello!

Thanks for stopping by today! I've got a pretty card to share today. 

StampingJo Sheltering Tree

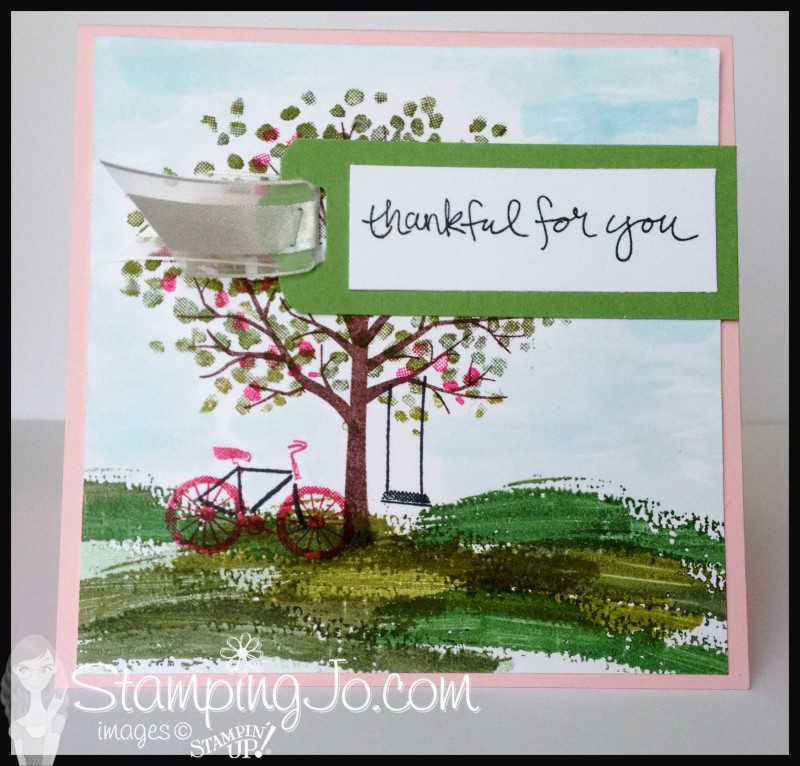
One thing I love about the Sheltering Tree stamp set is that it is not hard to make it look so pretty! This card was created mostly using the Stampin' Write markers! That is how I got all the different colours on this card and I think it makes it look like I spent alot of time colouring! All I did was take each colour of marker and I coloured the stamp itself before stamping the image on Whisper White. The 'grass' stamp was stamped with a different colour of green with each stamp and sometimes mixed right on the stamp to create some depth. 

In fact the only real colouring I did on this card, was to colour the sky with Aqua Painters, by rubbing the marker on an acrylic block and then picking up the ink with an Aqua Painter dipped in alcohol. 

I finished off the card with the sentiment stamped on Whisper White. Then for the tag layer I cut a one inch width strip of Old Olive and punched the edge with the Tag Topper Scalloped Punch– by centering the smaller tag piece in the punch I was able to create a scalloped tag edge without having to make it the full tag size. 

Here are the supplies I used for this card:


Thanks for stopping by today! Tomorrow I will have a few Easter inspired cards to share. 

signature


stampingjojojopoints

April Hostess Code to use: WEG2FME7

Earn FREE stamps! Use this monthly Hostess Code to earn JO JO POINTS for every $40 you spend (before taxes & shipping)!

Click here to learn more about this updated Loyalty Program!
hostessrewards

>>How to use the hostess code:

a. Enter your items into cart
b. At Check out- Look under the "Special Offers" box (bottom left)
c. Enter HOSTESS CODE in box and hit apply, then complete your order

d. After you receive your order confirmation, keep track of your JO JO POINTS earned on your JO JO POINTS Tracking Sheet! Earn 1 JO JO POINT for every $40 you spend before taxes and shipping!

e. Once you have 10 JO JO POINTS, email me your Tracking Sheet and choice of photopolymer or clear-mount stamp set FREE!!

NOTE: If your order is over $200, do not use the Hostess Code so that you to claim the Stampin' Rewards (more FREE items!) on your order! You will still earn JO JO POINTS on that order!… READ MORE “Sheltering Tree”

Read more

Easter Bunny Box & Basket of Eggs

Posted on March 25, 2015March 24, 2015 by Josee

Good Morning!

Glad to see you back here! Now that Spring has officially arrived, Easter is next weekend! Hopefully we see more of the snow melt by then and things warm up around here! 

I was inspired by this Sweet Bunny Bag! It is so darn cute! But I wanted to do something a little different, so here is what I ended up with 🙂

StampingJo Easter Set

I decided to use a Tiny Treat Box to create my bunny.

Ears & Paws: I started with the ears, essentially following the same idea as the inspiration tutorial, using the Oval Collection Framelits and Pink Pirouette cardstock to create the ears. I used the same ovals for the paws. 

Eyes: I used punch outs of Whisper White and Chocolate Chip from the Owl punch to create the eyes and then for the super cute eyelashes I cut two of the larger circles in Chocolate Chip cardstock and then used the Fringe Scissors to create the eyelashes by cutting half way into the circle punchout.

Nose & Whiskers: The nose was cut from the smallest heart of the Heart Collection Framelits; the whiskers are a strip of Chocolate Chip and then using the Fringe Scissors I created the whiskers by cutting into the strip half way on each end and adhering that under the nose.  The buck teeth were a small piece of Whisper White cut to look like his teeth. I used a Stampin' Write marker to add some details to the muzzle. 

StampingJo Easter bunny box

All the pieces were inked with Chocolate Chip ink around all edges to create dimension before they were all adhered to the box. I made sure to leave room to open the box so that little treats could be tucked inside 🙂 You could add a little cotton ball tail to the back as well.

For the card: I decided to do a larger square 5.5" card to allow a bigger canvas for what I had in mind 🙂 When I need an envelope I will make one with the Envelope Punch Board. The base is Coastal Cabana and Whisper White for the top layer. I ran the Whisper White piece through the Big Shot and the Perfect Polka Dots Textured Embossing Folder to create the border by lining up the cardstock with the two edges and only embossing to the edge. 

The basket & eggs: I created the basket by weaving some strips of Soft Suede together, adhering them under each weave. Then, I used the Deco Labels Collection Framelits to cut the basket shape from the weaved piece as well as for the handle. The handle was created by lining up two framelits for cutting.

StampingJo Easter Framelit basket (2)

The eggs were cut with the Oval Collection Framelits and edges inked up and then I used various embossing folders to create some various eggs. I finished off the basket with some 1/4" cotton ribbon.

StampingJo Easter  Hello Life & letter thinlits

For the Sentiment: I stamped the word 'Happy' from the Hello Life Stamp Set by using a Stampin' Write marker to ink up only the word 'Happy' from 'Do More of What Makes You Happy'.  I stamped that onto the Rose Red cardstock then cut that with the Banner Framelits. Then I used the Little Letters Thinlits to cut out the word 'Easter' and adhered that onto the banner. 

StampingJo Easter Framelit basket

I love when I get inspired to create! I hope you like it! Come by tomorrow, I'll be sharing a few more fun cards!

Here are all the items I used to create this Easter Ensemble:


signature


stampingjojojopoints

March Hostess Code to use: 326ZMCMW

NEW! A NEW way to earn FREE stamps! Use this monthly Hostess Code to earn JO JO POINTS for every $40 you spend (before taxes & shipping)!

Click here to learn more about this updated Loyalty Program!
hostessrewards

>>How to use the hostess code:

a. Enter your items into cart
b. At Check out- Look under the "Special Offers" box (bottom left)
c. Enter HOSTESS CODE in box and hit apply, then complete your order

d. After you receive your order confirmation, keep track of your JO JO POINTS earned on your JO JO POINTS Tracking Sheet! Earn 1 JO JO POINT for every $40 you spend before taxes and shipping!

e. Once you have 10 JO JO POINTS, email me your Tracking Sheet and choice of photopolymer or clear-mount stamp set FREE!!

NOTE: If your order is over $200, do not use the Hostess Code so that you to claim the Stampin' Rewards (more FREE items!) on your order! You will still earn JO JO POINTS on that order!… READ MORE “Easter Bunny Box & Basket of Eggs”

Read more

Welcome Spring!! I missed you!

Posted on March 20, 2015March 13, 2015 by Josee

Hello! Happy Friday!! And….

Happy First Day of Spring!!!!!!!!!!!!!!!!!!!!!!!!!!!!!!!!!!!!!!!!!!!! Yes! Finally!! It has felt like the longest and coldest winter ever!!! and officially it's over!! WOOOOOHOOOOOO!! 

So, today in honour of Spring I've got a card that reminds me of spring flowers smiley and continues a bit on yesterday's watercoloring technique. 

stamping jo painted petals watercolour

I used Watercolor Paper and gave it a light spray with some water, then proceeded to stamp the flowers and leaves from Painted Petals. I used Blackberry Bliss, Rose Red and Old Olive ink pads. I really like the soft watercolor look!

Tip: Keep paper towels handy when watercoloring! If you find you the ink & water running where you don't want it to, the paper towels will help you keep the ink from spreading too far. 

I dried the Watercolor Paper with the Heat Tool and then trimmed the corners with the Project Life Corner punch. I did the same with the mat layer of Old Olive cardstock, then layered that on the Rose Red card base.

Then for the sentiment, I punched Blackberry Bliss cardstock with the Extra Large Oval Punch and stamped with Blackberry Bliss ink on Whisper White and then punched it with the Scallop Oval.

Watercolor: XL Oval, Scallop Oval, Bird Builder Punch

To finish off the card, I punched the leaves from Old Olive cardstock using the Bird Builder punch. 

Well, I hope you enjoyed this little bit of Spring 🙂 and I hope you are getting wonderful Spring weather where you are and get to enjoy a super weekend!! 

See you back here on Monday for My Crafty Friends Monday!!

Here are the supplies I used on this card:


signature


stampingjojojopoints

March Hostess Code to use: 326ZMCMW

NEW! A NEW way to earn FREE stamps! Use this monthly Hostess Code to earn JO JO POINTS for every $40 you spend (before taxes & shipping)!

Click here to learn more about this updated Loyalty Program!
hostessrewards

>>How to use the hostess code:

a. Enter your items into cart
b. At Check out- Look under the "Special Offers" box (bottom left)
c. Enter HOSTESS CODE in box and hit apply, then complete your order

d. After you receive your order confirmation, keep track of your JO JO POINTS earned on your JO JO POINTS Tracking Sheet! Earn 1 JO JO POINT for every $40 you spend before taxes and shipping!

e. Once you have 10 JO JO POINTS, email me your Tracking Sheet and choice of photopolymer or clear-mount stamp set FREE!!

NOTE: If your order is over $200, do not use the Hostess Code so that you to claim the Stampin' Rewards (more FREE items!) on your order! You will still earn JO JO POINTS on that order!

Read more

Watercolor Embossing

Posted on March 19, 2015March 13, 2015 by Josee

Good Morning!

Thanks for coming by today! I wanted to show you a fun technique for a pretty watercolor look!

First I started with a Strawberry Slush card base. Then, I cut a sheet of Watercolor Paper to fit and got my Spring Flowers Textured Impressions Embossing Folder ready. I used the Strawberry Slush and Coastal Cabana Classic Stamp Pads and Aqua Painters filled with water to pick up the ink from the ink pad lids.

Tip: Just give the lid a little squeeze before you open up the ink pad and there will be a light spot of ink on the lid- this is what you will use to watercolor with! That way you don't get water directly on your ink pad! Use a paper towel to clean up any excess when you are all done!

I used the Aqua Painter to drop ink colours right on the embossing folder in the recessed side. I tried to fill the flowers with the Strawberry Slush and the leaves with Coastal Cabana but allowed the watery ink to run where it wanted to. Once I was satisfied the embossing folder was full enough of ink- it doesn't have to be perfect- I carefully placed the Watercolor Paper into the embossing folder and then ran it through the Big Shot. 

What came out was this wonderful embossed image! I just love the subtle watercolor look! Now, you can let that dry or use a Heat Tool to speed things up. I let it dry while I worked on the sentiment. stamping jo watercolour emboss with Spring Flowers Celebrate Today

I used the Celebrate Today stamp set for the sentiments. I stamped 'Happy' in Strawberry Slush and then the 'Birthday' in Tuxedo Black. Then I lined up the die from the Deco Labels Collection Framelits to match up to the top of the stamped sentiments, ran it through the Big Shot and then cut it in half!  The matted layer behind it is the next size die cut from Coastal Cabana and embossed with the Chevron Textured Impressions Embossing Folder. Those were both adhered together then added to the bottom of the Watercolor Paper layer. 

Before adhering the Watercolor Paper layer to the card base, I added some ribbon from the Best Year Ever Accessory Pack (a Sale-A-Bration freebie!) and once it was all adhered together I added a strip of Pearl Basic Jewels to add a finishing touch!

I hope you have a wonderful day! 

I will be back tomorrow with another cute card!

Here are the supplies used on this card:


Built for Free Using: My Stampin Blog


signature


stampingjojojopoints

March Hostess Code to use: 326ZMCMW

NEW! A NEW way to earn FREE stamps! Use this monthly Hostess Code to earn JO JO POINTS for every $40 you spend (before taxes & shipping)!

Click here to learn more about this updated Loyalty Program!
hostessrewards

>>How to use the hostess code:

a. Enter your items into cart
b. At Check out- Look under the "Special Offers" box (bottom left)
c. Enter HOSTESS CODE in box and hit apply, then complete your order

d. After you receive your order confirmation, keep track of your JO JO POINTS earned on your JO JO POINTS Tracking Sheet! Earn 1 JO JO POINT for every $40 you spend before taxes and shipping!

e. Once you have 10 JO JO POINTS, email me your Tracking Sheet and choice of photopolymer or clear-mount stamp set FREE!!

NOTE: If your order is over $200, do not use the Hostess Code so that you to claim the Stampin' Rewards (more FREE items!) on your order! You will still earn JO JO POINTS on that order!… READ MORE “Watercolor Embossing”

Read more

Simply Painted Petals

Posted on March 17, 2015March 17, 2015 by Josee

Hello! 

Welcome back! Happy St. Patty's Day!

Before I show you today's card, I have an announcement: Stampin' Up has decided to discontinue the MDS Digital products and Printing as of May 31, 2015. If you are an MDS user, please read the details and Q&A here.

Now, onto the fun stuff. I just love the card I am sharing with you today. I know I've said it many times, but I love simple cards! And I just love it when a particular stamp set is perfect for making simple cards! Painted Petals is one those stamp sets! 

First thing I did was to stamp the Painted Petals flowers on the Whisper White. I used a rock n' roll technique to ink the flowers: I inked them up with the Wisteria Wonder ink pad, then rolled the edges of the flower stamps in Blackberry Bliss before stamping them. I did the same thing with the leaves using only Always Artichoke- except that I stamped off on a scrap piece of paper and then rolled the edges in Always Artichoke again. 

I just used my Paper Trimmer to cut the Whisper White piece and then matted it on a layer of Wisteria Wonder.

I cut the Whisper White card base and then used the Apothecary Accent Framelit die to cut only the edge of the card. You can do this by inserting the card 'through' the framelit and line it up evenly before putting it on the Magnetic Platform to run it through the Big Shot. 

Then I stamped the sentiment in Wisteria Wonder and added some Pearl Basics Jewels for a special touch 🙂

Now, onto this week's NEW Weekly Deals! Built for Free Using: My Stampin Blog


Make sure you come back tomorrow! I've got another simple pretty card to share! 🙂


signature


stampingjojojopoints

March Hostess Code to use: 326ZMCMW

NEW! A NEW way to earn FREE stamps! Use this monthly Hostess Code to earn JO JO POINTS for every $40 you spend (before taxes & shipping)!

Click here to learn more about this updated Loyalty Program!
hostessrewards

>>How to use the hostess code:

a. Enter your items into cart
b. At Check out- Look under the "Special Offers" box (bottom left)
c. Enter HOSTESS CODE in box and hit apply, then complete your order

d. After you receive your order confirmation, keep track of your JO JO POINTS earned on your JO JO POINTS Tracking Sheet! Earn 1 JO JO POINT for every $40 you spend before taxes and shipping!

e. Once you have 10 JO JO POINTS, email me your Tracking Sheet and choice of photopolymer or clear-mount stamp set FREE!!

NOTE: If your order is over $200, do not use the Hostess Code so that you to claim the Stampin' Rewards (more FREE items!) on your order! You will still earn JO JO POINTS on that order!… READ MORE “Simply Painted Petals”

Read more

Posts pagination

  • Previous
  • 1
  • …
  • 4
  • 5
  • 6
  • 7
  • 8
  • 9
  • 10
  • …
  • 19
  • Next

go to store