Skip to content

Hand Stamped Cards with Josee Smuck-Stampin' Up! Canada Demonstrator

Stampin' Up! Canada Demonstrator; Rubber Stamps & Supplies for Cardmaking & Scrapbooking in Stittsville, Ontario (near Ottawa)

Menu
  • Home
  • JO JO POINTS
  • **Join**
  • Monthly Craft Kit
  • Weekly News
  • Shop Now
  • Contact Me
Menu

Author: Josee

Stippled Roses Congratulations Card

Posted on January 25, 2024January 26, 2024 by Josee

Supplies:

  • Stamp Sets – Stippled Roses*(162657)
  • Card Stock – Lost Lagoon (133679); Pebbled Path (161722); Vellum (101856); Basic White (159276)
  • Stamp Pads –Memento Black (132708); Lost Lagoon (161678); Pebbled Path (161648)
  • Misc. – Softly Stippled Designer Series Paper** (SAB 162975); Stippled Roses Dies *(162666); Stylish Shapes Dies (159183): Timeworn Type 3D Embossing Folder (156505); Lost Lagoon Blends (161680); Pebbled Path Blends (161658); Classic Matte Dots (158146)Dimensionals (104430)

*Buy the Stippled Roses stamp set & dies as a Bundle (162667) and save 10%
**Get this item FREE with a $60 order! more info

SHOP FOR THESE PRODUCTS HERE

Measurements:

  • Lost Lagoon: 8 1/2” x 5 1/2” and scraps
  • Pebbled Path: 2-1/4” x 4” and scraps
  • Vellum: Scraps
  • Basic White: 4” x 5-1/2”, 5” x 3-1/2”, 4-1/2” x 3” and 3-3/4” x 1-1/4”
  • Softly Stippled DSP: 2” x 4”

Instructions:

  1. Stamp the large flower image onto the 5” x 3-1/2” Basic White card stock with Memento ink. Color the flowers with Lost Lagoon and the leaves with Pebbled Path Blends.
  2. Stamp the leaves image onto the 4-1/2” x 3” Basic White card stock with Pebbled Path ink. Then stamp the greeting onto the 3-3/4” x 1-1/4”Basic White card stock with Lost Lagoon ink.
  3. Emboss the 4” x 5-1/2”piece of Basic White card stock with the Timework Type 3D Embossing Folder.
  4. Using the Stippled Roses Dies, cut out two vellum buds, five Lost Lagoon flowers, two Pebbled Path open leaves and two Lost Lagoon small leaves using the scraps of card stock.
  5. Cutout the stamped images using the coordinating dies.
  6. Fold the Lost Lagoon card stock in half to make the card and adhere the Basic White card stock layer to the front of the card. Then add the Pebbled Path and Softly Stippled DSP layers.
  7. Add the die cut pieces as shown adding the greeting with Dimensionals.
  8. To finish the card, add three Basic Gray dots from the Classic Matte Dots pack.


JANUARY HOSTESS CODE FOR SHOPPING >> 6QNGZ4N7   <<

Qualify for JO JO POINTS

QUICK LINKS & PROMOS:

        1. NEW: Sale-A-Bration Promo  click here for brochure
        2. NEW: Mini Catalogue (Jan 4-Apr 30, 2024)
          View PDF here:  English  French
        3. Online Exclusive Products  click here
        4. May2023-Apr2024 Annual Catalogue –
          View PDF here: English  French  See products online
        5. Online Exclusive Products: click here
        6. Clearance Products – click here
        7. JO JO POINTS: Earn free stamps with my VIP reward program!
        8. Jo-Jo’s Stamping Essentials– click here
        9. WEEKLY NEWSLETTER & TUTORIALS: Sign up for my newsletter to get updates, specials & card ideas!
Read more

Up Up and Away

Posted on January 24, 2024January 26, 2024 by Josee

Supplies:

  • Stamp Sets – Hot Air Balloon Bundle (162755)
  • Cardstock – Fresh Freesia (155613); Basic White (159276)
  • Stamp Pads – Fresh Freesia (155611)
  • Misc. – Lighter Than Air Designer Series Paper (DSP) (162747); Multipurpose Liquid Glue (110755); Stampin’ Dimensionals (104430); Rainbow Adhesive-Backed Dots (162758)

SHOP FOR THESE PRODUCTS HERE

Measurements:

  • Fresh Freesia Cardstock: 4 1/4” x 11”
  • Basic White Card Stock: 4 x 5 ¼”; 1 ½” x 3”
  • Lighter Than Air DSP: 3 ¾” x 5”; 3” x 4” (2 pieces)

Instructions:

  1. Score and fold the 4 ¼” x 11” Fresh Freesia Cardstock at 5 ½” to create card base.
  2. Attach the Basic White Cardstock panel to the card base using Multipurpose Liquid Glue.
  3. Layer the to the three (3) pieces of Lighter Than Air DSP to the card front.
  4. Cut a hot air balloon from the Lighter Than Air DSP using a coordinating die from the Hot Air Balloon Dies. Note: don’t forget to die cut the hot air balloon basket.
  5. Using Stampin’ Dimensionals, attach the hot air balloon to the top panel leaving room to add the sentiment.
  6. Stamp the sentiment from from the Hot Air Balloon Stamp Set onto the 1 ½” x 3” Basic White Cardstock piece using the Fresh Freesia Classic Stampin’ Pad.
  7. Use the banner die to cut around the sentiment and attach to the card using Stampin’ Dimensionals.
  8. Embellish the banner with Rainbow Adhesive-Backed Dots.


JANUARY HOSTESS CODE FOR SHOPPING >> 6QNGZ4N7   <<

Qualify for JO JO POINTS

QUICK LINKS & PROMOS:

        1. NEW: Sale-A-Bration Promo  click here for brochure
        2. NEW: Mini Catalogue (Jan 4-Apr 30, 2024)
          View PDF here:  English  French
        3. Online Exclusive Products  click here
        4. May2023-Apr2024 Annual Catalogue –
          View PDF here: English  French  See products online
        5. Online Exclusive Products: click here
        6. Clearance Products – click here
        7. JO JO POINTS: Earn free stamps with my VIP reward program!
        8. Jo-Jo’s Stamping Essentials– click here
        9. WEEKLY NEWSLETTER & TUTORIALS: Sign up for my newsletter to get updates, specials & card ideas!
Read more

I Can’t Thank You Enough

Posted on January 23, 2024January 25, 2024 by Josee

Supplies:

  • Stamp Sets: Perennial Postage (162598)
  • Card Stock: Basic White (159276), Costal Cabana (131297), Lemon Lime Twist (144245), Daffodil Delight (119683) Calypso Coral (122925), Vellum (101856)
  • Stamp Pads: Costal Cabana (147097)
  • Misc: Paper Butterfly Accents (162612), Iridescent Foil Gems (162842); Stampin’ Cut & Emboss Machine (149653); Multipurpose Liquid Glue (110755)

SHOP FOR THESE PRODUCTS HERE

 Measurements:

  • Basic White: 5 ½ x 8 1/2”
  • Costal Cabana, Lemon Lime Twist, Daffodil Delight, Calypso Coral: 1 ¼ x 3 3/4”
  • Vellum: 3 x3”

Instructions:

  1. Stamp sentiment in Costal Cabana on Costal Cabana strip.
  2. Adhere the Costal Cabana, Lemon Lime Twist, Daffodil Delight and Calypso Coral pieces to the card.
  3. Adhere the paper butterfly to the vellum piece.
  4. Add liquid glue to the back of the vellum where behind the butterfly so that the glue does not show, then add it to the card.
  5. Add gems to the vellum piece.

JANUARY HOSTESS CODE FOR SHOPPING >> 6QNGZ4N7   <<

Qualify for JO JO POINTS

QUICK LINKS & PROMOS:

        1. NEW: Sale-A-Bration Promo  click here for brochure
        2. NEW: Mini Catalogue (Jan 4-Apr 30, 2024)
          View PDF here:  English  French
        3. Online Exclusive Products  click here
        4. May2023-Apr2024 Annual Catalogue –
          View PDF here: English  French  See products online
        5. Online Exclusive Products: click here
        6. Clearance Products – click here
        7. JO JO POINTS: Earn free stamps with my VIP reward program!
        8. Jo-Jo’s Stamping Essentials– click here
        9. WEEKLY NEWSLETTER & TUTORIALS: Sign up for my newsletter to get updates, specials & card ideas!
Read more

Heartfelt Condolences

Posted on January 22, 2024January 22, 2024 by Josee

Supplies:

  • Stamp Set– Wild Ferns (162648); Bundle with dies (162655)
  • Card Stock – Crumb Cake (120953); Basic White (159276); Petal Pink (146985); Pretty Peacock (150880)
  • Stamp Pads – Memento Black Ink (132708)
  • Misc. –Perennial Lavender Designer Series Paper (DSP) (162593); Iridescent Foil Gems (162842); Ribbon Duo Combo Pack (161318); Paper Snips (103579); Stampin’ Dimensionals (104430); Stampin’ SEAL (152813); Mini Glue Dots (103683); Multipurpose Liquid Glue (110755)

SHOP FOR THESE PRODUCTS HERE

Measurements:

  • Card Stock 1: card base: Crumb Cake- 4 ¼” x 11”
  • Card Stock 2: Crumb Cake- 5” x 5” for die-cuts
  • Card Stock 3: Basic White- 2 ½” x 1 ¼” for sentiment
  • Card Stock 4: Petal Pink- 2” x 2”
  • Card Stock 5: Pretty Peacock- 2” x 2”
  • Perennial Lavender Designer Series Paper (DSP): 4 ¼” x 5 ½”

Instructions:

  1. Score the card base on the long side at 5 ½” and fold.
  2. Attach the piece of DSP to the card front using Stampin’ SEAL.
  3. Wrap a 9” piece of ribbon around the center of the card leaving the seam in the front and securing with mini glue dots.
  4. Die cut 2leafy border pieces (L shaped) using Crumb Cake cardstock and the Wild Ferns dies. Use the same die twice. There are two similar dies in the set so choose one and cut two of them. Adhere them to the center of the card front using liquid glue to form a rectangle over the seam of the ribbon.
  5. Die cut a medium rectangle from the die set using Basic White cardstock. Then, stamp your sentiment using Memento Black ink.
  6. Attach the sentiment to the card front using Stampin’ Dimensionals.
  7. Die cut two each of the leaf images from the die set in Petal Pink and Pretty Peacock. One small and one large in each color. Attach them to the card front as shown using liquid glue. For this card I used one large pink and one small peacock on the top left and the opposite for the bottom right.
  8. Lastly, add a bow using the ribbon and a mini glue dot and add three Iridescent Foil Gems.

JANUARY HOSTESS CODE FOR SHOPPING >> 6QNGZ4N7   <<

Qualify for JO JO POINTS

QUICK LINKS & PROMOS:

        1. NEW: Sale-A-Bration Promo  click here for brochure
        2. NEW: Mini Catalogue (Jan 4-Apr 30, 2024)
          View PDF here:  English  French
        3. Online Exclusive Products  click here
        4. May2023-Apr2024 Annual Catalogue –
          View PDF here: English  French  See products online
        5. Online Exclusive Products: click here
        6. Clearance Products – click here
        7. JO JO POINTS: Earn free stamps with my VIP reward program!
        8. Jo-Jo’s Stamping Essentials– click here
        9. WEEKLY NEWSLETTER & TUTORIALS: Sign up for my newsletter to get updates, specials & card ideas!
Read more

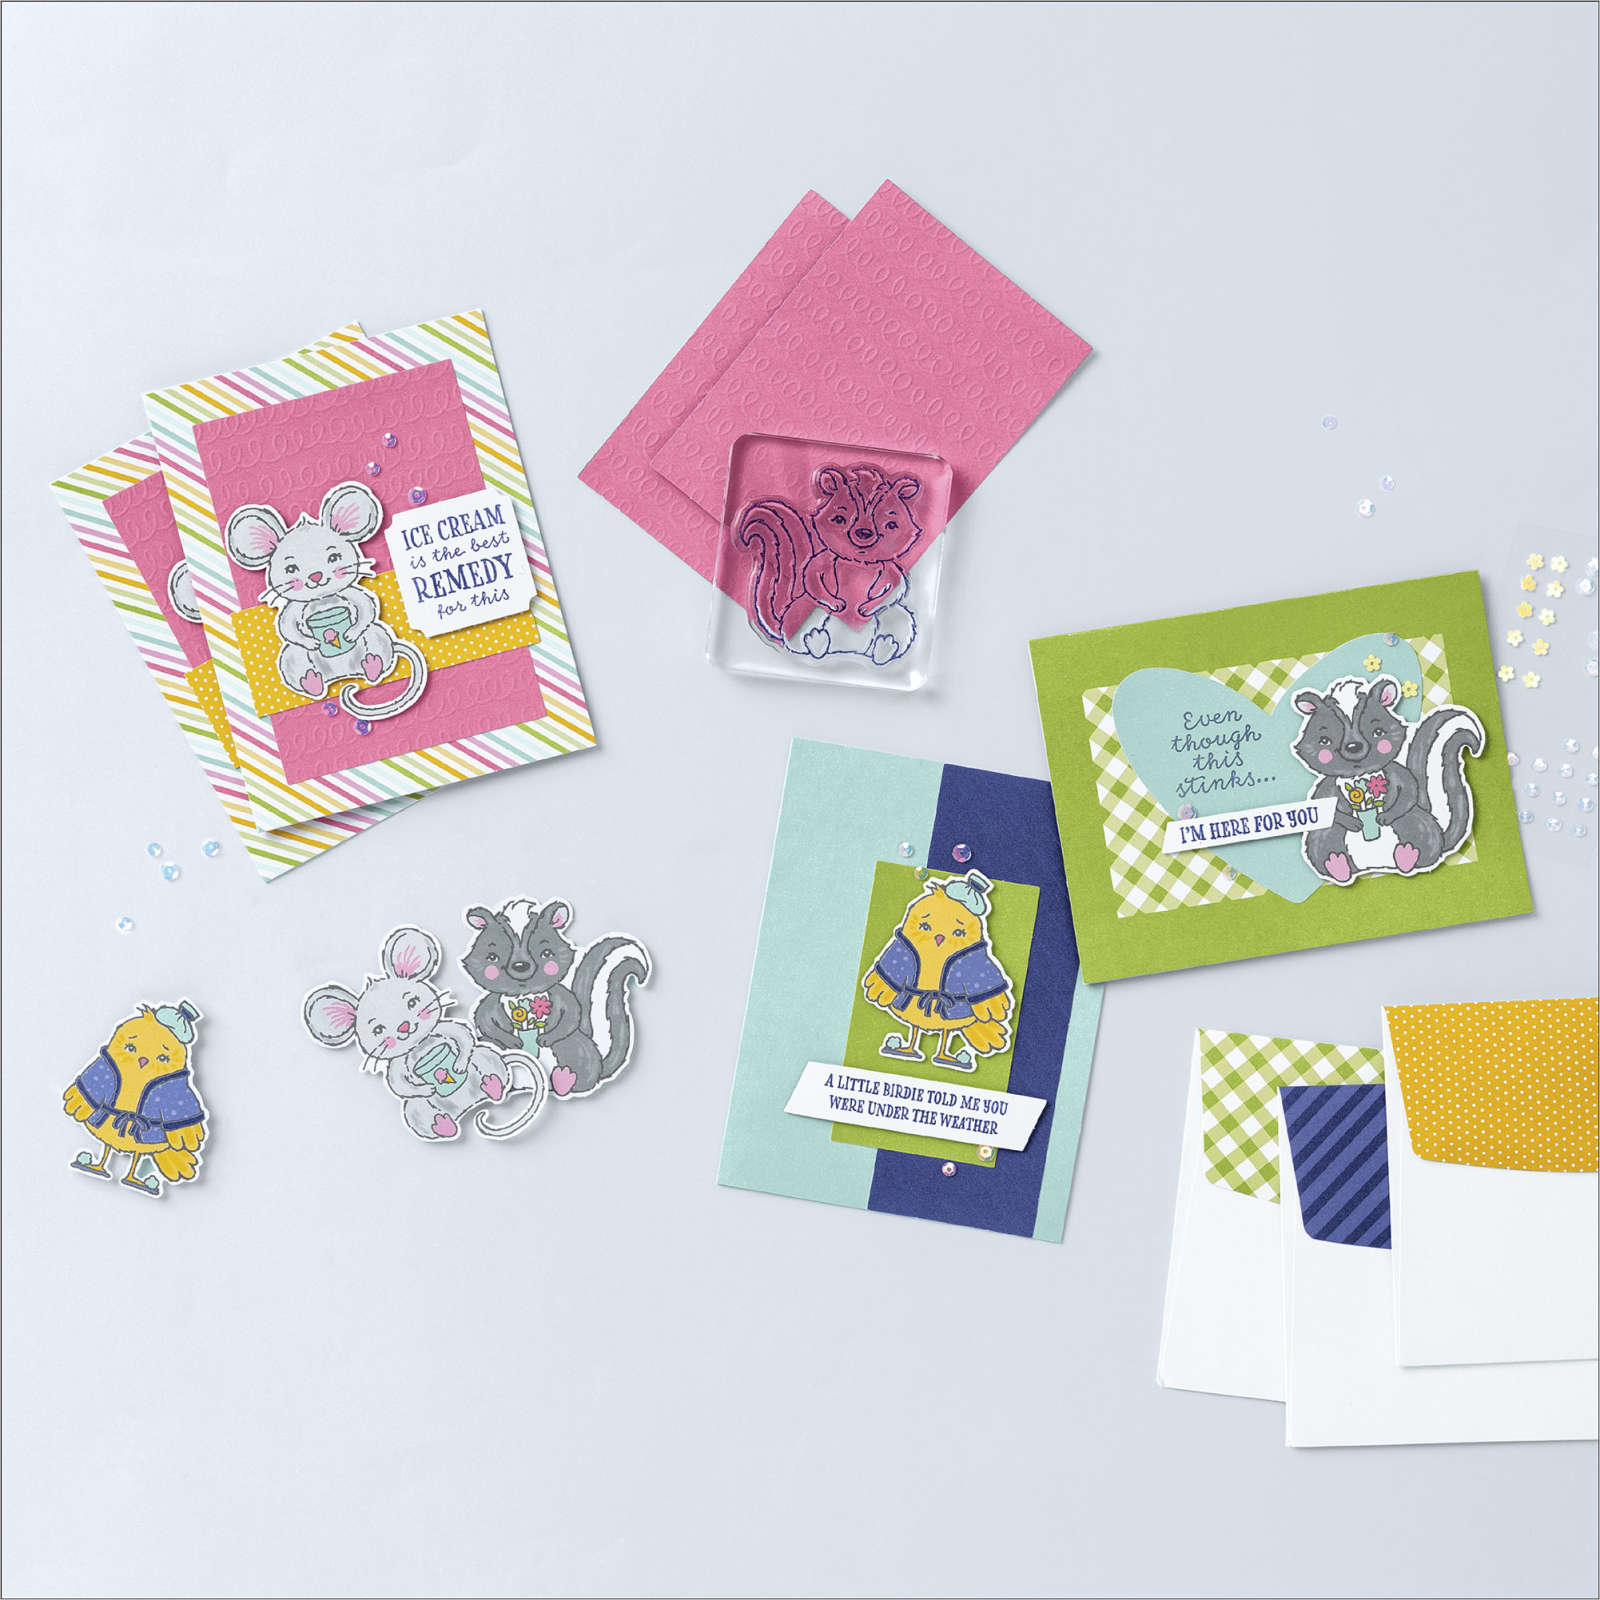
Well, That Stinks!

Posted on January 15, 2024January 21, 2024 by Josee

The Best Remedy Kit! Stamping Kits make the perfect way to do some beautiful and fast cards. The stamp set includes cute images and fun phrases that are sure to deliver a smile. When someone you love needs a pick-me-up, this kit offers the perfect remedy!

Supplies:

  • Stamp Sets – The Best Remedy Kit (160171)
  • Card Stock – Basic White Thick (159229); Basic White (159276); Sweet Sorbet (159268)
  • Stamp Pads – Smoky Slate (147113); Memento Tuxedo Black (132708); Sweet Sorbet (150216)
  • Misc. – 2022-2024 In Color Pearls (161621); 2022-2024 In Color Baker’s Twine Pack (159195); Stampin’ Blends Combo Packs: Parakeet Party (159220); Sweet Sorbet (159224); Lemon Lolly (161673); Copper Clay (161662); Smoky Slate (154904) & Bubble Bath (161675); Paper Trimmer (152392); Bone Folder (102300); Multipurpose Liquid Glue (110755); Mini Glue Dots (103683); Stampin’ Dimensionals (104430); Paper Snips (103579)

SHOP FOR THESE PRODUCTS HERE

The Best Remedy Kit includes: 
* The Best Remedy Photopolymer Stamp Set
* Starry Sky Classic Stampin’ Spot
* 9 cards: 3 each of 3 designs
* Folded card size: 5-1/2″ x 4-1/4″ (14 x 10.8 cm)
* 9 coordinating envelopes
* 1 clear block
* Embellishments
* Adhesive

THE BEST REMEDY KIT (ENGLISH)THE BEST REMEDY KIT (ENGLISH)

Measurements:

  • Basic White Thick: 8 1/2” x 5 1/2” scored at 4 1/4”
  • Sweet Sorbet: 4 7/8” x 3 5/8” & 1/2” strip
  • Basic White: 4 3/4” x 3 1/2” & 3/8” strip & scrap

Instructions:

  1. Fold and burnish card base with bone folder.
  2. Stamp skunks with Smoky Slate Ink on 4 3/4” x 3 1/2” Basic White layer as shown.
  3. Adhere stamped layer to Sweet Sorbet layer and then to card front.
  4. Stamp skunk on Basic White scrap with Memento Tuxedo Black Ink.
  5. Color skunk with Stampin’ Blend Markers as shown. Fussy cut and add to front layer with Stampin’ Dimensionals.
  6. Stamp sentiment with Sweet Sorbet Ink on 3/8” Basic White strip. Trim and adhere to 1/2” Sweet Sorbet strip and trim.
  7. Adhere sentiment layer to card front where shown with Stampin’ Dimensionals.
  8. Tie triple bow with Sweet Sorbet Baker’s Twine and tuck under corner of sentiment with Mini Glue Dot.
  9. Embellish with Sweet Sorbet In Color Pearls.

JANUARY HOSTESS CODE FOR SHOPPING >> 6QNGZ4N7   <<

Qualify for JO JO POINTS

QUICK LINKS & PROMOS:

        1. NEW: Sale-A-Bration Promo  click here for brochure
        2. NEW: Mini Catalogue (Jan 4-Apr 30, 2024)
          View PDF here:  English  French
        3. Online Exclusive Products  click here
        4. May2023-Apr2024 Annual Catalogue –
          View PDF here: English  French  See products online
        5. Online Exclusive Products: click here
        6. Clearance Products – click here
        7. JO JO POINTS: Earn free stamps with my VIP reward program!
        8. Jo-Jo’s Stamping Essentials– click here
        9. WEEKLY NEWSLETTER & TUTORIALS: Sign up for my newsletter to get updates, specials & card ideas!
Read more

Posts pagination

  • Previous
  • 1
  • …
  • 19
  • 20
  • 21
  • 22
  • 23
  • 24
  • 25
  • …
  • 587
  • Next

go to store

Promos

Paper Bouquet Kit

josee smuck

Josée Smuck

Stampin’ Up! Canada Demonstrator since 2002
Ottawa, ON, Canada
Contact me with questions!
Josee@StampingJo.com
(613) 831-2917

Current Catalogues

Annual Catalogue (May2024-April2025)Stampin' Up! Annual CatalogueView Catalogue-ENG | Shop Online
View Catalogue- FR

——————

Looking for something?

Get the news


Click HERE to download Jo-Jo’s FREE Sketches & Tips Guide

Updates

Receive NEXT-DAY updates by email:

Receive SAME DAY updates by subscribing in a reader:
Click to Subscribe in a reader

Recent Posts

  • Embrace the Journey April 11, 2025
  • For the Books April 8, 2025
  • Beautiful Birthday April 5, 2025
  • Happy Retirement April 2, 2025
  • Frame & Flowers March 28, 2025

Categories

Proud Member…

Inky_Divas800

The content of this blog is the sole responsibility of Josee Smuck as a Stampin’ Up! Independent Demonstrator.  The use of and content of classes, services or products offered is not endorsed by Stampin’ Up! Unless otherwise indicated, images © Stampin’ Up! 1990 – present.

© 2025 Hand Stamped Cards with Josee Smuck-Stampin' Up! Canada Demonstrator | Powered by Superbs Personal Blog theme